Customization
Batch Email with PDF Filename & Current Date
- This guide will teach you on how to capture current date on your export PDF File Name.
-
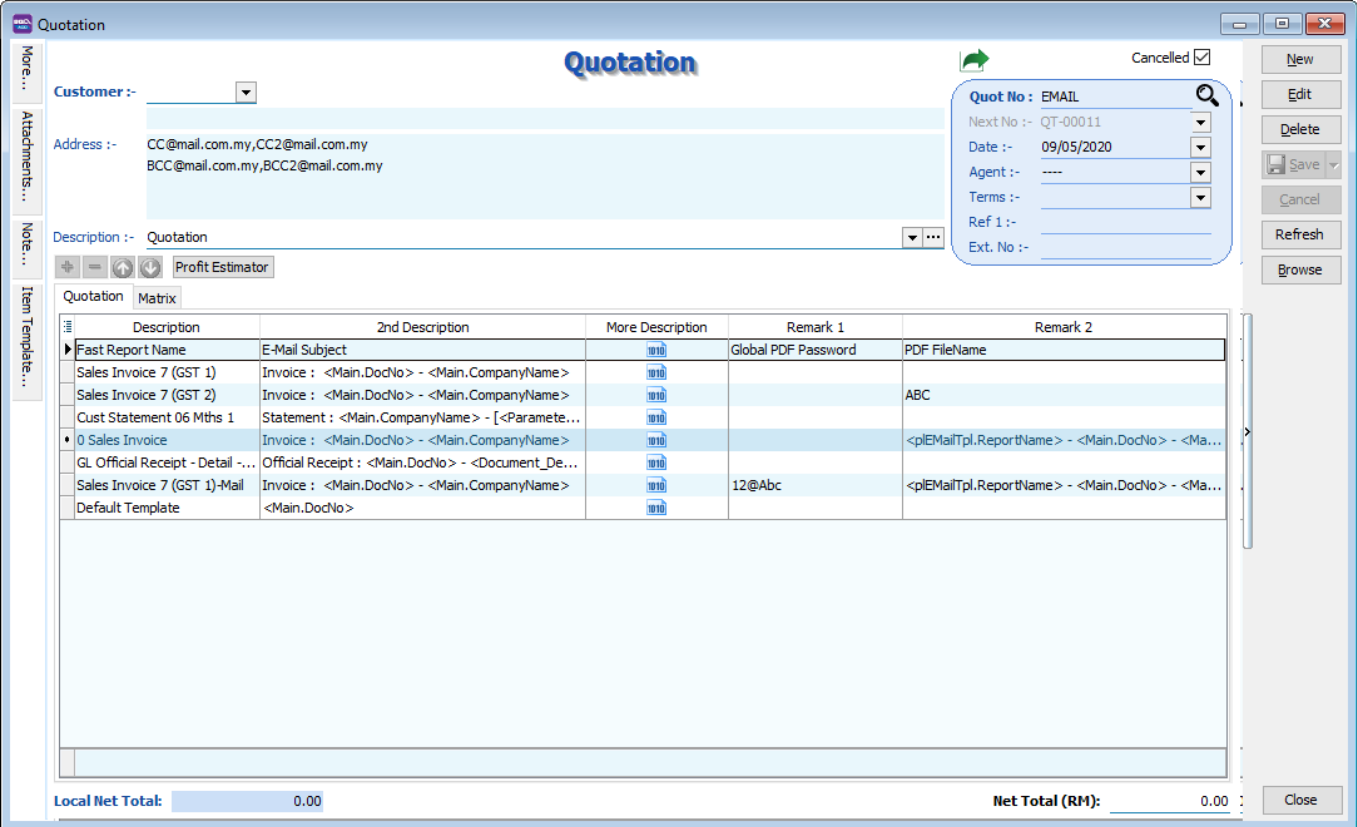
In QT Template DocNo = EMAIL, PDF File Name may set in Remark 2
 note
noteRemark 2 must fill in
-
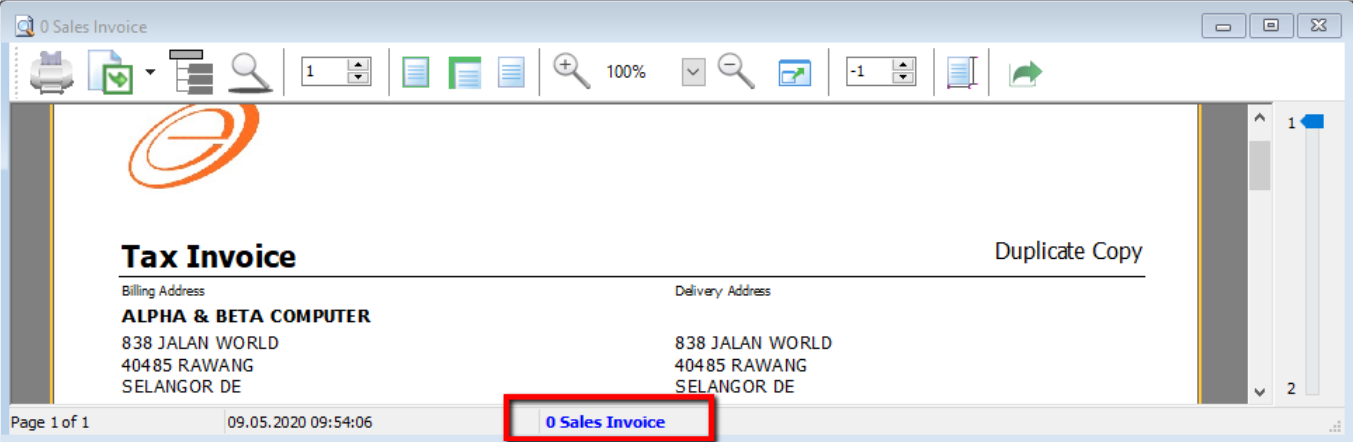
Preview your report | Click on Report Name
-
Click on Code Tab |
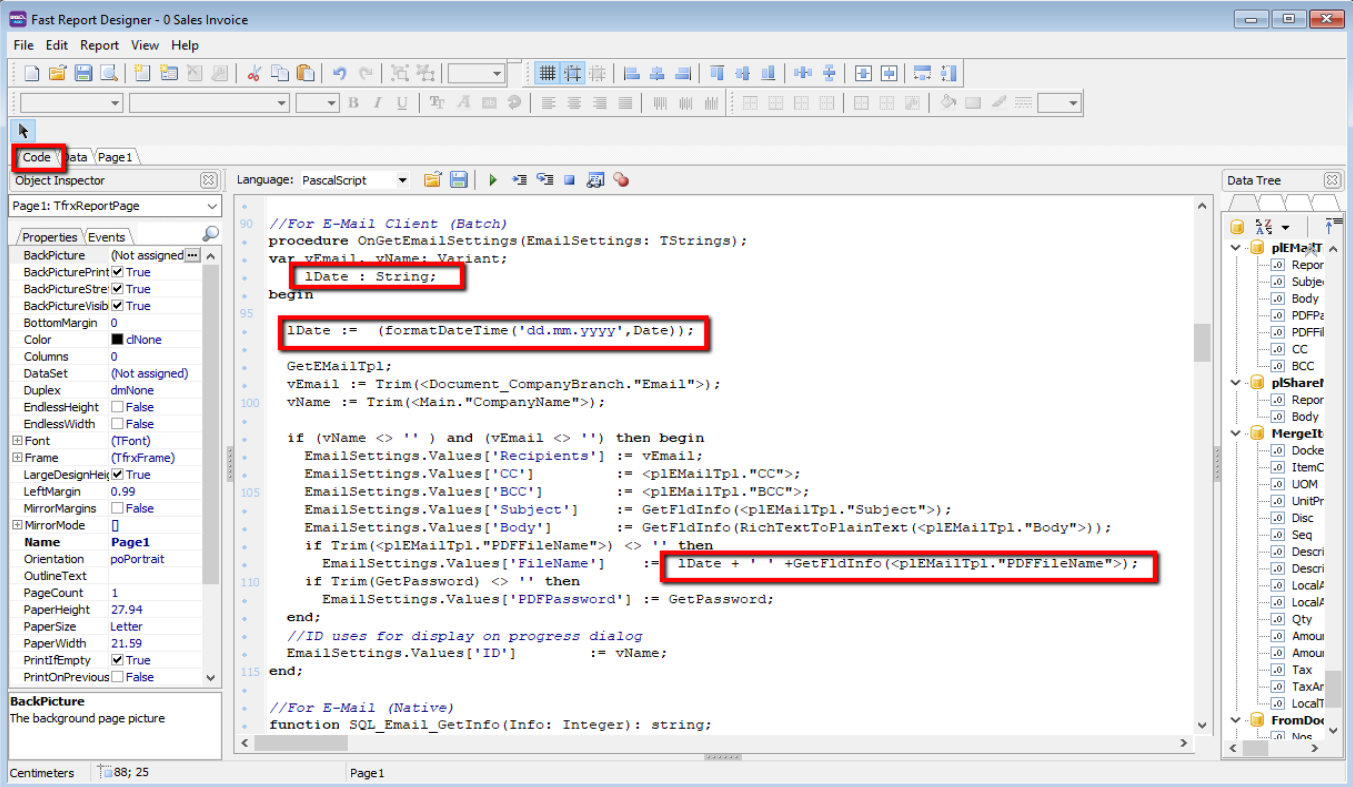
procedure OnGetEmailSettings(EmailSettings: TStrings);
var
    vEmail, vName: Variant;
    lDate : String;
begin
    lDate := (formatDateTime('dd.mm.yyyy',Date));

    GetEMailTpl;
    vEmail := Trim(<Document_CompanyBranch."Email">);
    vName := Trim(<Main."CompanyName">);

    if (vName <>  '' ) and (vEmail <>  '') then begin
        EmailSettings.Values['Recipients'] := vEmail;
        EmailSettings.Values['CC'] := <plEMailTpl."CC"> ;
        EmailSettings.Values['BCC'] := <plEMailTpl."BCC"> ;
        EmailSettings.Values['Subject'] := GetFldInfo(<plEMailTpl."Subject">);
        EmailSettings.Values['Body'] := GetFldInfo(RichTextToPlainText(<plEMailTpl."Body">));

        if Trim(<plEMailTpl."PDFFileName">) <>  '' then
            EmailSettings.Values['FileName'] := lDate + ' ' +  GetFldInfo(<plEMailTpl."PDFFileName">);
        if Trim(GetPassword) <>  '' then
            EmailSettings.Values['PDFPassword'] := GetPassword;
    end;

    EmailSettings.Values['ID'] := vName;
end;
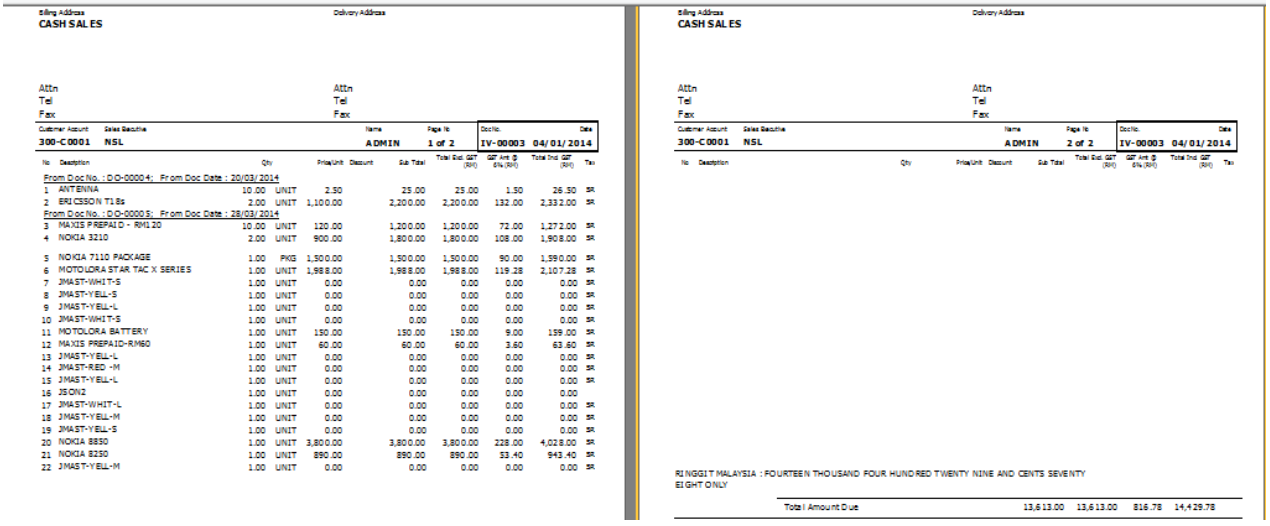
Display More Description in Multiple Page
-
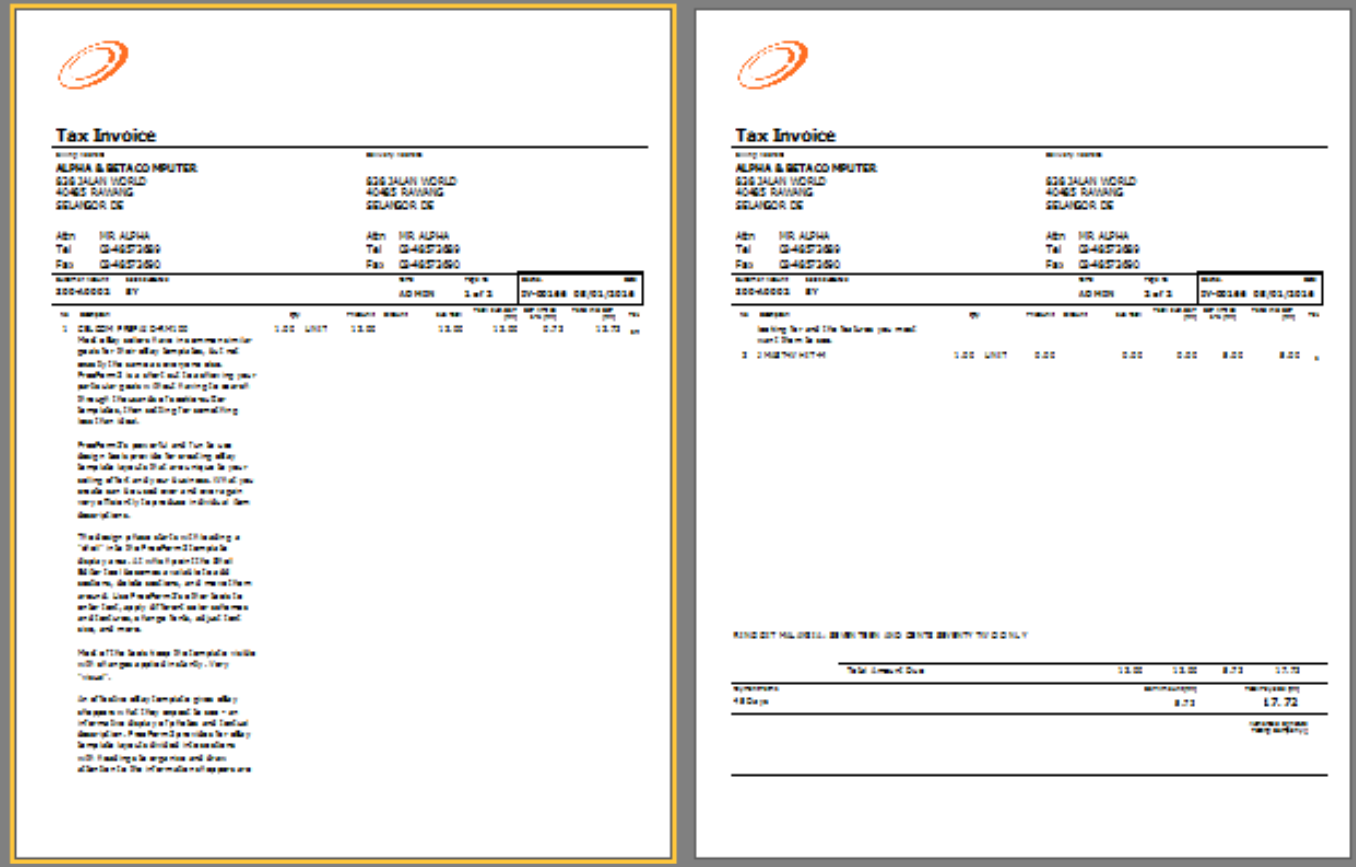
If More Description more than 1 page, first page will show blank.
-
Example Problematic Report :
Solution:
-
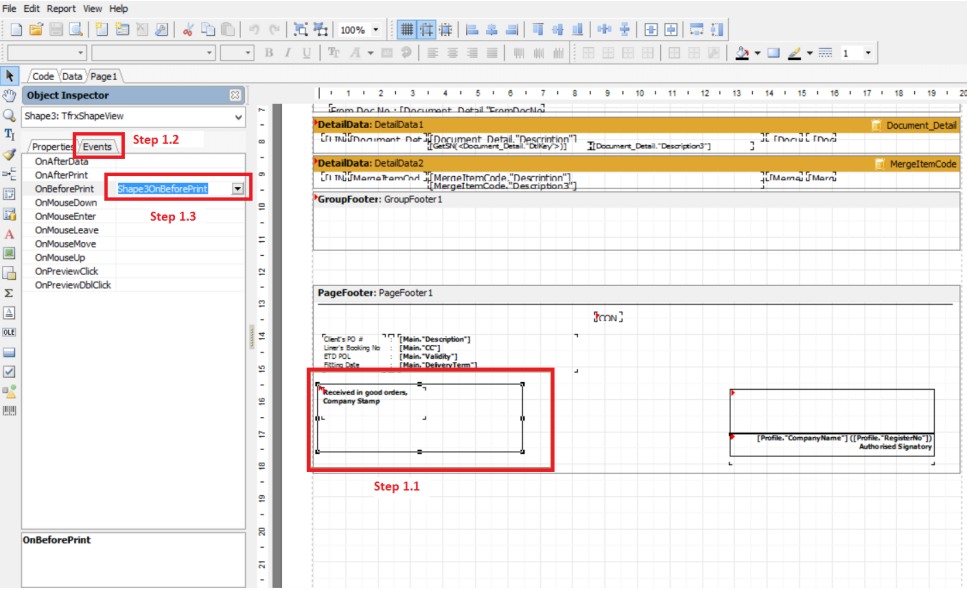
Click on Blue Color Report Name in bottom.
-
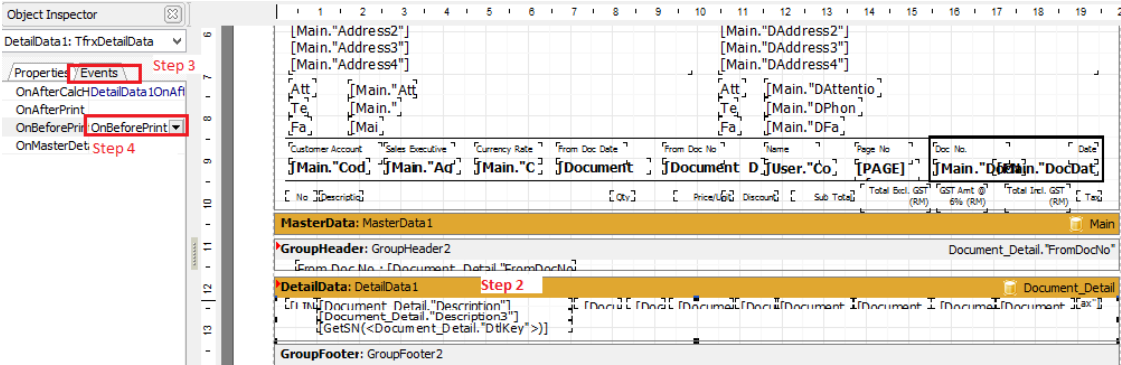
Click on DetailData1
-
Click on Events
-
Double Click on OnAfterCalc Script
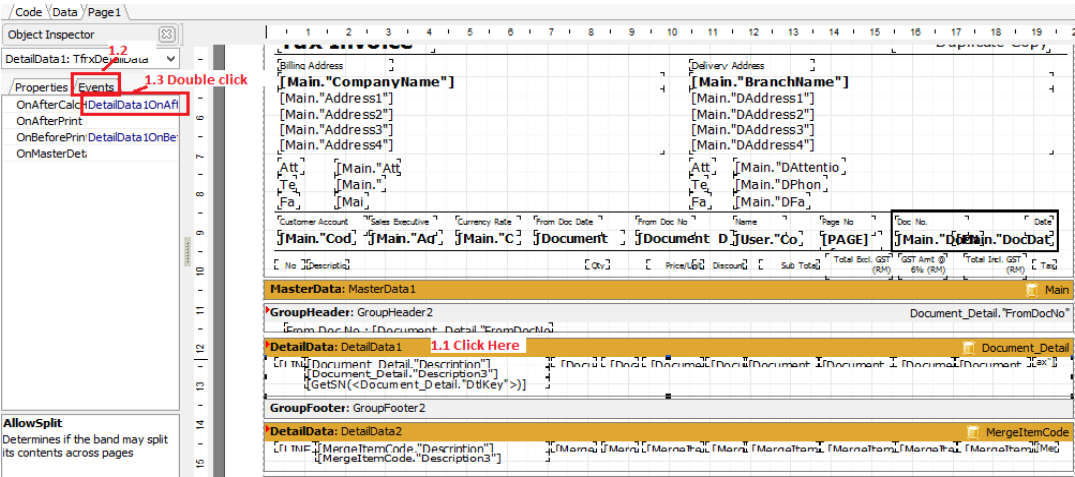
-
The system will redirect to Code Page, then disable the script by adding the symbol '//' infront of the script.

-
Go back to Page1 Tab
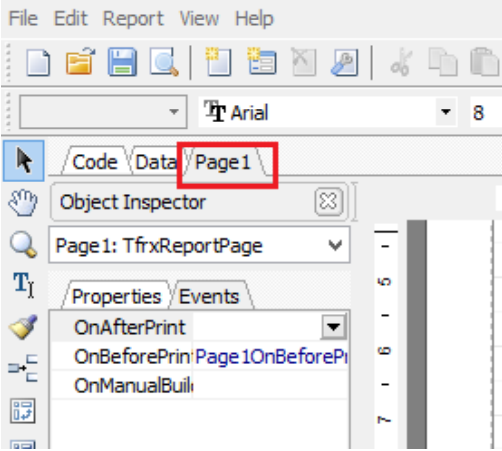
-
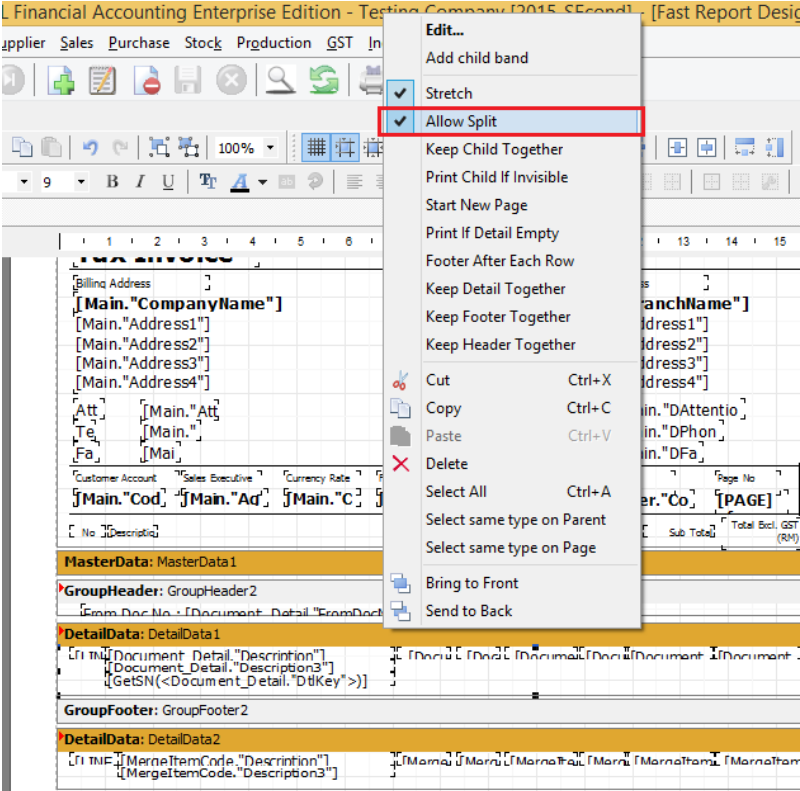
Right Click on DetailData1 | Tick Allow Split.
-
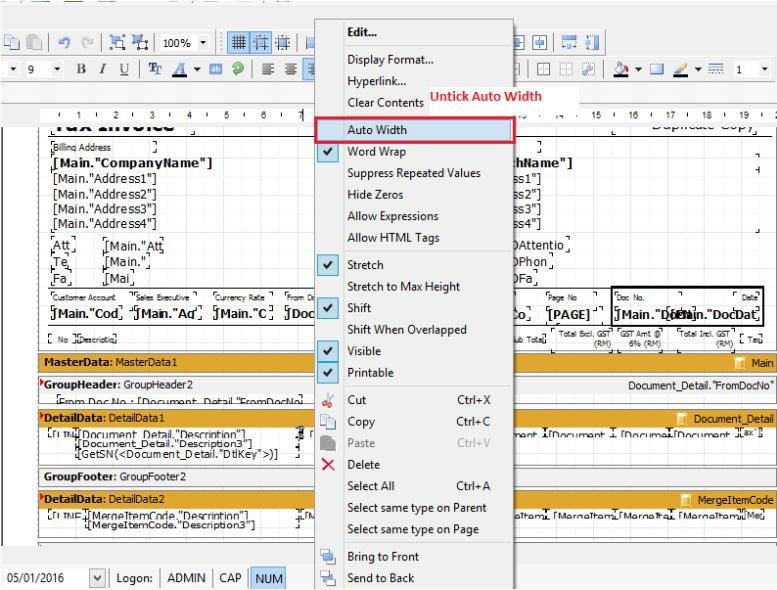
Right Click on Qty DBText | Untick Auto Width.
-
Do the same Step 7 for UnitPrice, SubTotal, Total Exc GST, GST Amt, Total Inc GST and Tax

-
Click on Group Footer1
-
Click on Events
-
Double Click on OnBeforePrint.
-
In Code Page, Remove the "– 60" from the code
Before:

After Amend:

-
Go Back to Page1 Tab | make Page footer1 closer.

-
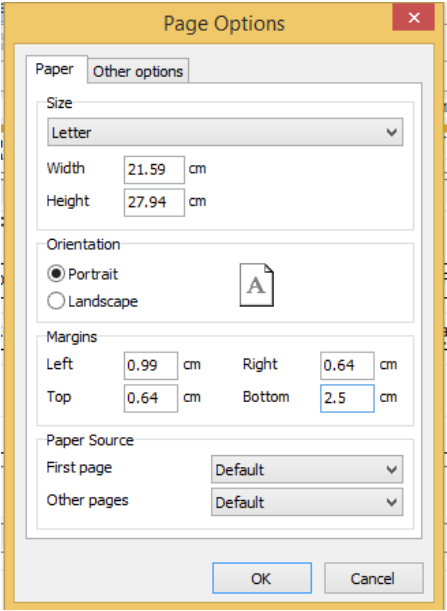
Go to File | Page Setting | Bottom set to 2.5
-
File | Save As | Input New Report Name
-
Preview again
-
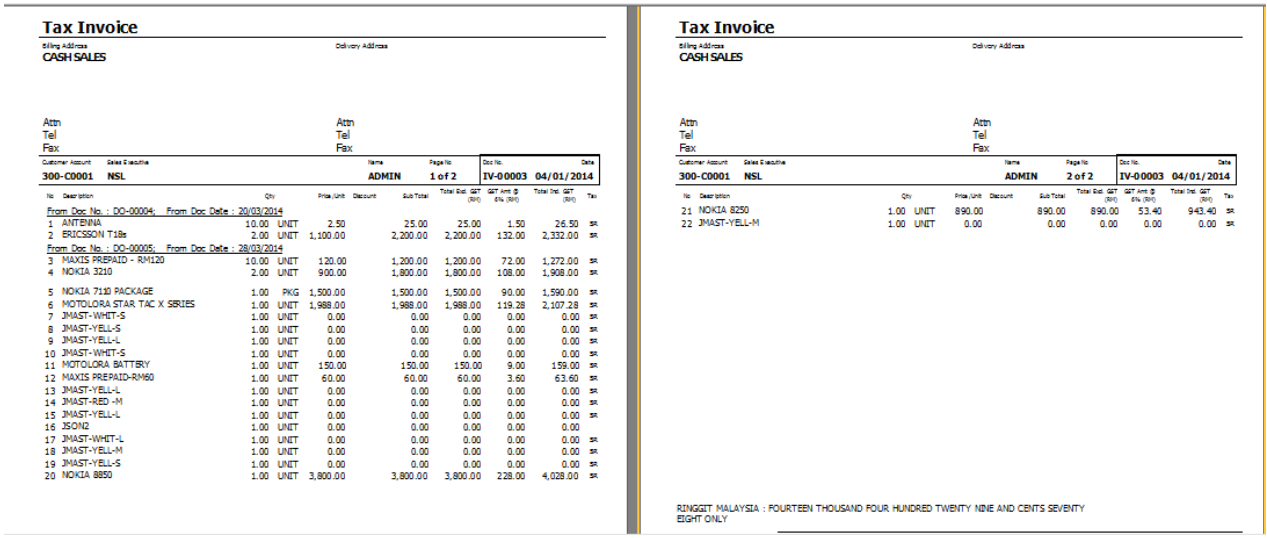
Problem Solved
-
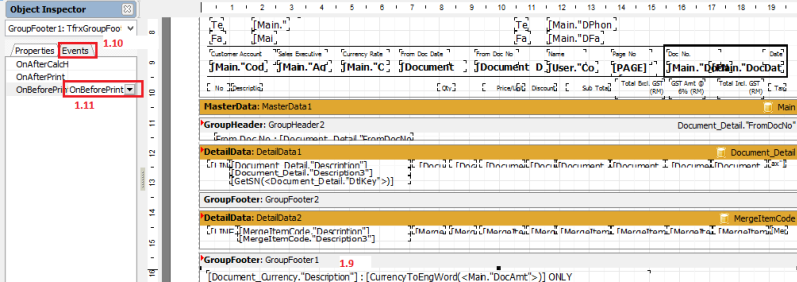
Display Text Object in Last Page's Footer only
-
Click on the object you want to show only in Last Page
-
Click on your Object
-
Click on Events Tab
-
Click on OnbeforePrint | Double Click it
-
Place this query inside the Code page.
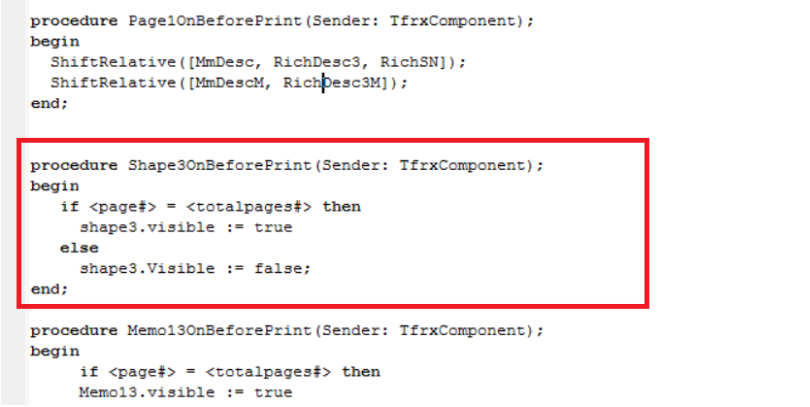
Code:
if <page#> = <totalpages#> then
    shape3.visible := true
else
shape3.Visible := false; -
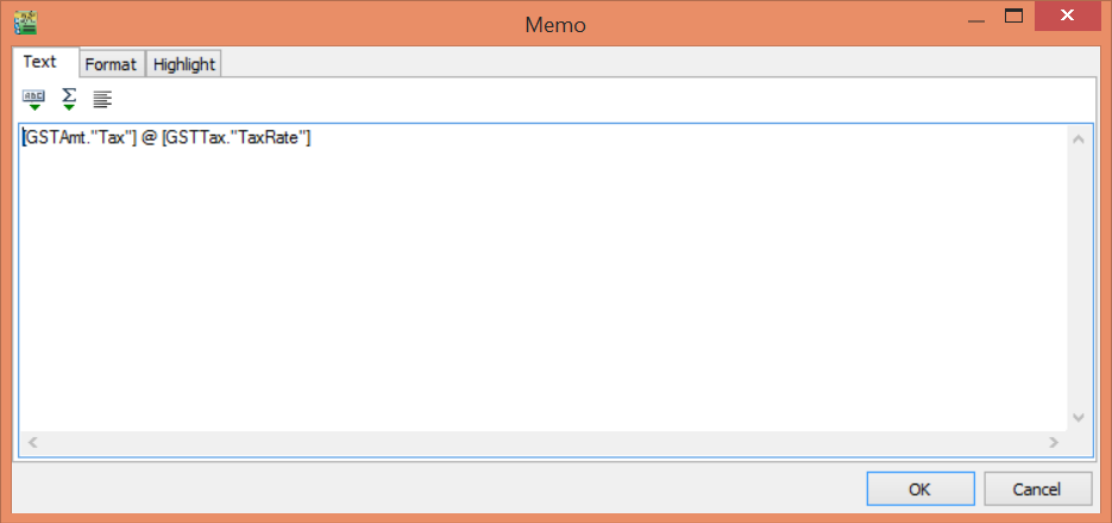
Fix Report Tax Rate show A instead of 6%
-
Preview the Report format, Click on blue color link and enter into Report Design. (Refer Pic1)
Pic1:

-
Click on Code Tab(Refer Pic2)
Pic2:
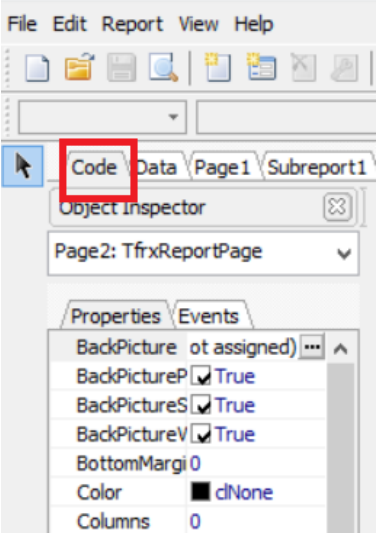
-
In Code page insert TaxRate (Refer Pic3)
Pic3:
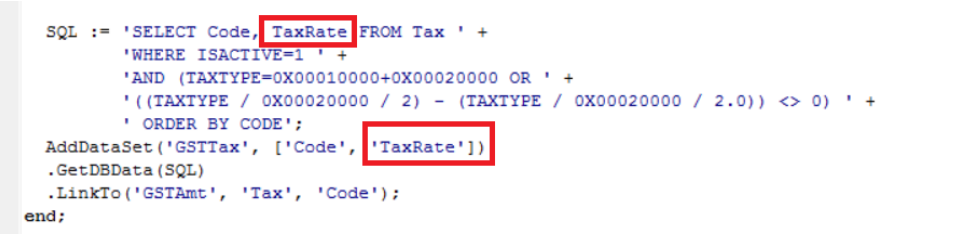
Full Query :
SQL := 'SELECT Code, TaxRate FROM Tax ' +
            'WHERE ISACTIVE=1 ' +
            'AND (TAXTYPE=0X00010000+0X00020000 OR ' +
            '((TAXTYPE / 0X00020000 / 2) - (TAXTYPE / >0X00020000 / 2.0)) <> 0) ' +
            ' ORDER BY CODE';
            AddDataSet('GSTTax', ['Code', 'TaxRate'])
            .GetDBData(SQL)
.LinkTo('GSTAmt', 'Tax', 'Code'); -
Click on SubReport1 Tab | Click on the Text Field (Refer Pic4)
Pic4:
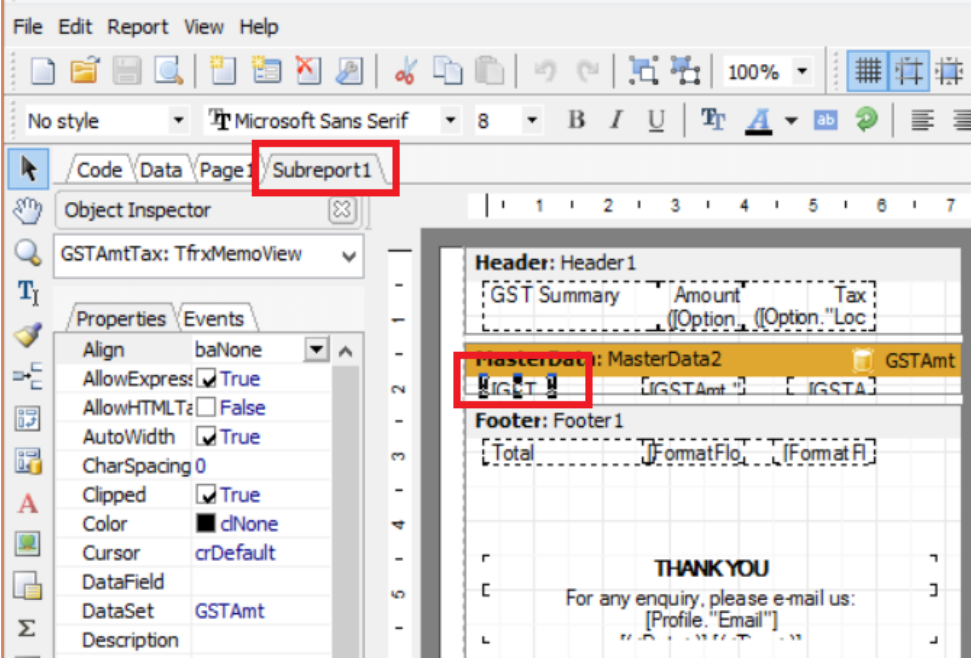
-
Change the Query as below | Press OK (Pic5)
Pic5:
-
File | Save
-
Close the Fast Report
-
Preview the same format again.
Hide Zero Value
-
Method 1
-
Right Click on the Text | Select Hide Zeros
-
Tick Allow Expressions
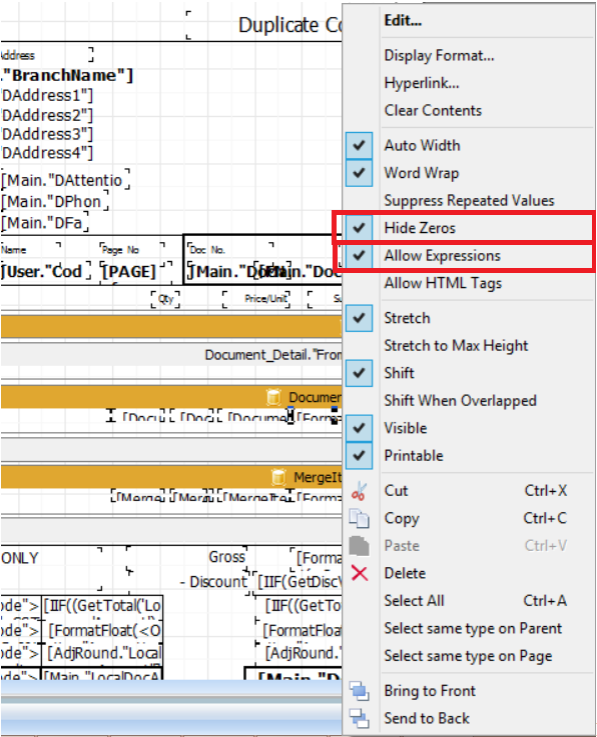
-
Try save the report and preview the result.
-
-
Method 2 (Only use this if method 1 doesn't work)
-
Double click on Text
-
Click on Highlight Tab
-
Press Add
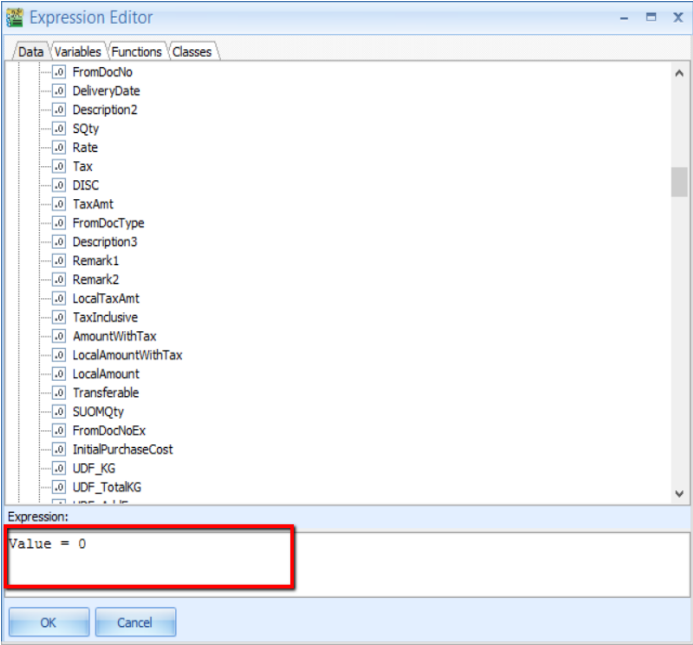
-
Press ok
-
Untick Visible
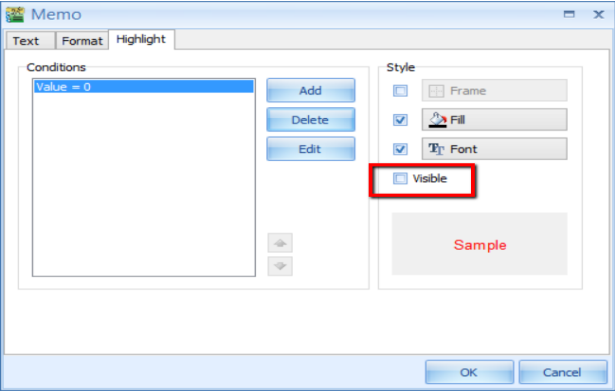
-
File | Save as | Enter Report name
-
Preview and see the result
-
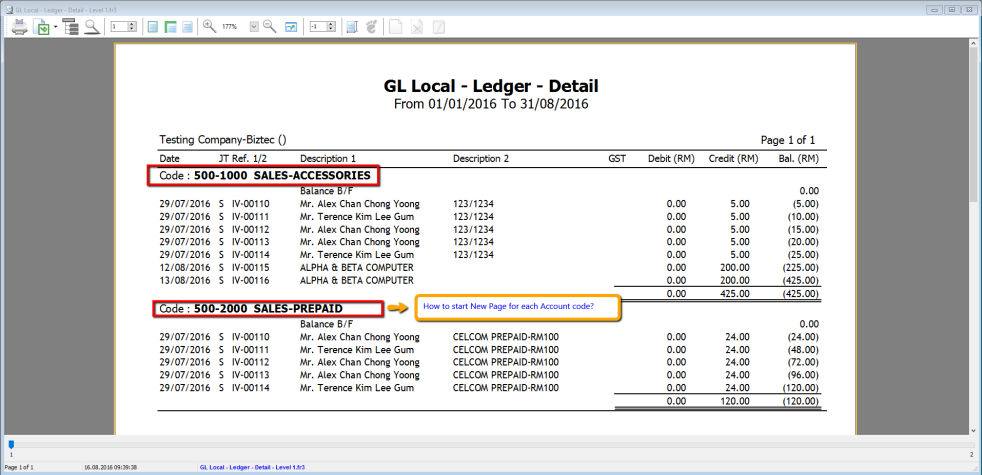
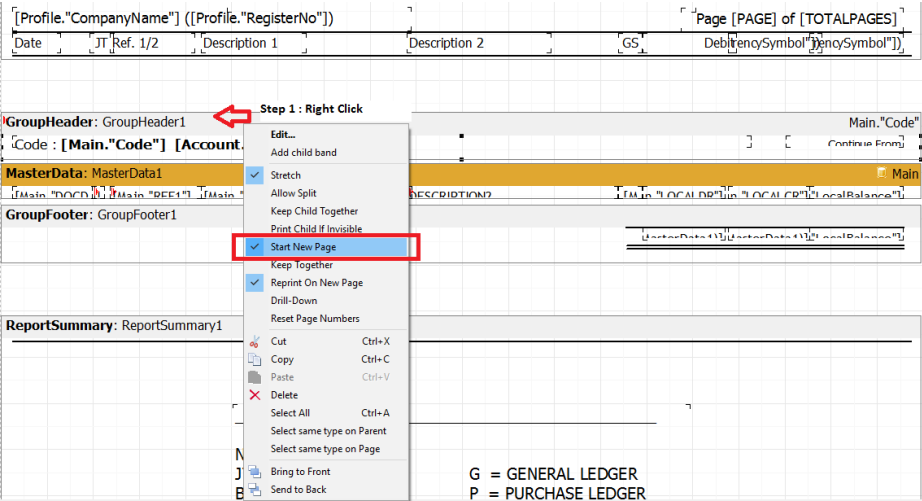
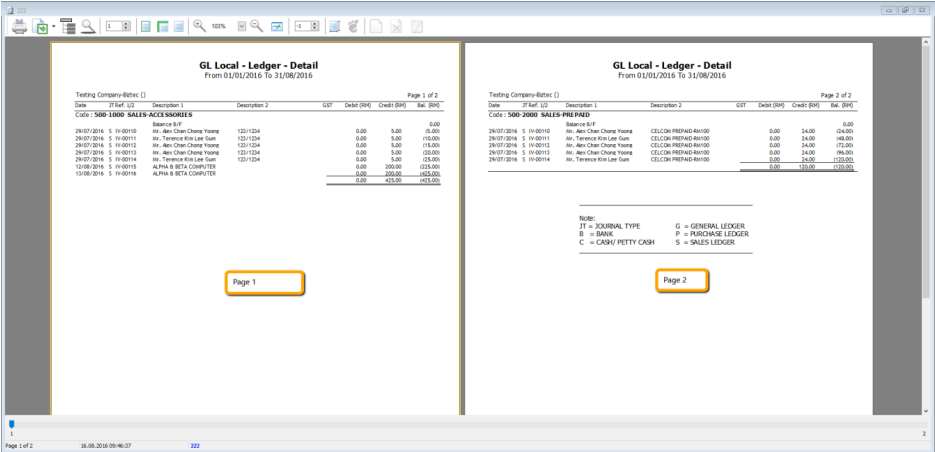
Ledger Report Start New Page for New Group
Before Amend :
-
Right Click on Group Header 1, Select Start New Page
-
File | Save as | Enter New Report Name
-
Preview
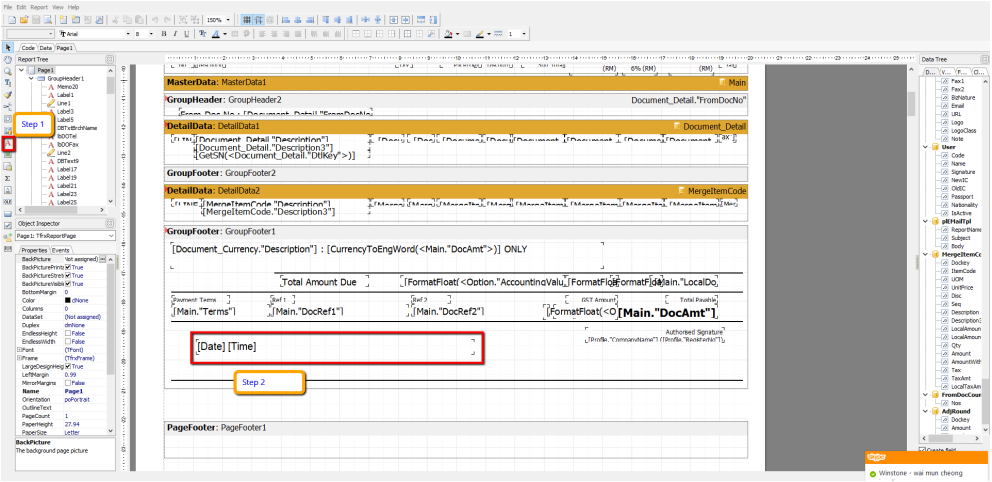
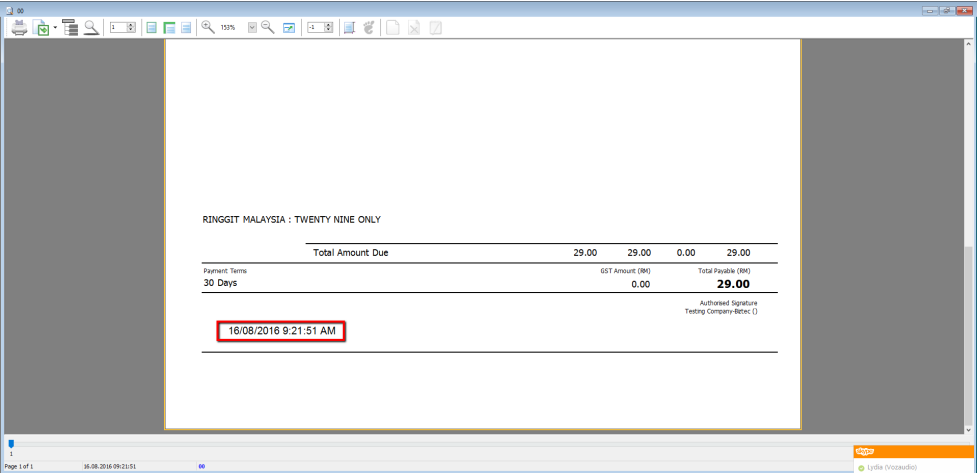
Print Date Time
-
Click on Text Object

-
Enter [Date] [Time]
-
File | Save as Enter New Report Name
-
Preview
Report Print Count
Report Before Set Report Count :
Step to do :
-
Go into Report Design
-
Click on DetailData1
-
Click On Events Tab
-
Double Click on OnBeforePrint.
-
System will auto bring you to the code page. Insert the Query as Below :
if TfrxDetailData(Sender).Visible and (<Line#> mod 20 = 1) and (<Line#> > 1) then Engine.NewPage;If you want to change the Record Count to 15, just change the count:
if TfrxDetailData(Sender).Visible and (<Line#> mod 15 = 1) and (<Line#> > 1) then Engine.NewPage; -
Go to File | Save As | Insert New Report Name
-
Preview with New Report Name.
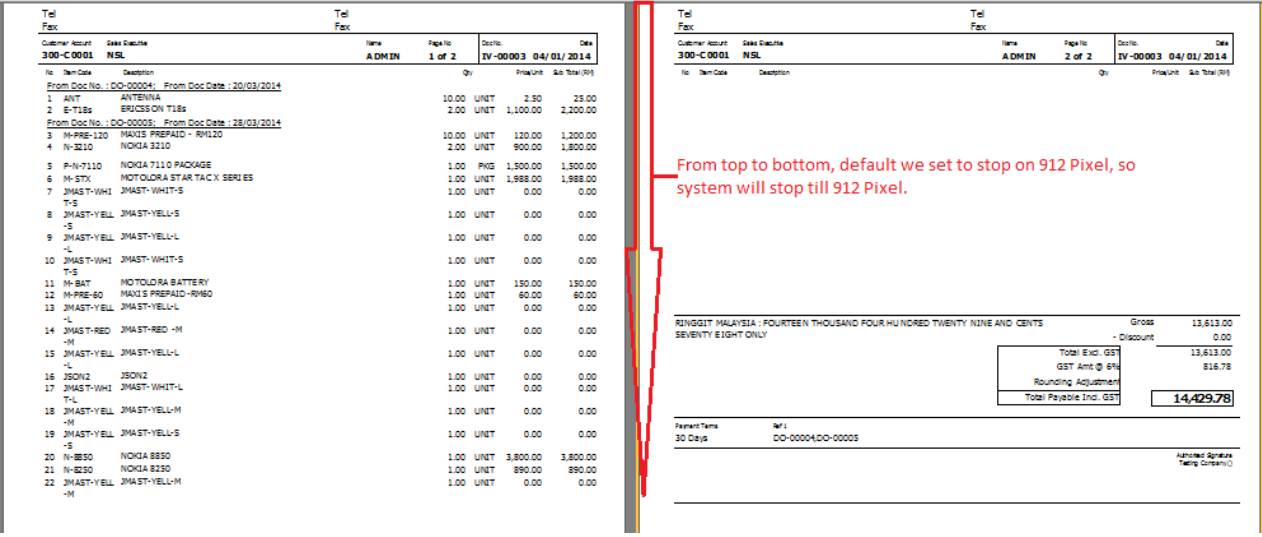
Set Stop Position
Example of setting the Stop Position with 912 Pixel :
-
Go into Report Design
-
Click on DetailData1
-
Click on Events
-
Double Click onAfterCalcHeight.
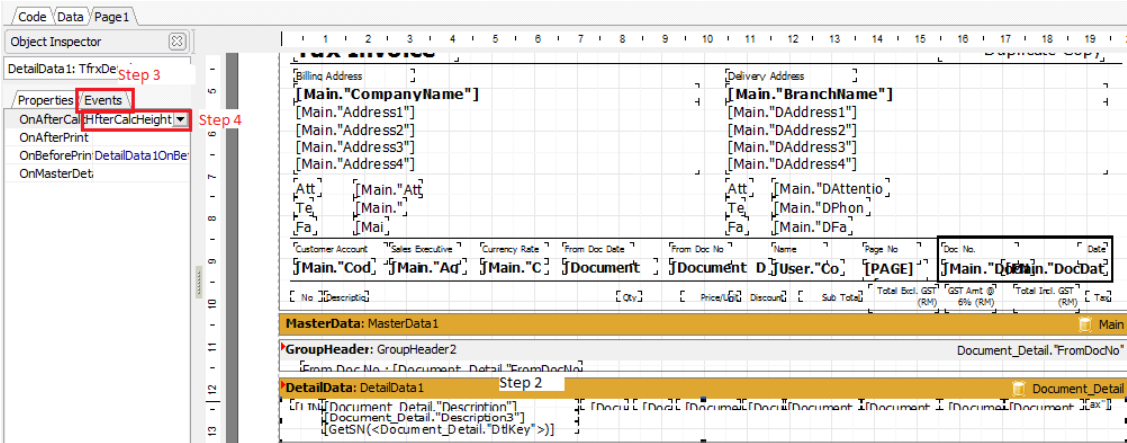
-
The system will redirect to Code Page
TIPSIf you want to stop on 9 Inch, then you have to convert to Pixel.
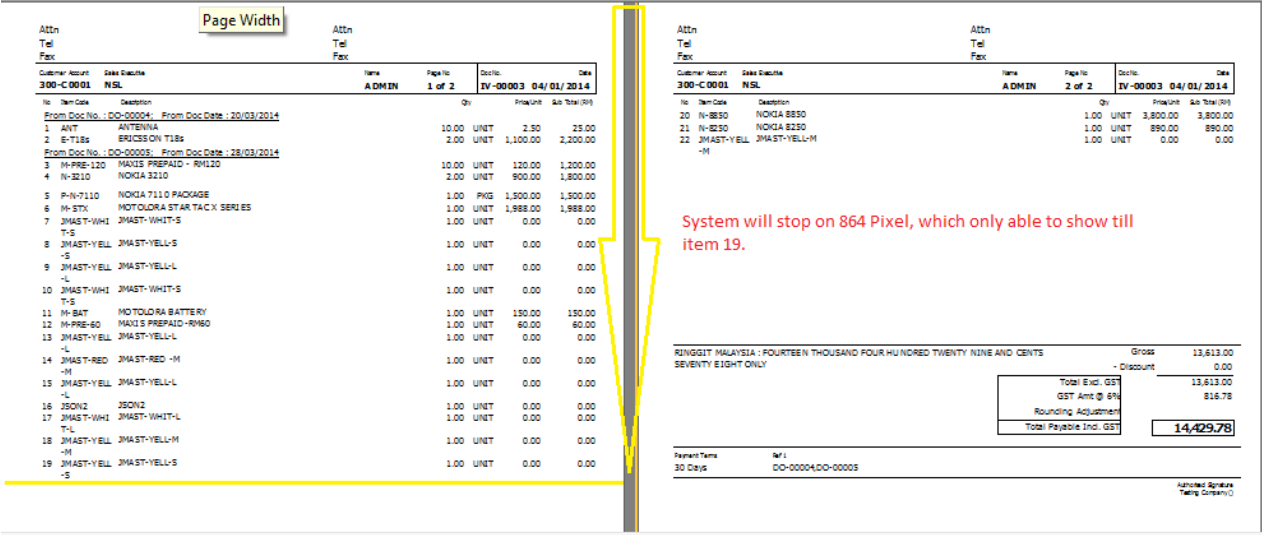
1 Inch = 96 Pixel, So if you want stop on 9 Inch, then use 9 *96 = 864 Pixel.

Code:
if TfrxDetailData(Sender).Visible and (Engine.CurY + DetailData1.Height >= 864) then Engine.NewPage; -
File | save as | Enter New Report Name
-
Preview with new report name to see the result.
Example Result after set to 864 Pixel :
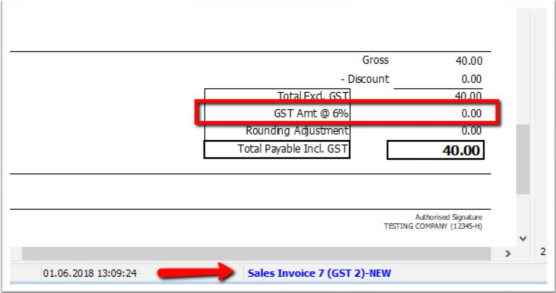
Update GST from 6% to 0% (show zero instead of blank)
SQL Account system build in report format will automatic detect your Tax Rate based on your invoice issued.
- If invoice issued on May, it will show GST @ 6%, while invoice issued on June, it will display GST @ 0%.
- If your Delivery Order (D/O) is issued on May, transferred to Invoice and invoice date on June, the system will automatic detect and set your GST rate correctly.
- However, if your format customized previously, you can refer this guideline on how to change the script from GST @ 6% to GST 0%.
-
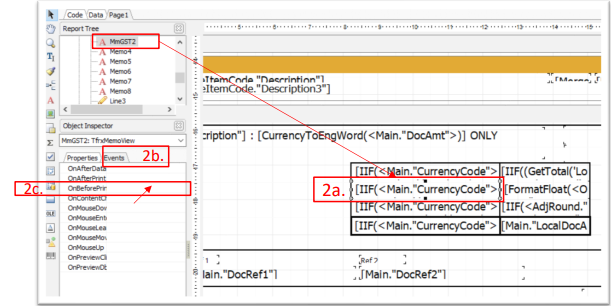
Click on your report name to enter into report designer page.
-
Refer to the image below for the follow instructions,
-
Click on this field, you can double check on left panel, the field name is MmGST2
-
go Event
-
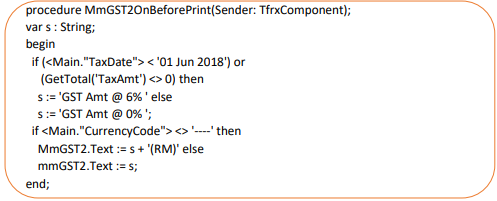
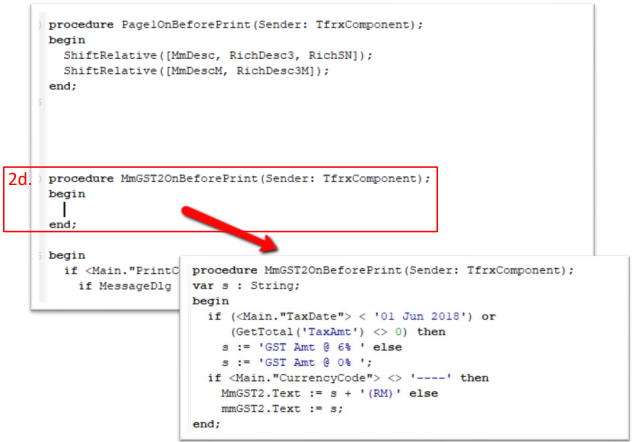
double click the empty area beside OnBeforePrint, system will bring you to step iv as below
-
replace to this script
-
-
Once you complete the steps above, Click file > save as, enter a new report name and exit, then you may preview again your format outcome.