FAQ
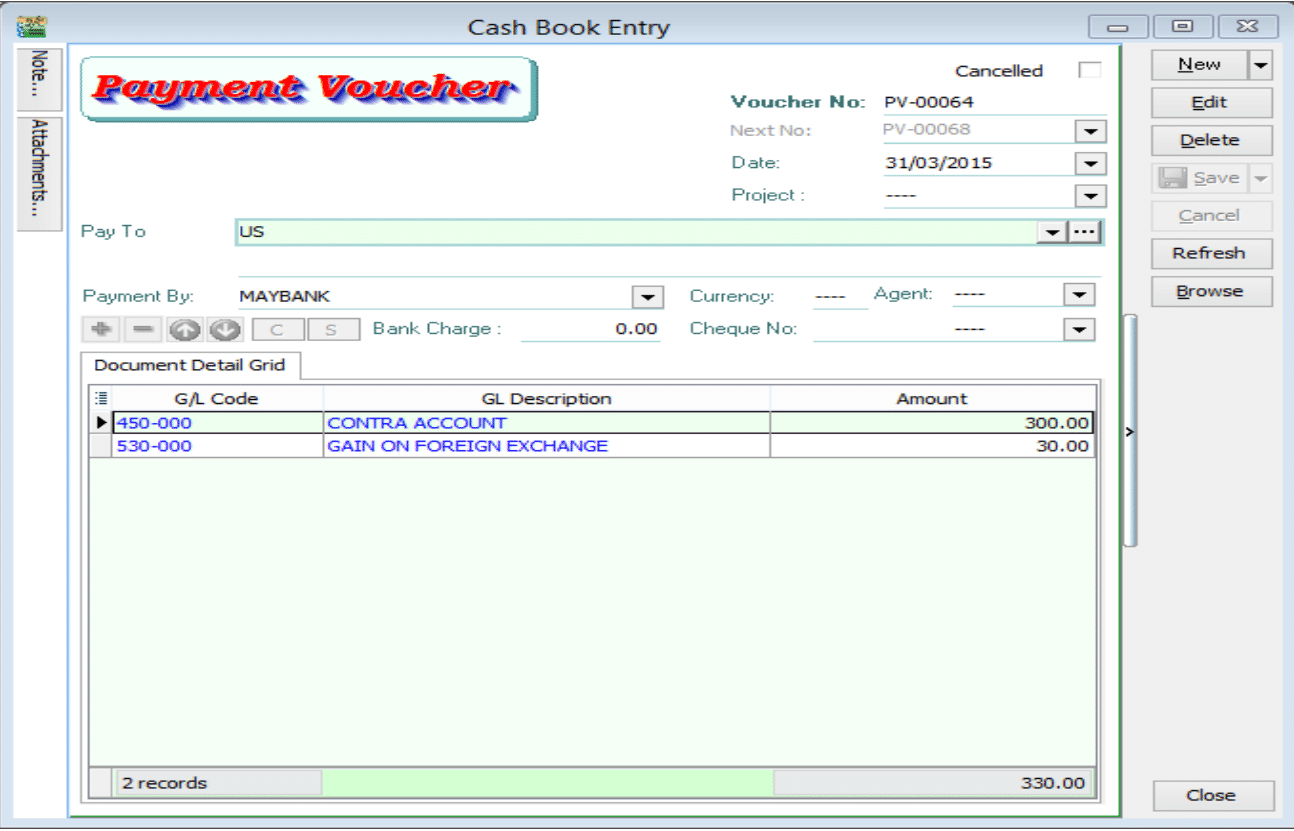
Bounced Payments in Foreign Currencies
Customer Invoice
Example: Invoice amount USD 100 | Rate 3.00 | Local Net Total = RM 300

Scenario 1: Payment Received at a Higher Rate (Gain)
Example: Received RM 330 (Gain of RM 30).
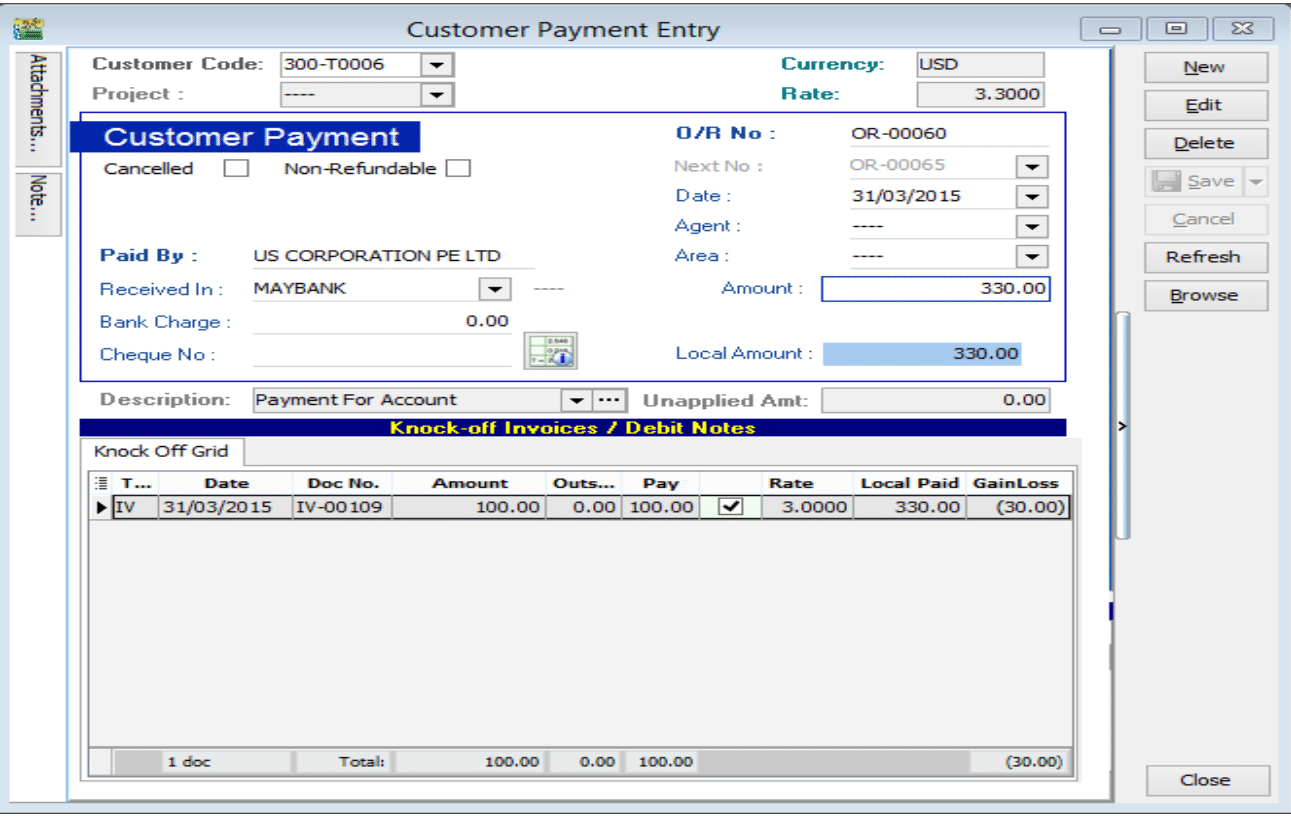
To process the bounced payment:
-
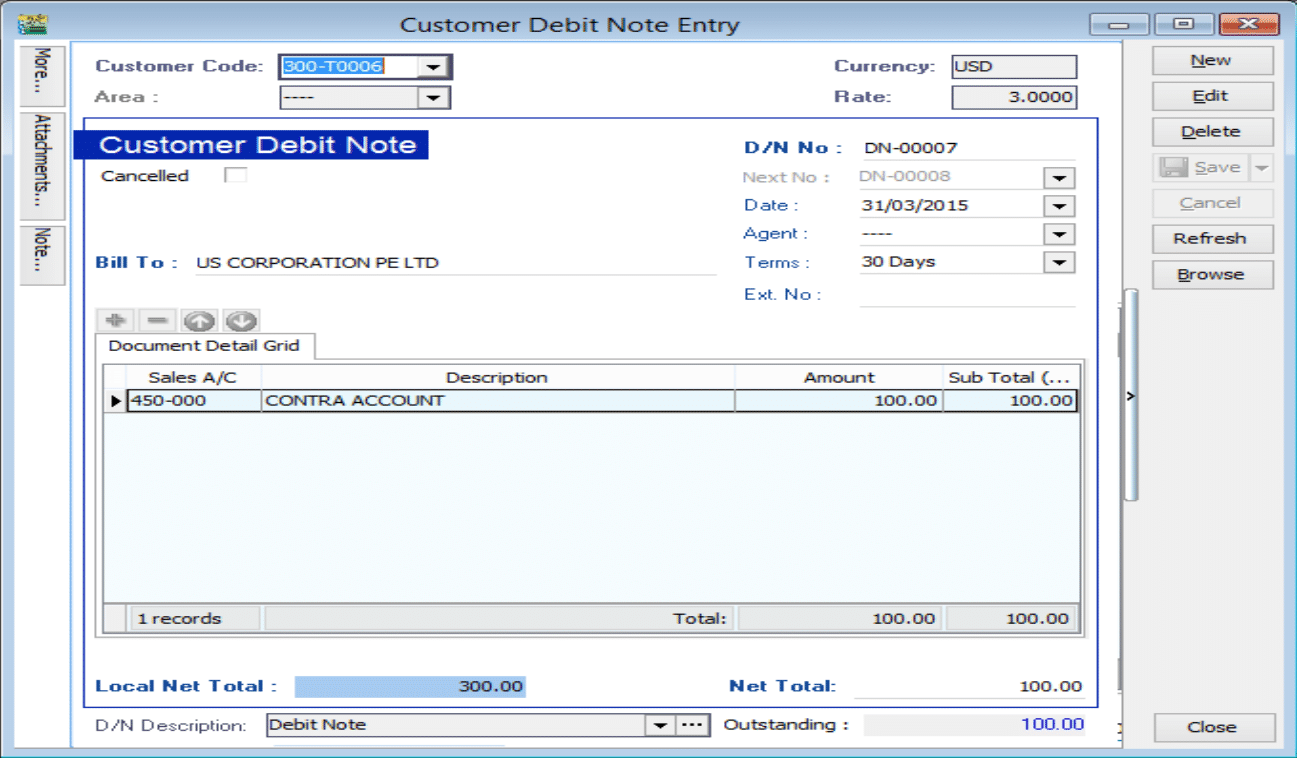
Issue a Customer Debit Note: Create a Debit Note to reverse the original invoice amount.
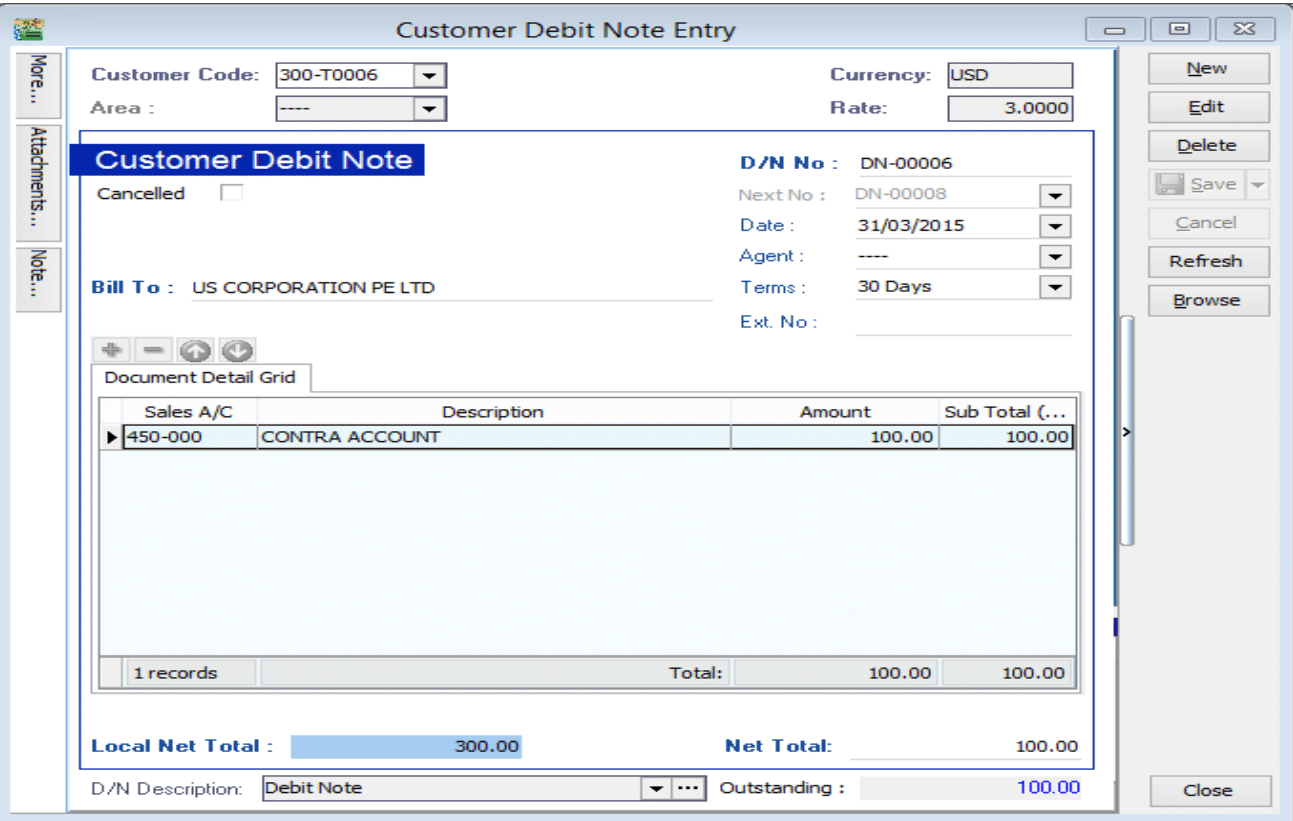
-
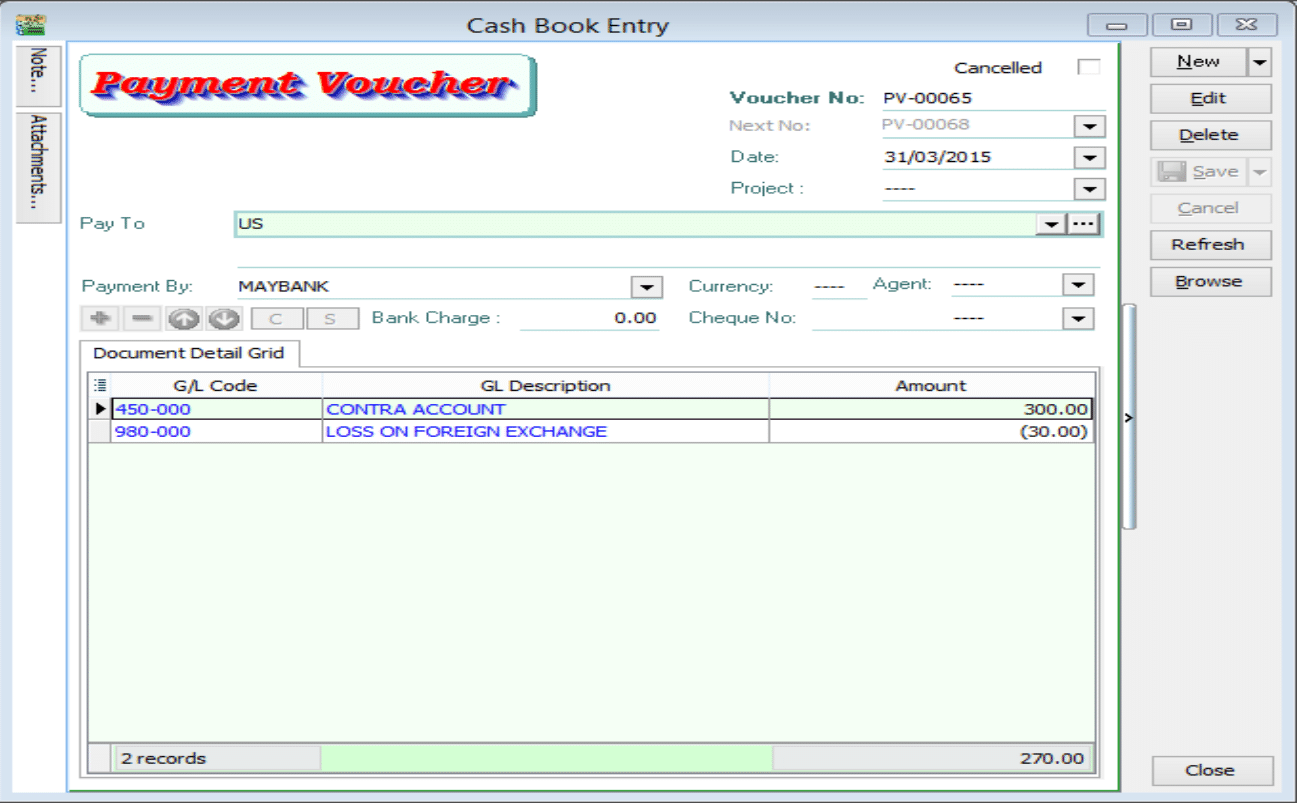
Issue a Payment Voucher: Create a Payment Voucher to credit out the amount that was previously knocked off.
Scenario 2: Payment Received at a Lower Rate (Loss)
Example: Received RM 270 (Loss of RM 30).
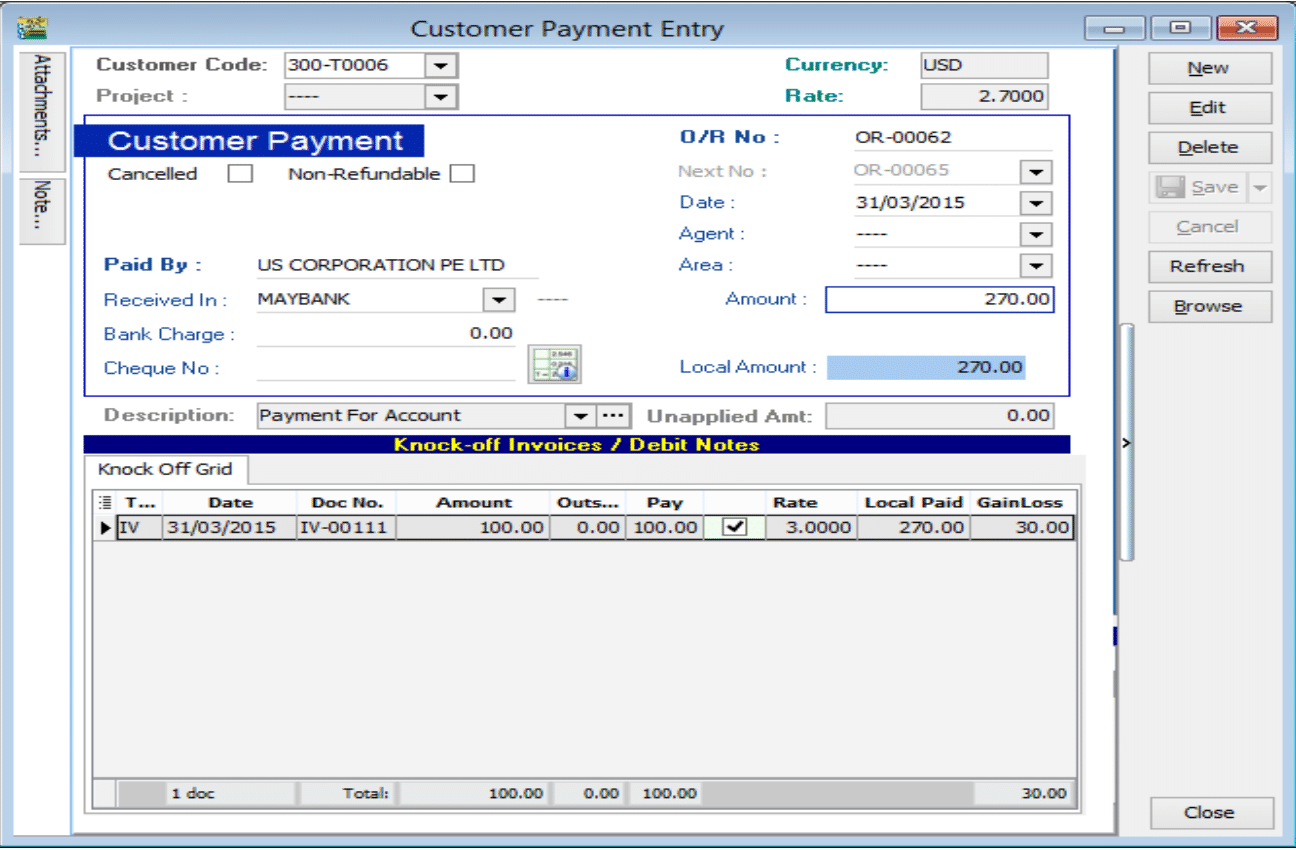
To process the bounced payment:
-
Issue a Customer Debit Note: Create a Debit Note to reverse the original invoice amount.
-
Issue a Payment Voucher: Create a Payment Voucher to credit out the amount that was previously knocked off.
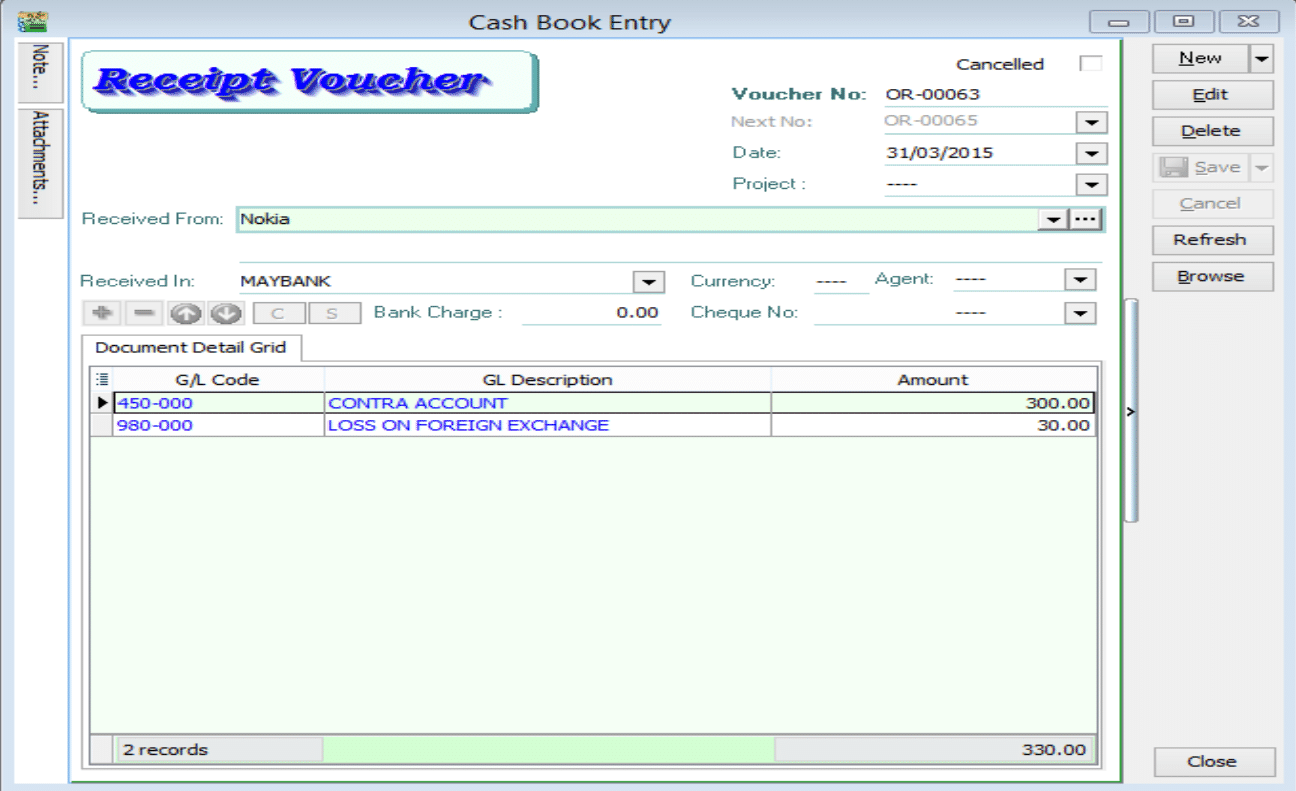
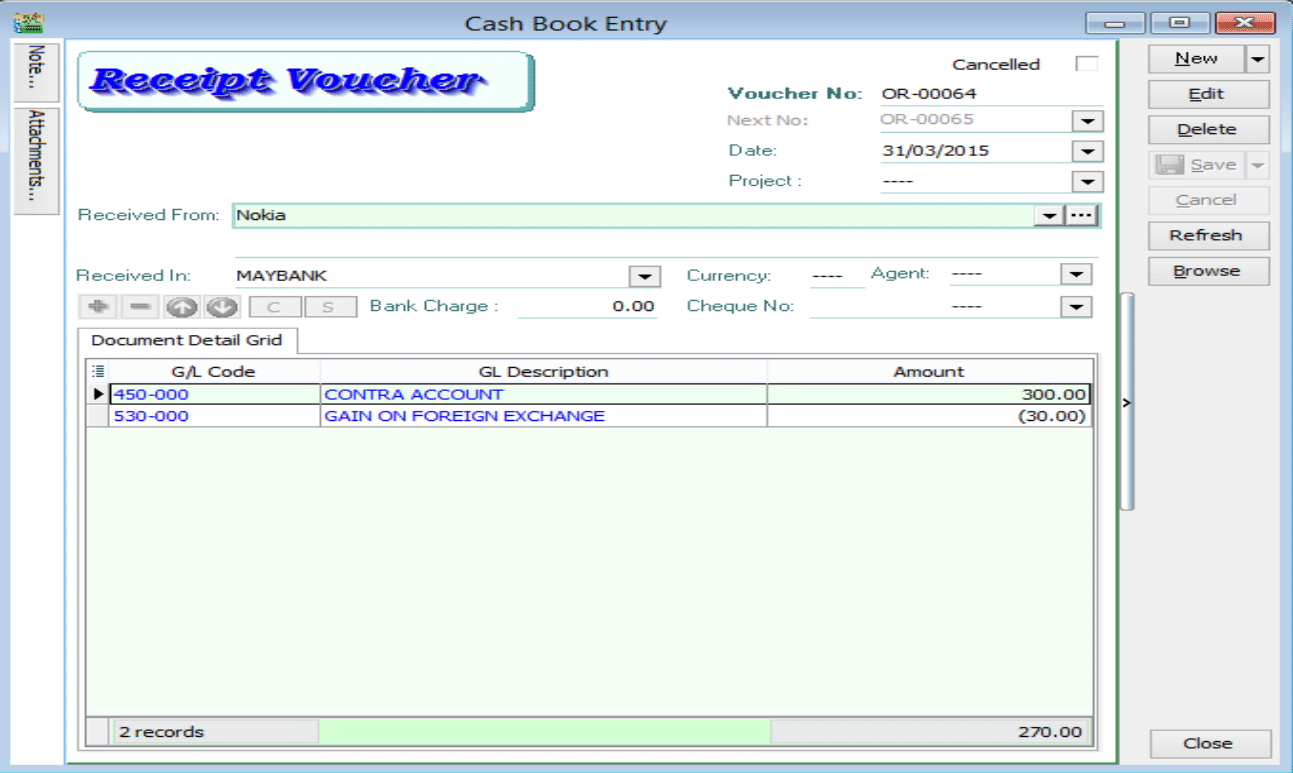
Supplier Invoice
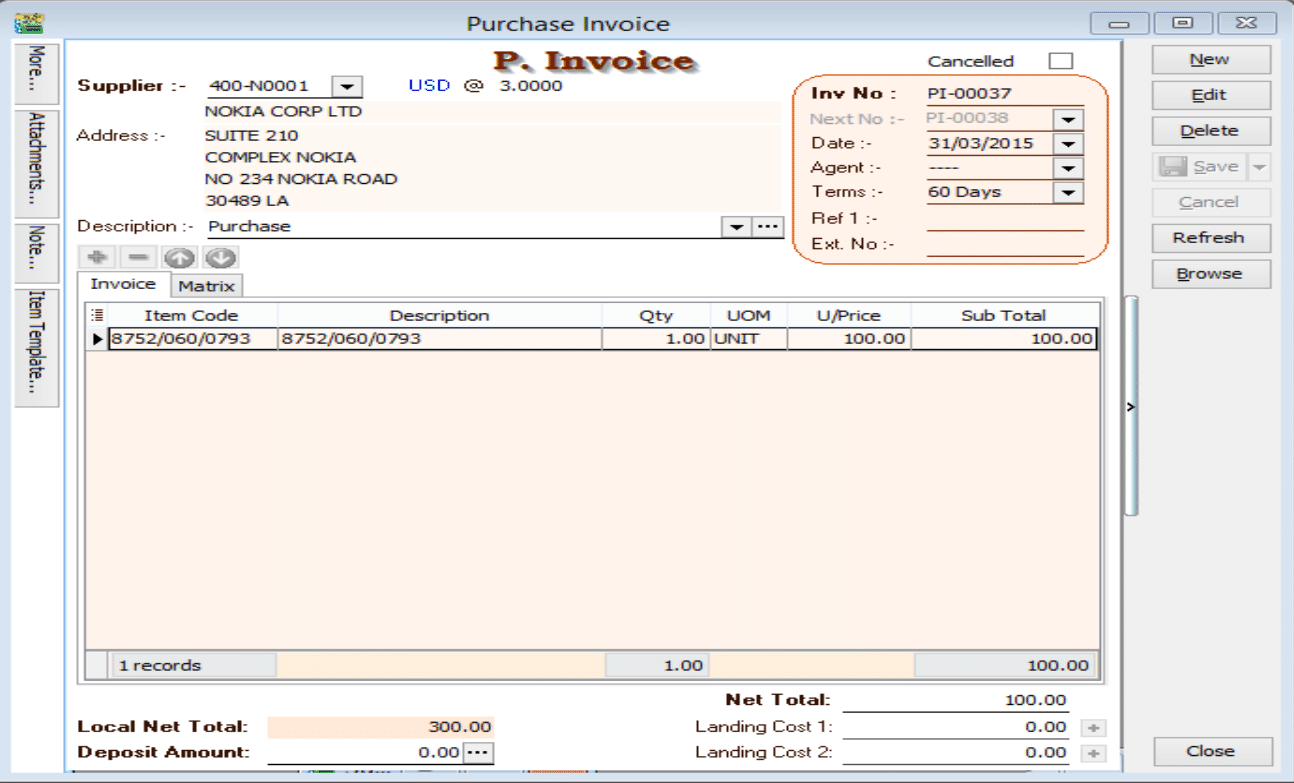
Example: Supplier Invoice amount USD 100 | Rate 3.00 | Local Net Total = RM 300
Scenario 1: Payment Made at a Higher Rate (Loss)
Example: Made payment of RM 330 (Loss of RM 30).
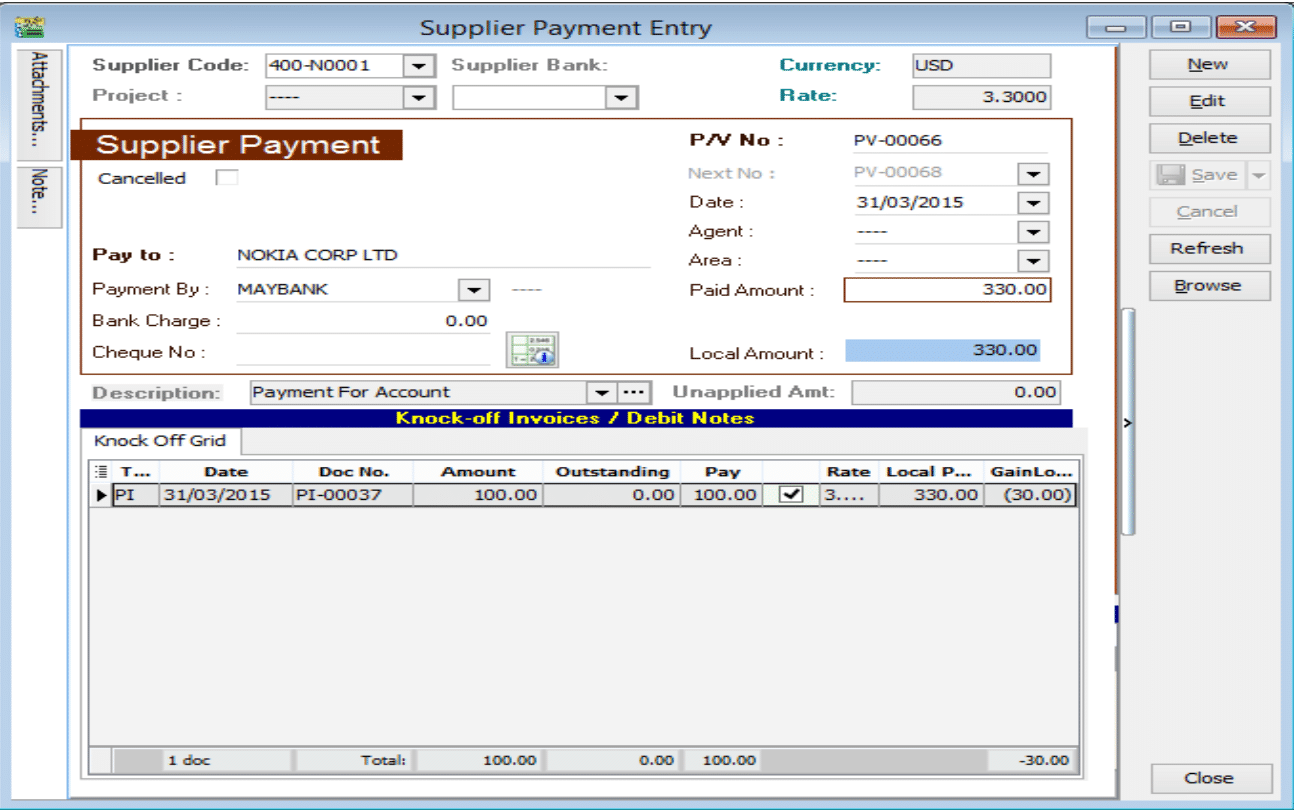
To process the bounced payment:
-
Issue a Supplier Debit Note: Create a Debit Note to reverse the original invoice amount.

-
Issue an Official Receipt: Create an Official Receipt to debit the amount that was previously knocked off.
infoAssign the USD 30 difference to a Loss on Foreign Exchange GL account.
Scenario 2: Payment Made at a Lower Rate (Gain)
Example: Made payment of RM 270 (Gain of RM 30).
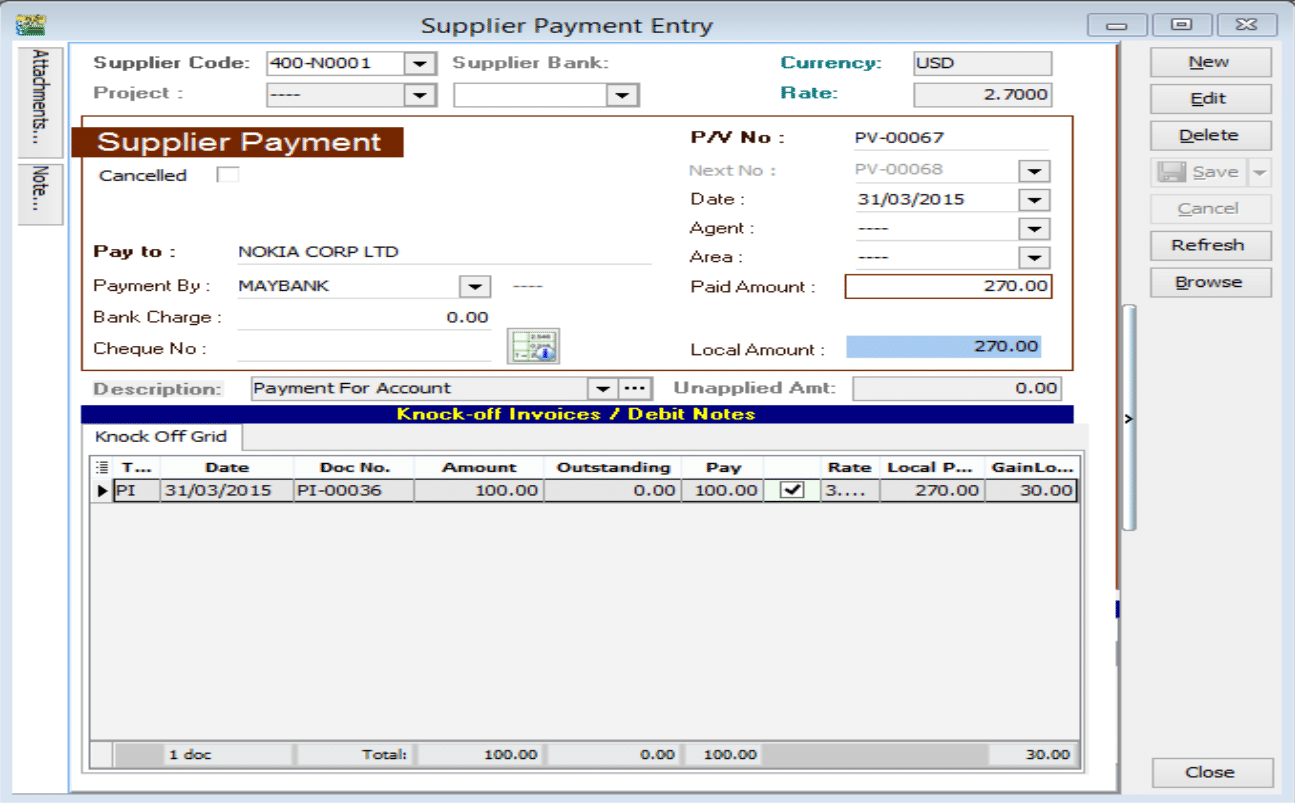
To process the bounced payment:
-
Issue a Supplier Debit Note: Create a Debit Note to reverse the original invoice amount.

-
Issue an Official Receipt: Create an Official Receipt to debit the amount that was previously knocked off.
infoAssign the USD -30 difference to a Gain on Foreign Exchange GL account.
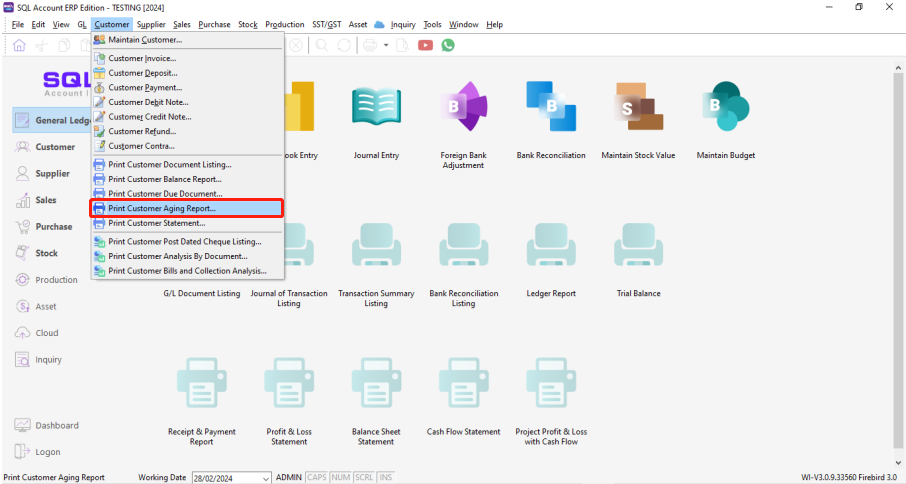
Unrealized Foreign Exchange Gain/Loss
Posting Unrealized Gain/Loss
-
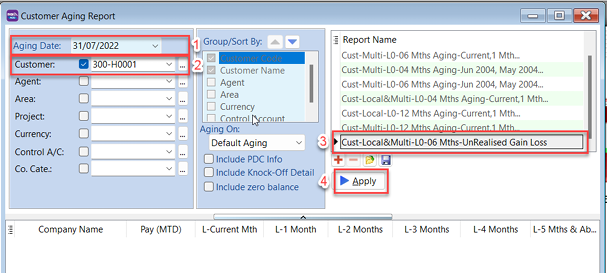
Go to Customer → Print Customer Aging Report.
-
Select the Date.
-
Select the Foreign Customer.
-
Select the Unrealized Gain Loss report format.
-
Click Apply.
-
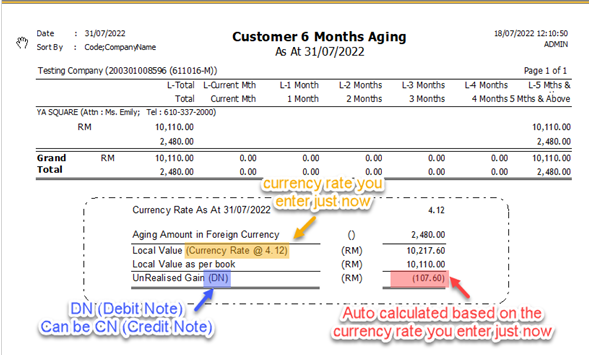
Click Preview. A dialog will prompt you to enter the currency rate.
-
Enter the Closing Currency Rate and click OK.

-
The system will display the report with the auto-calculated Unrealized Gain/Loss Amount.
-
Click Post_DNCN_Adjustment.
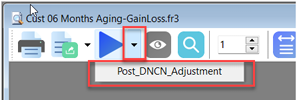
-
A "Posting Done" message will appear.

-
Go to Customer Credit Note or Customer Debit Note to verify the posted adjustment.
- The same steps apply to Suppliers.
- For more information, watch the tutorial on YouTube.
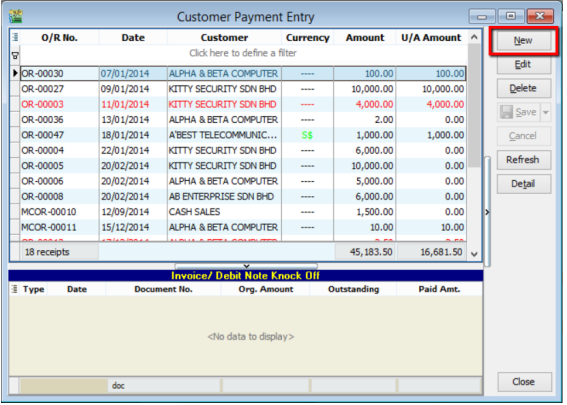
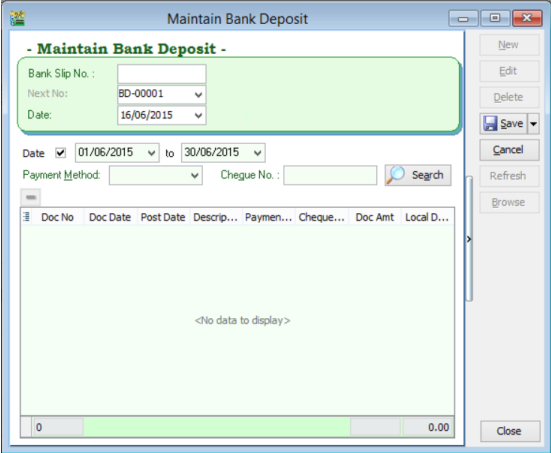
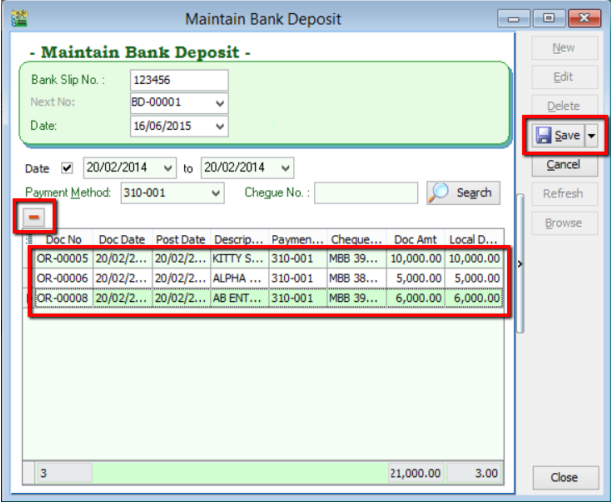
Bank Deposit Management
Bank Deposit is used when banking in two or more cheques in a single transaction slip. This groups the transactions in the Bank Reconciliation screen for easier matching.
Steps to Create a Bank Deposit
-
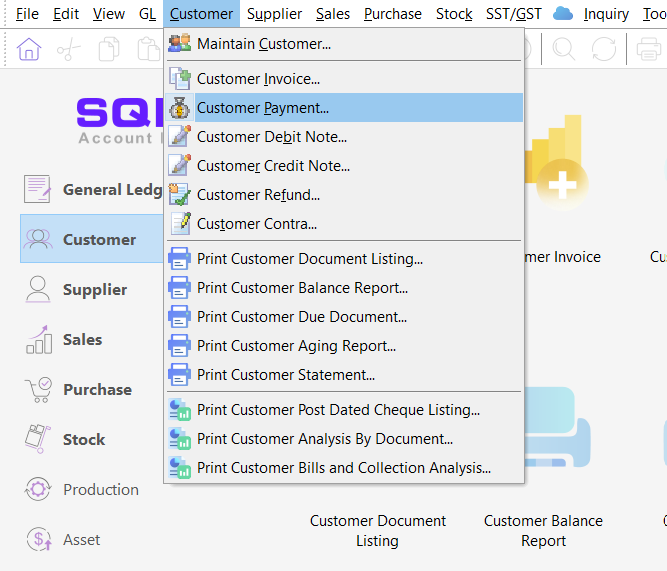
Go to Customer → Customer Payment.
-
Click New.
-
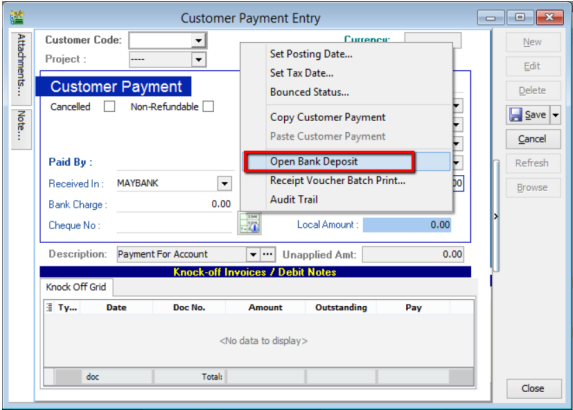
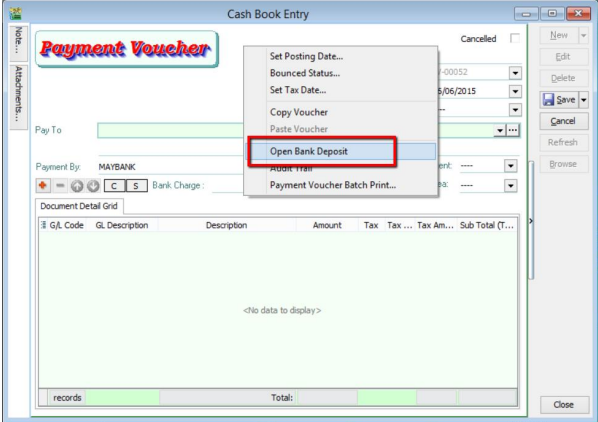
Right-click in the blank space of the entry grid and select Open Bank Deposit.
-
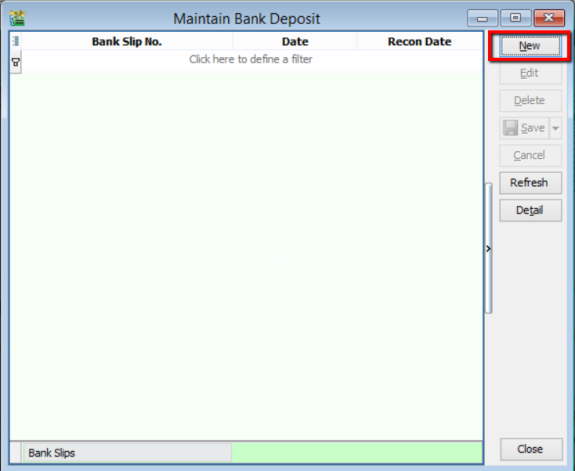
Click New.
-
Enter the Transaction Slip Number, select the Date, and choose the Bank Account.
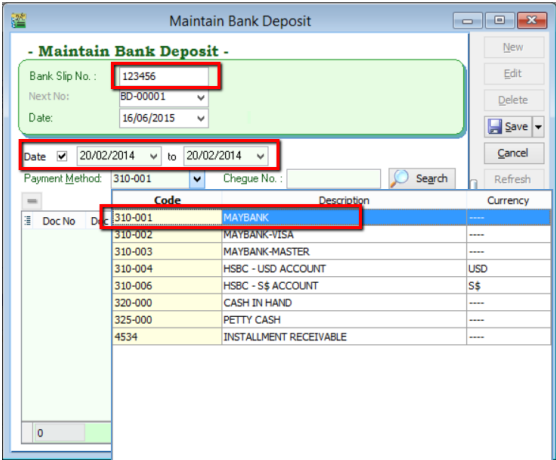
-
Click Search. The system will find customer payments within the selected date range.

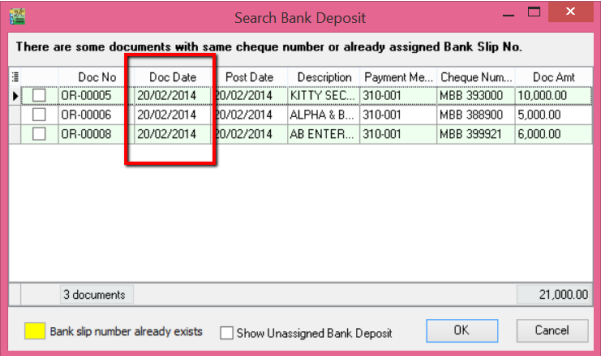
-
Check the payments included in the same transaction slip and click OK.
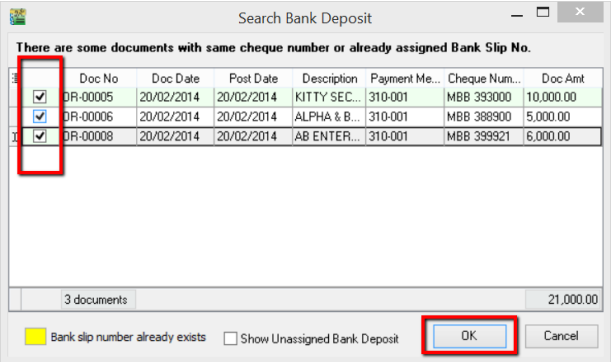
-
The selected payments will appear in the panel. You can remove incorrect entries using the [-] button. Click Save.
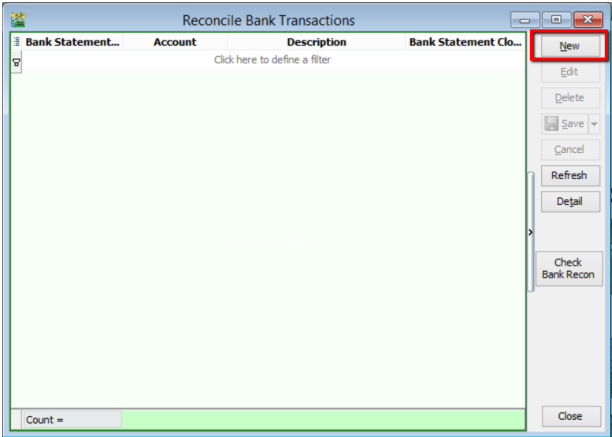
Reconciling the Bank Deposit
-
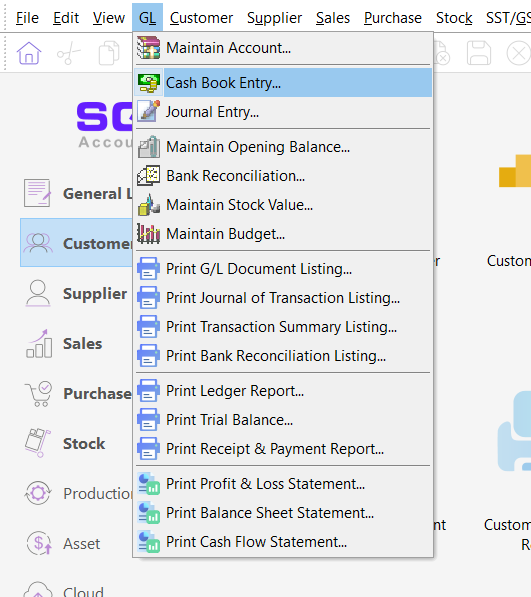
Go to GL → Bank Reconciliation.
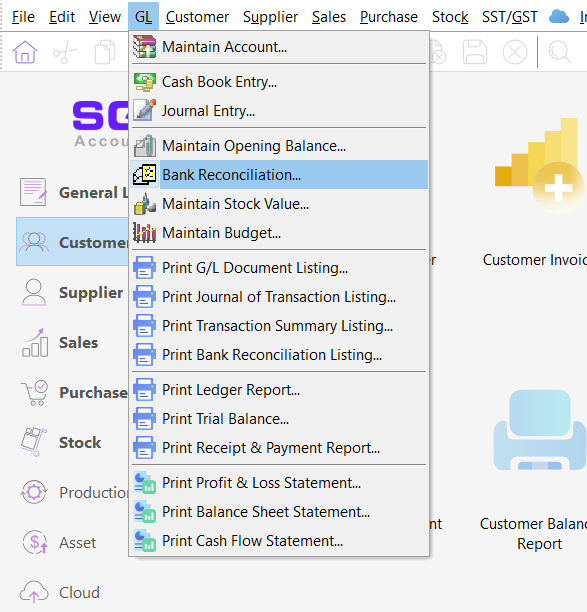
-
Click New.
-
Select the Bank Statement Date and the correct Bank Account.
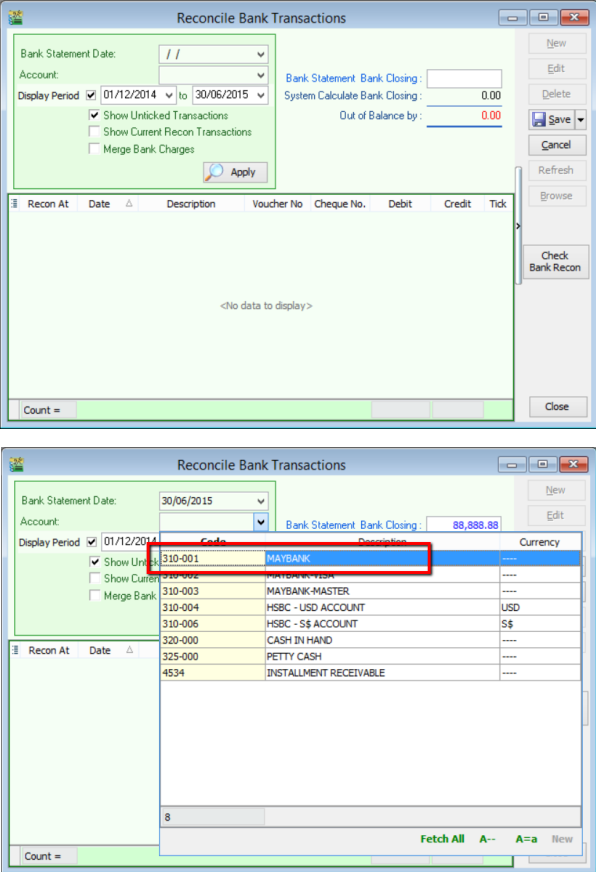
-
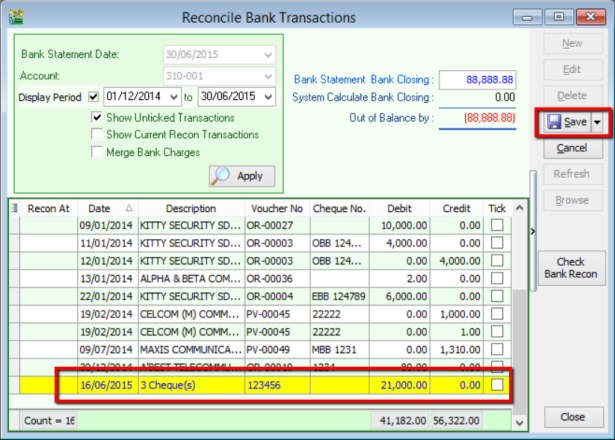
Set the Display Period (ensure it includes the bank deposit date). Enter the Bank Closing Balance from your statement and click Apply.

-
The cheques from the Bank Deposit will be displayed as a single row with the total amount. Check the row and click Save.
Bank Deposit via Cash Book Entry
You can also create a bank deposit through the Cash Book.
-
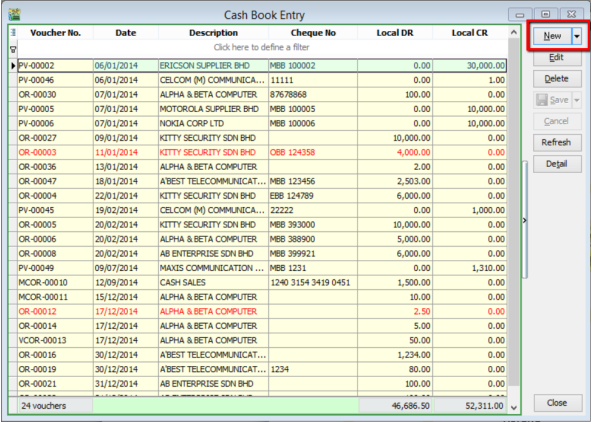
Go to GL → Cash Book Entry.
-
Click New.
-
Right-click in the blank space next to the Payment Voucher tab and select Open Bank Deposit.
Multi-Currency Payment Guide
Customer Payment Scenarios
| # | Customer Currency | Payment Received In |
|---|---|---|
| 1 | RM | RM |
| 2 | USD | RM |
| 3 | USD | USD |
| 4 | USD | SGD |
1. Customer Paid in RM & Payment Received in RM
-
Verify the customer's currency is set to RM (indicated by
----). Go to Customer → Maintain Customer.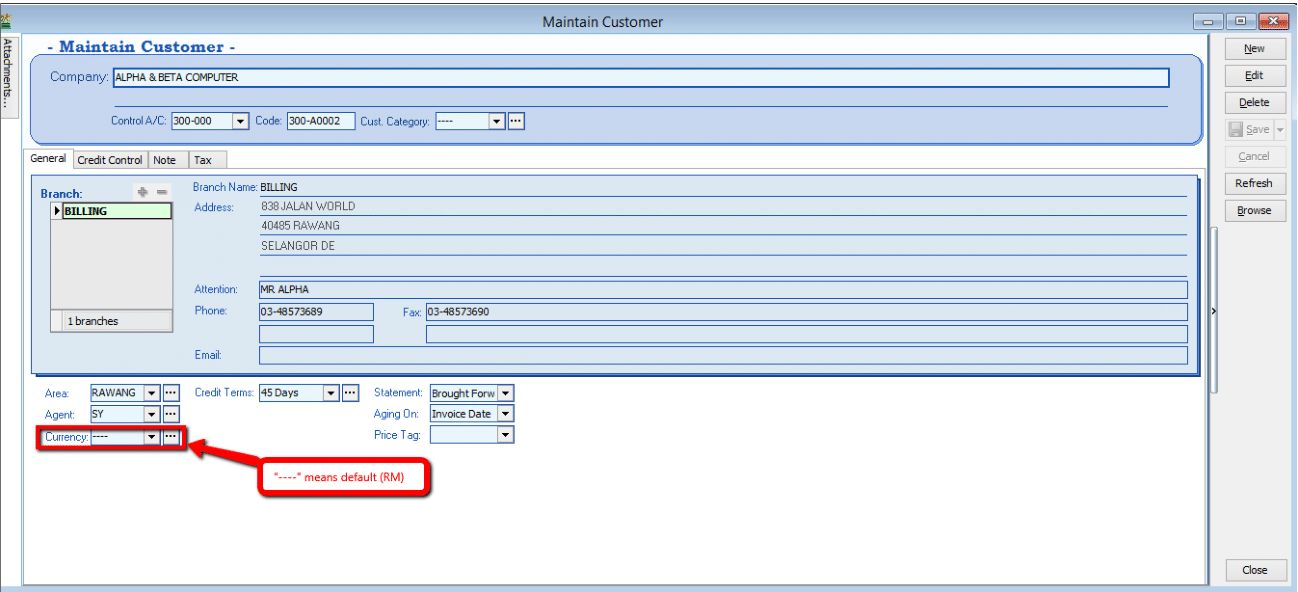
-
Create the Invoice. Go to Sales → Invoice.
-
Process the Payment. Go to Customer → Customer Payment.
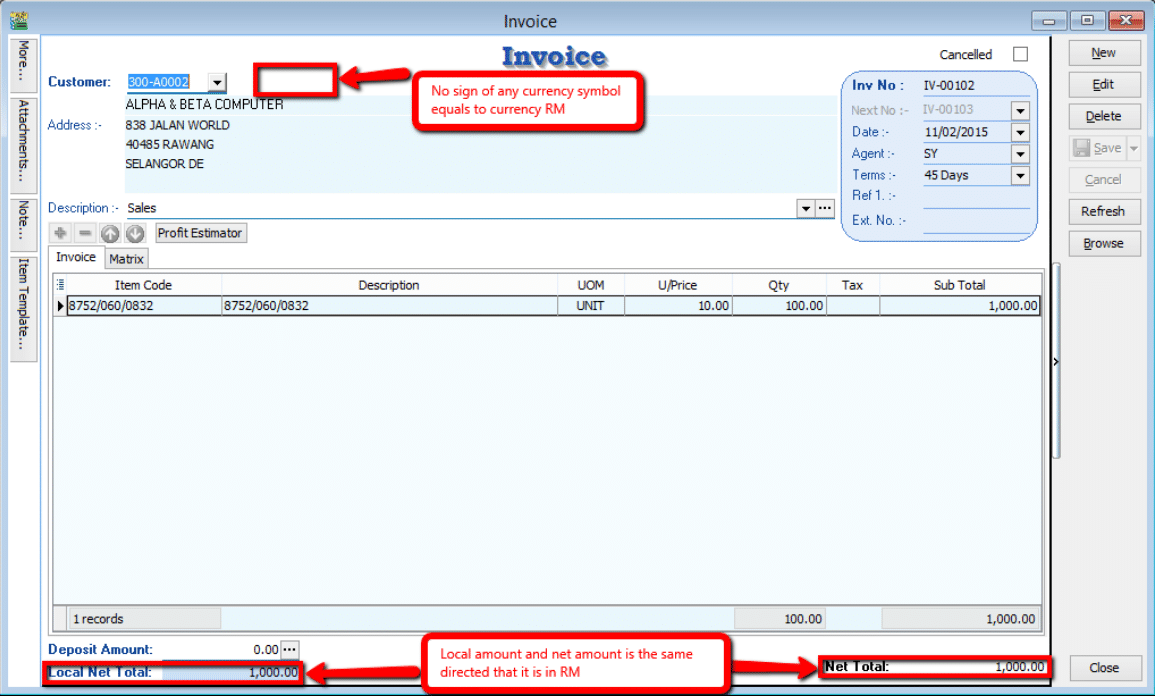
2. Customer Paid in USD & Payment Received in RM
Refer to Scenario 1 to verify if the customer is using USD.
-
Check the Local Amount and Net Total. If they differ, the document is in a foreign currency (e.g., USD). Go to Sales → Invoice.
-
Process the Payment. Go to Customer → Customer Payment.
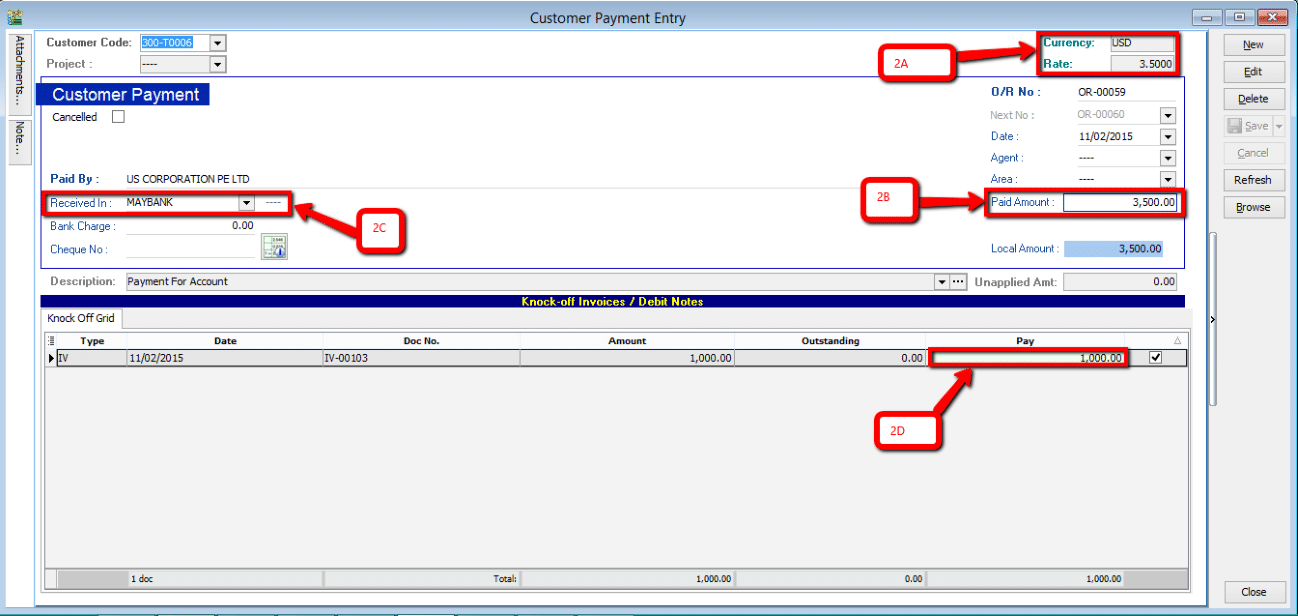
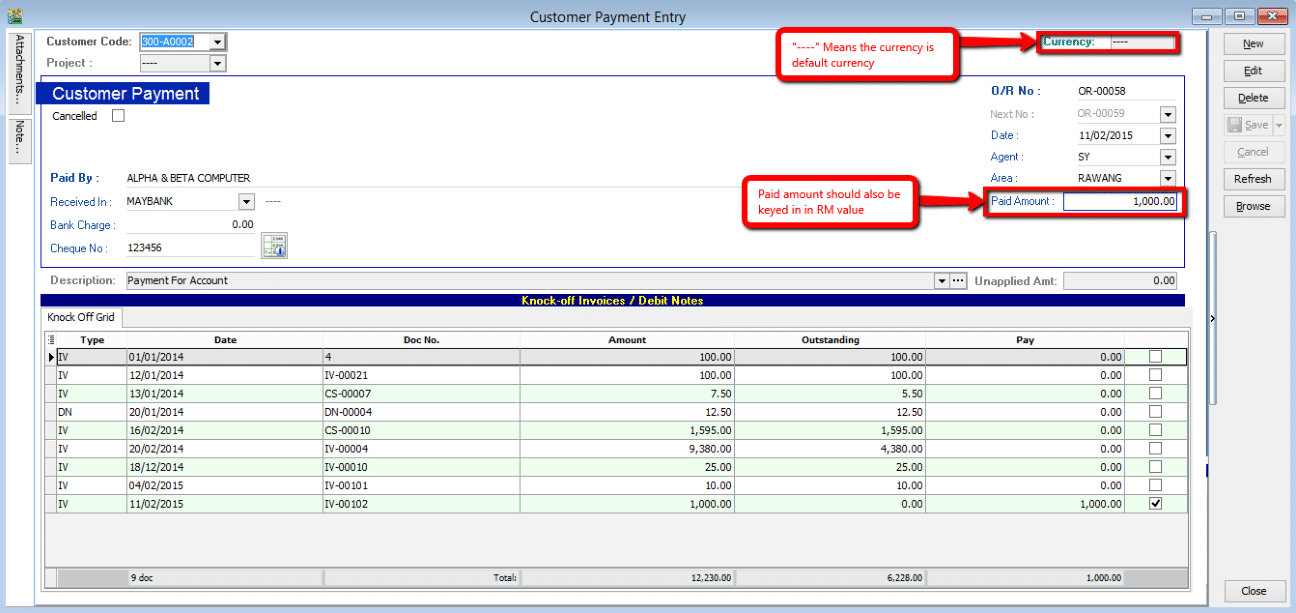
- 2A. Currency Rate: The rate used for knocking off the payment (auto-calculated).
- 2B. Payment Amount: The amount received in RM (based on the Bank payment method currency).
- 2C. Payment Method: Select the correct bank account.
- 2D. Pay Amount: You can enter the desired amount; the currency rate (2A) will update when you knock off the invoice.
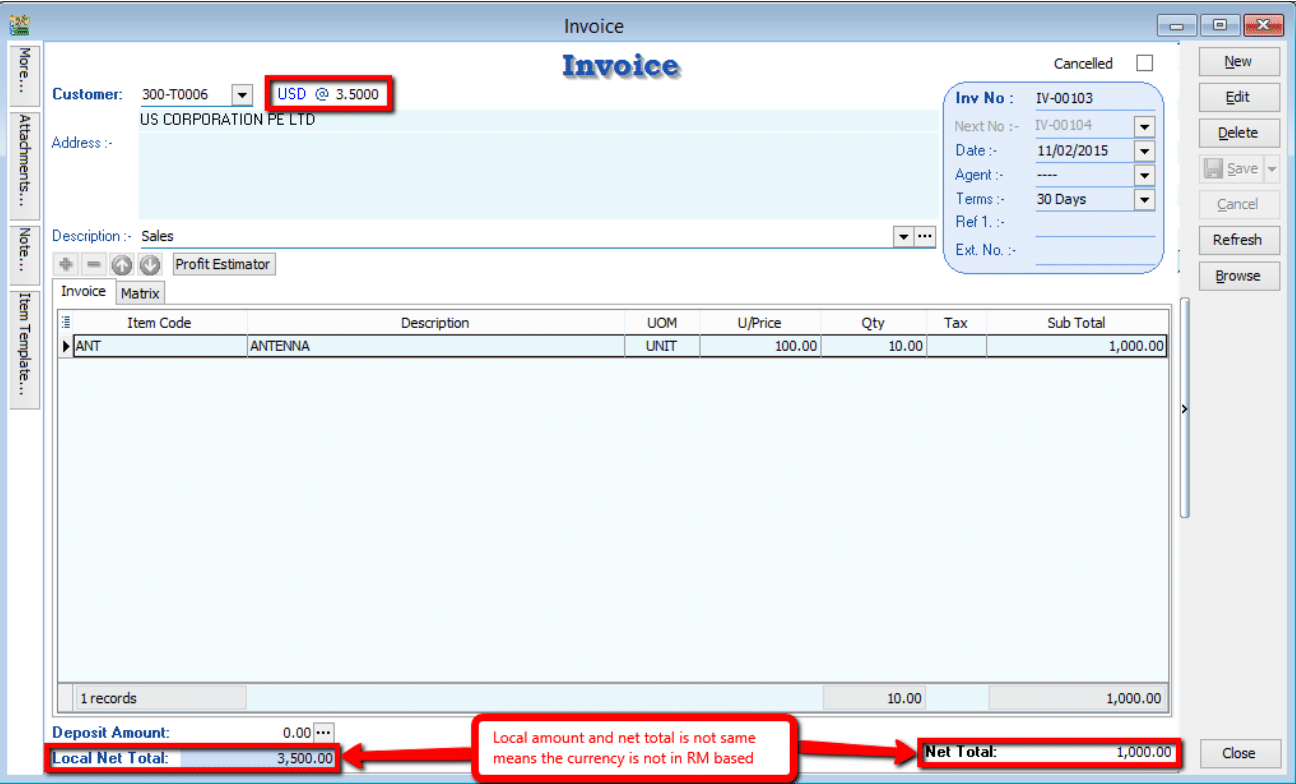
3. Customer Paid in USD & Payment Received in USD
-
Setup:
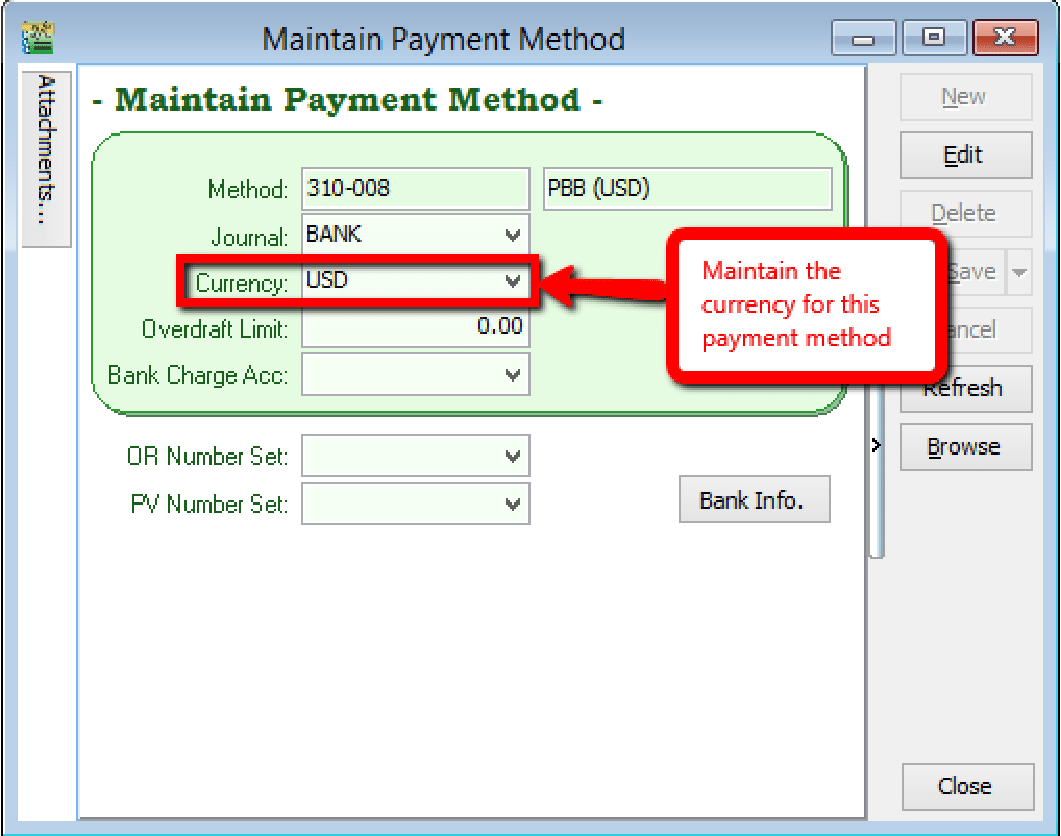
- Maintain a USD Bank account in the General Ledger (GL → Maintain Account).
- Assign the USD currency to the payment method (Tools → Maintain Payment Method).
-
Create the Invoice (USD currency). Go to Sales → Invoice.

-
Process the Payment. Go to Customer → Customer Payment.
infoThe currency rate in the top-right corner can only be edited if the customer's currency matches the payment currency.
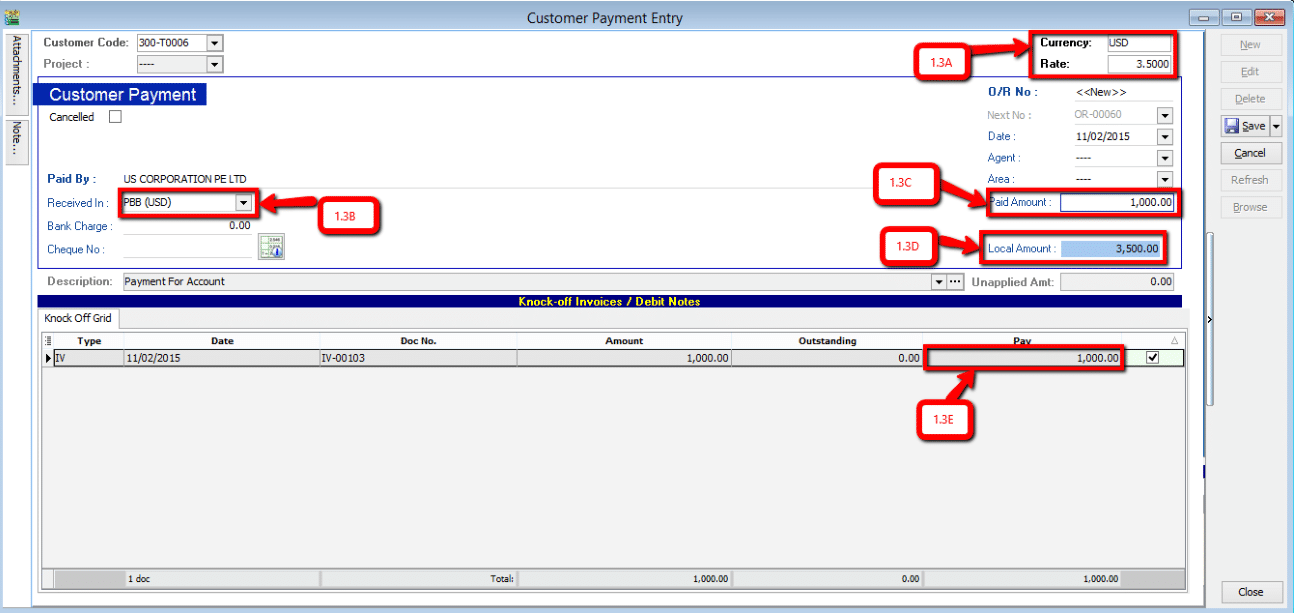
- Rate: Update the rate according to the current market value.
- Payment Method: Select the USD payment method.
- Paid Amount: Enter the amount of USD received.
- Local Amount: Auto-calculated as
Paid Amount × Currency Rate. - IV Amount: This follows the foreign currency amount, not the local amount.
If the currency rate differs from the Invoice rate, the system will prompt a message showing the Gain/Loss on Foreign Exchange upon saving.
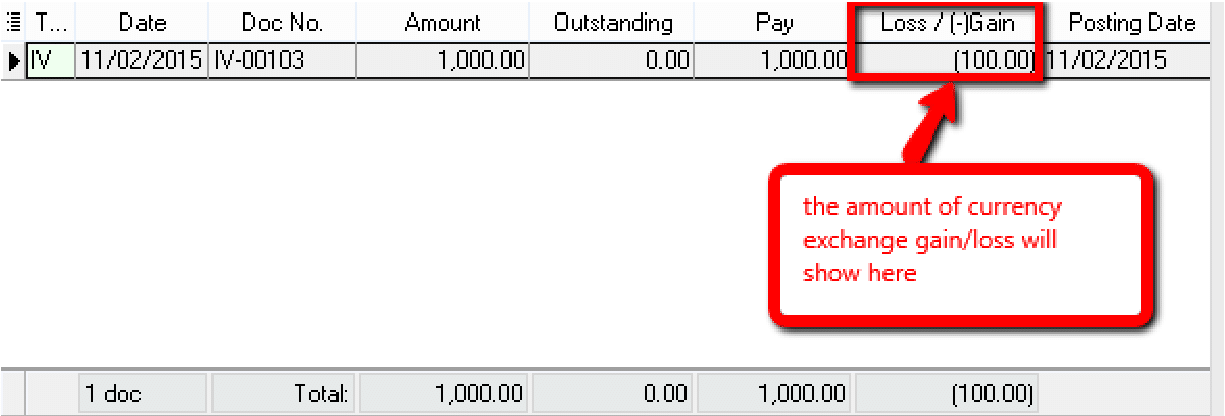 note
noteIf the Invoice rate was 3.5 and the payment rate is 3.6, the system will auto-calculate and display the gain/loss when you click Save.
4. Customer Paid in USD & Payment Received in SGD
For customers using USD where payment is received in a different foreign currency (e.g., SGD), ensure the corresponding payment method is maintained. Refer to Scenario 3 for setup instructions.
Sales Commission Reports
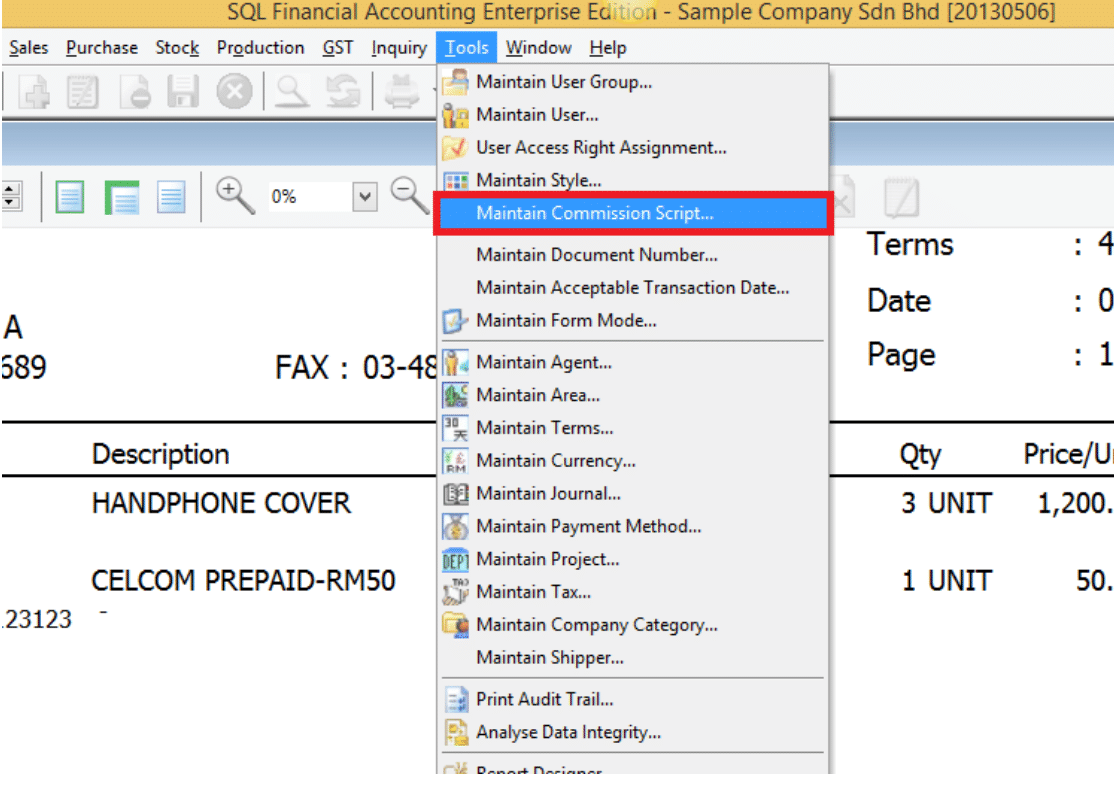
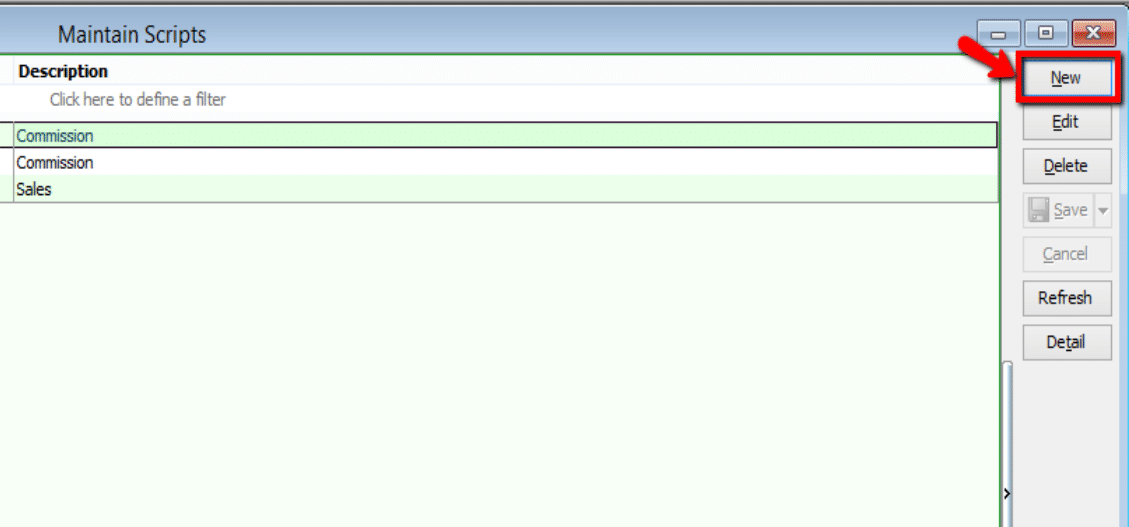
Setting Up Commission Scripts
-
Go to Tools → Maintain Commission Script → New. Enter a Code and Description.
noteThis feature requires the Maintain Commission Script module.

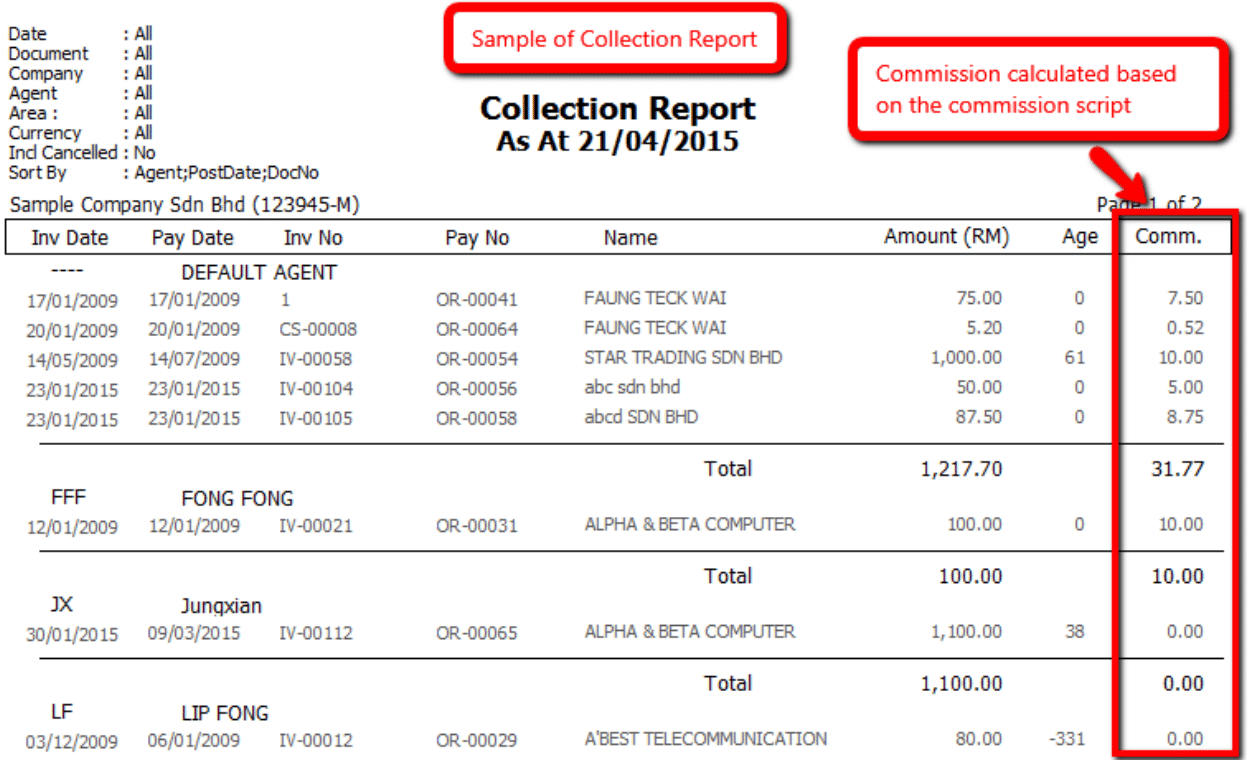
Default Commission Script Example:
procedure CalculateCommission(AKODocAmt, AAge: variant; var Value: variant);
begin
    if AAge < 10 then
        Value := AKODocAmt * 0.05
    else if AAge < 20 then
        Value := AKODocAmt * 0.03
    else if AAge < 30 then
        Value := AKODocAmt * 0.02
    else
        Value := AKODocAmt * 0.005;
end; -
Update the commission rates and age brackets in the script as needed, then click Save.
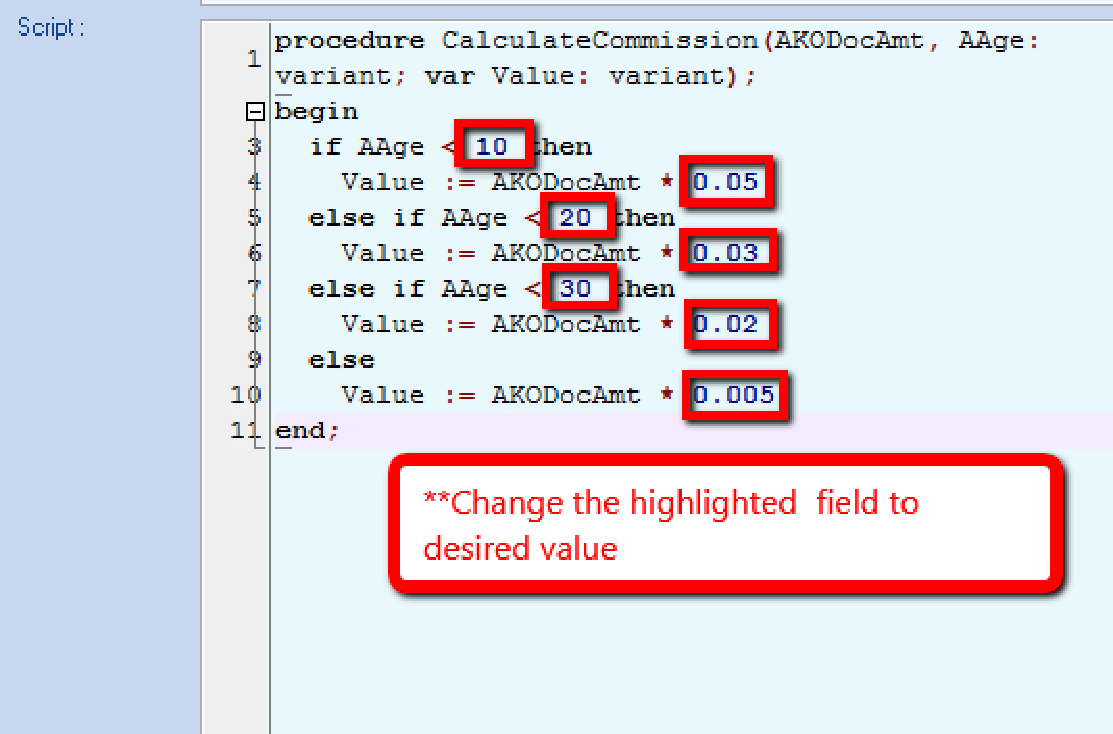
- Age Brackets: 10, 20, 30 days.
- Rates: 0.05 (5%), 0.03 (3%), etc.
-
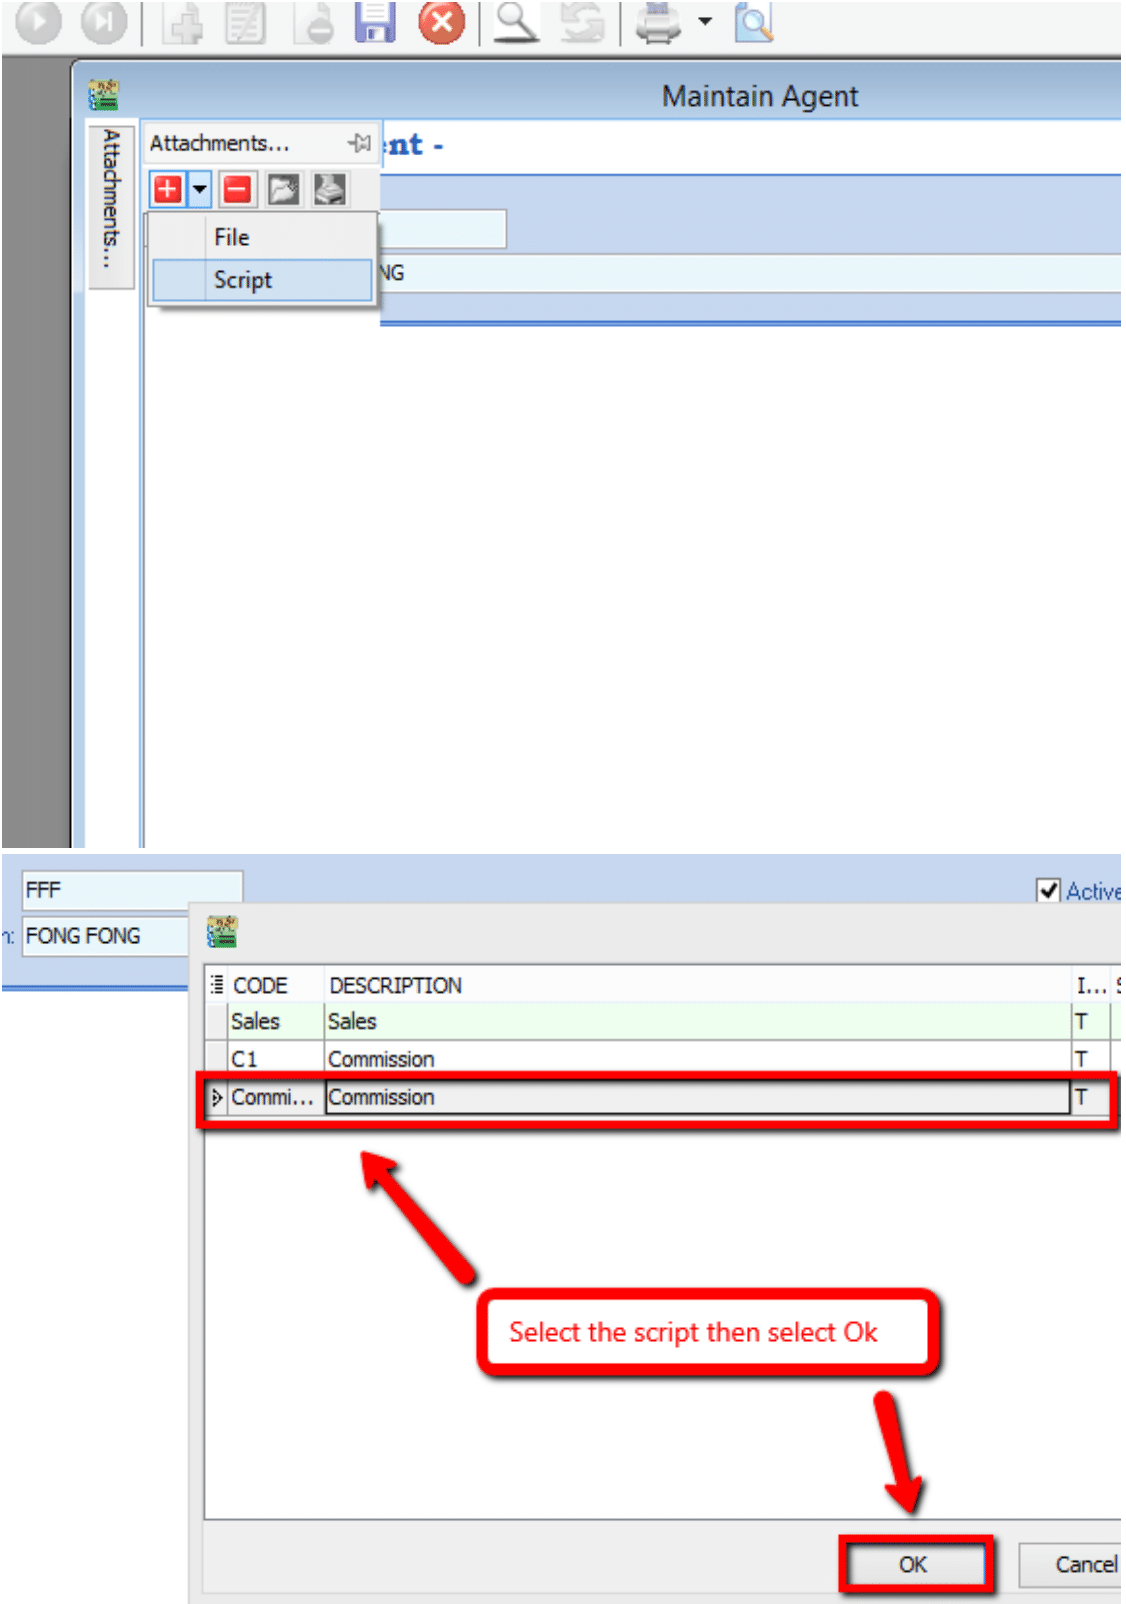
Assign the script to an agent. Go to Tools → Maintain Agent.
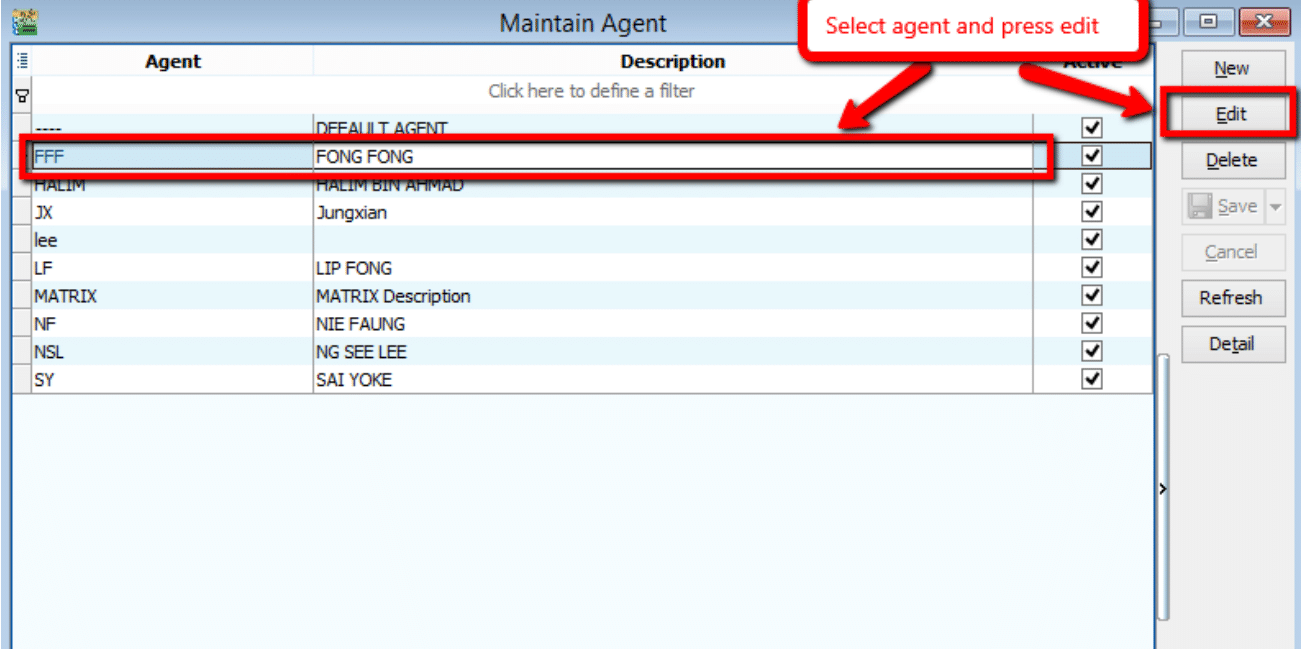
-
In the Attachment tab, select the commission script and click Save.
-
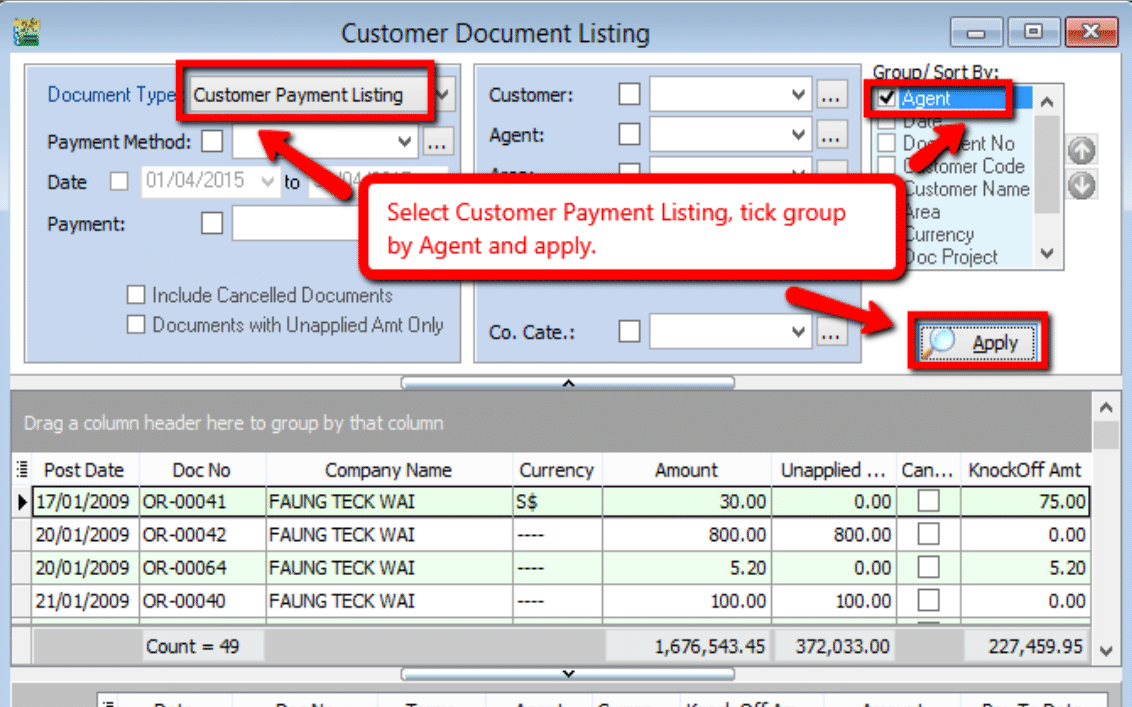
Generate the report. Go to Customer → Print Customer Document Listing.
- Select Document Type: Customer Payment Listing.
- Group By: Agent.
- Click Apply.
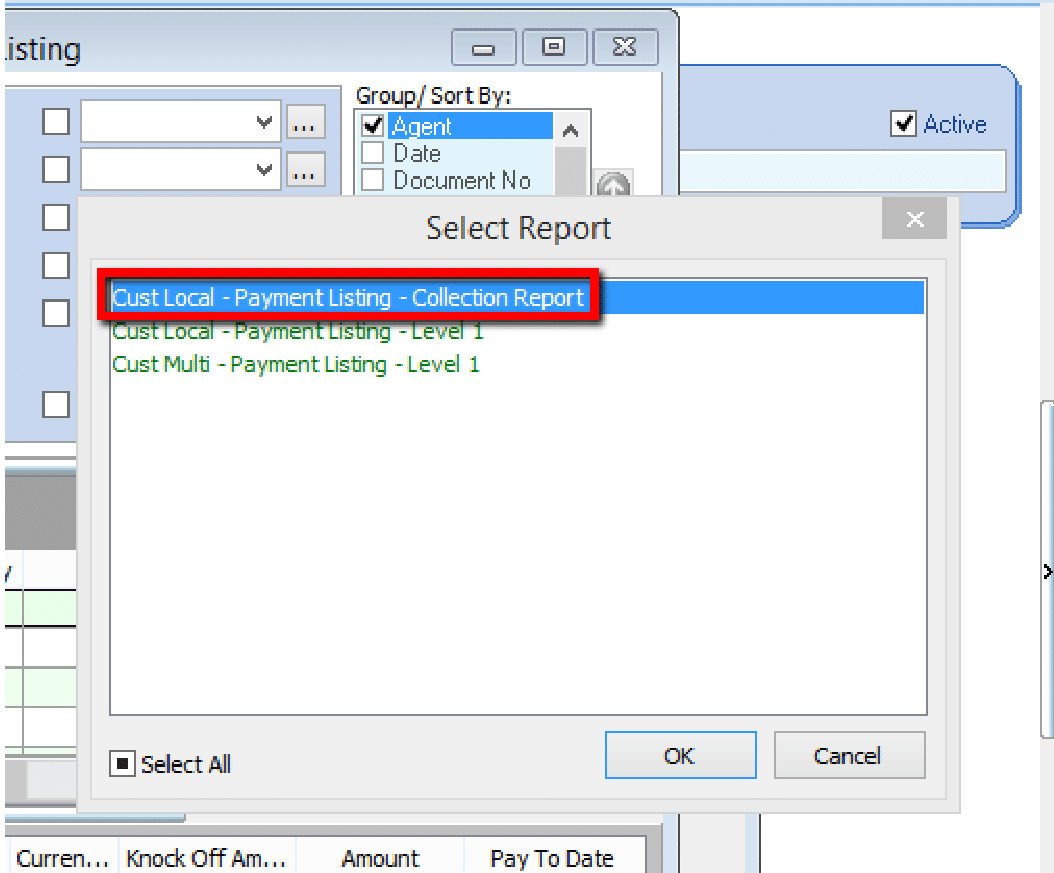
- Preview using the Cust Local - Payment Listing - Collection Report format.
Post-Dated and Bounced Cheques
Post-Dated Cheques (PDC)
A post-dated cheque is written for a future date.
-
Go to Customer → Customer Payment.

-
Click New.
-
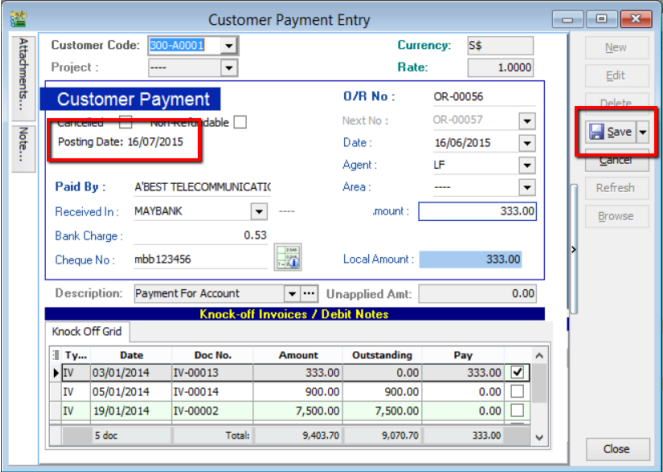
Create the payment and knock off the corresponding invoice. Ensure the bank account and amount are correct.
-
Right-click in the blank space next to the Customer Payment header and select Set Posting Date.
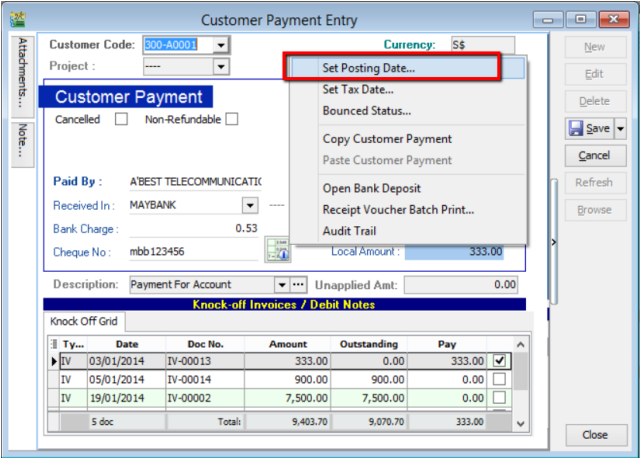
-
Select the actual Posting Date of the cheque and click OK.
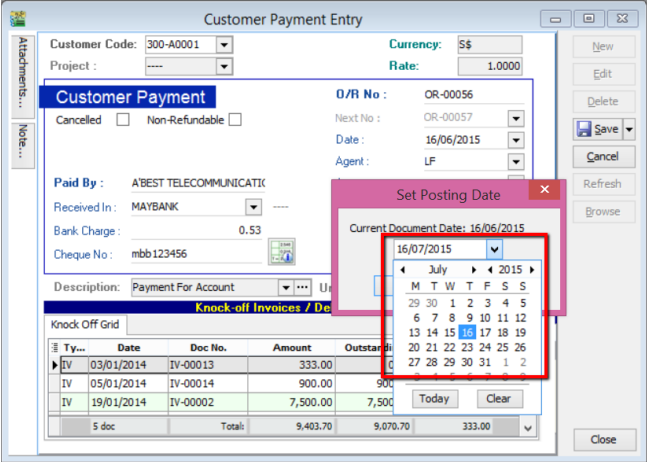
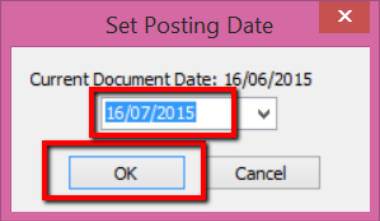
-
The posting date will now be displayed. Click Save.
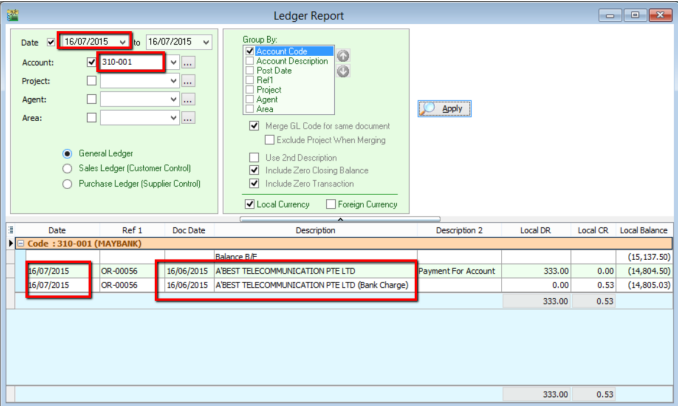
-
In the Ledger Report, the transaction will appear under the specified posting date.
-
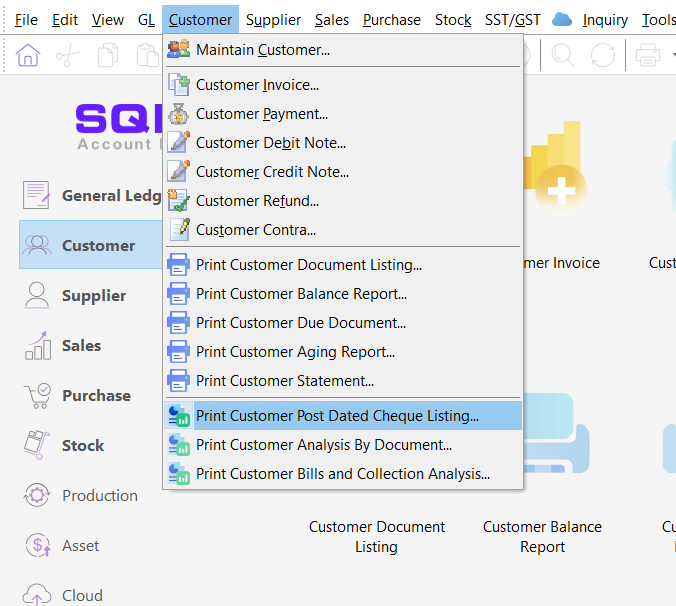
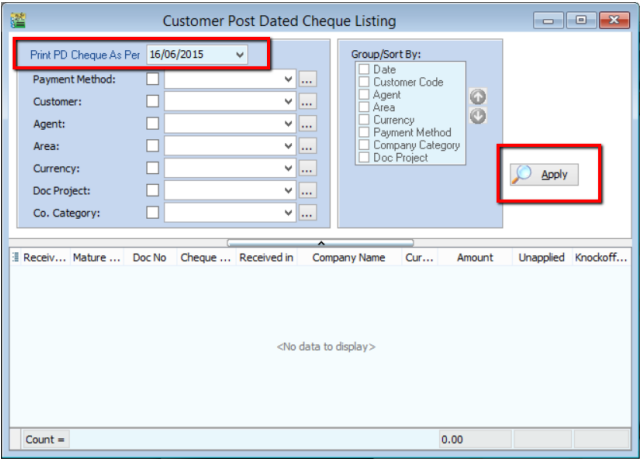
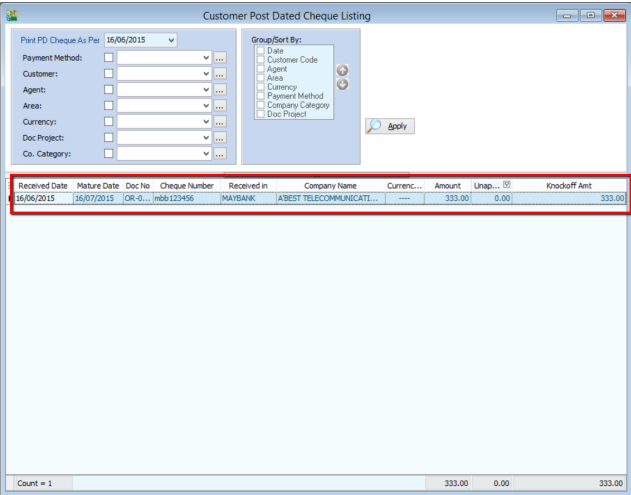
To view all PDCs, go to Customer Reports → Print Customer Post Dated Cheque Listing.
-
Select the Payment Date (not the posting date) and click Apply.
Bounced Cheques
A bounced cheque is one that cannot be processed due to insufficient funds or errors.
-
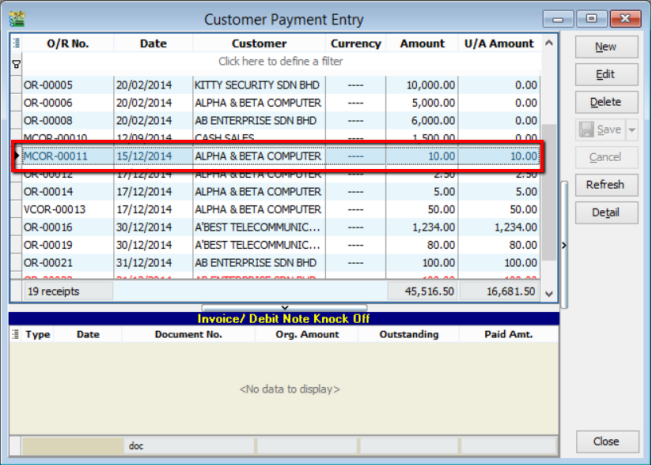
Go to Customer → Customer Payment.

-
Locate and double-click the bounced payment document.
-
Click Edit.
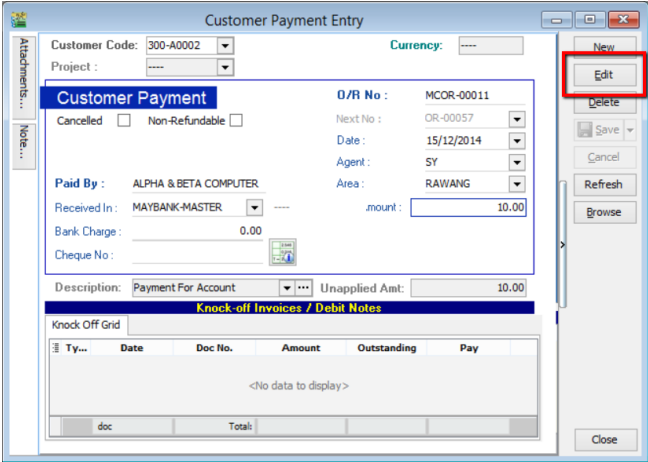
-
Right-click in the blank space next to the Customer Payment header and select Bounced Status.
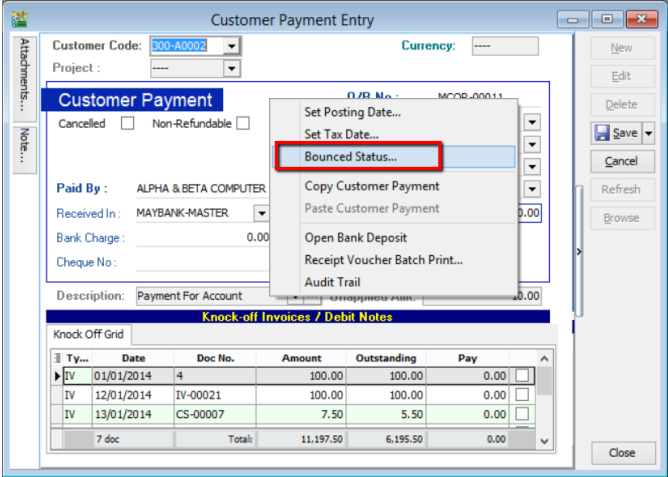
-
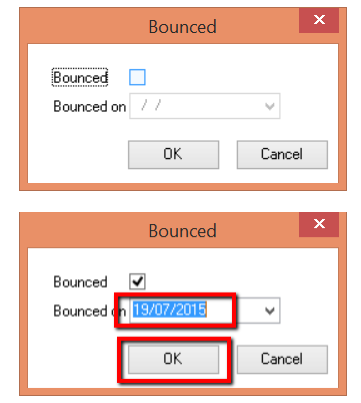
Check the Bounced box and set the Bounce Date (must be on or after the posting date). Click OK.
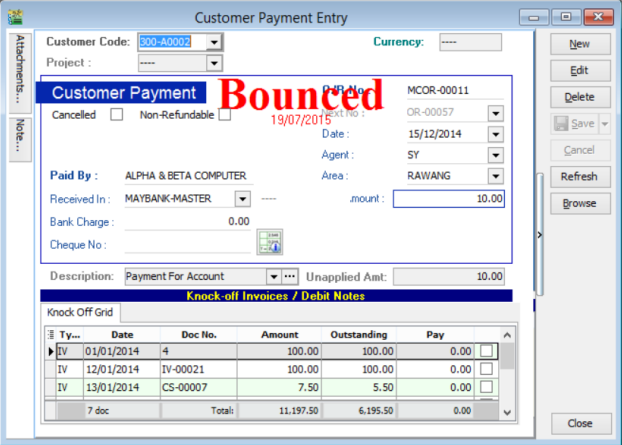
-
The document will be labeled as bounced. Click Save.
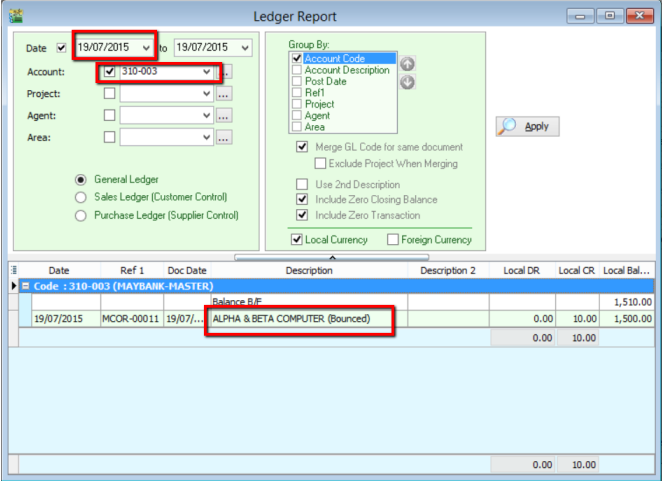
-
The Ledger Report will reflect the bounced transaction on the specified date.
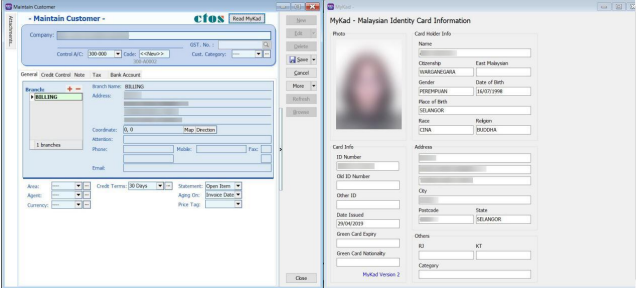
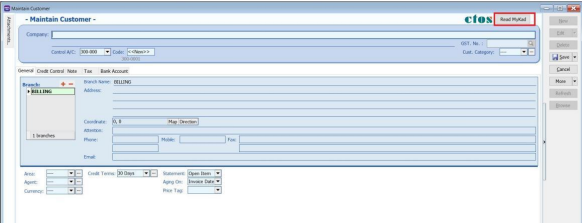
MyKad Integration
Reading Customer Info via MyKad
-
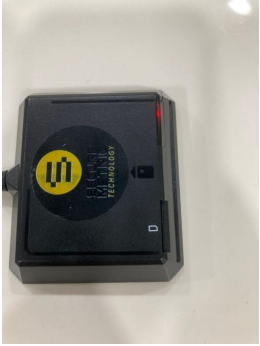
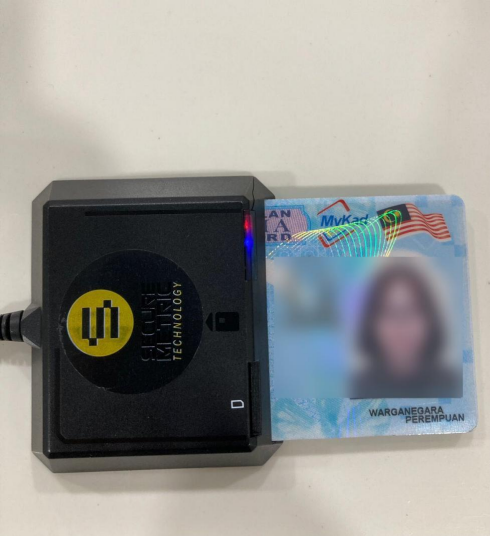
Connect your Smart Card Reader to your computer. The reader will show a red light when connected.
-
Insert the MyKad into the reader. A blue light indicates a successful read.
-
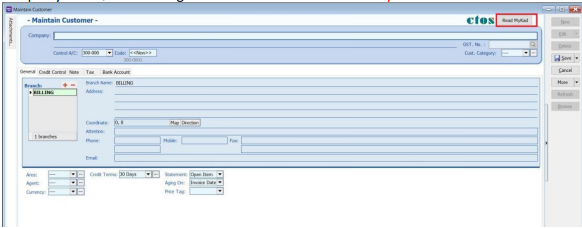
In SQL Account, go to Customer → Maintain Customer → New.
-
Click Read MyKad.
-
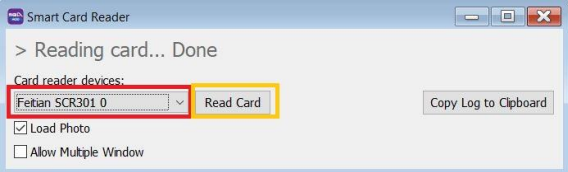
Select the Reader Device and click Read Card.
-
Click Read MyKad.
-
The system will automatically populate the Name, Address, and ID Number.