FAQ
Trial Balance Issues
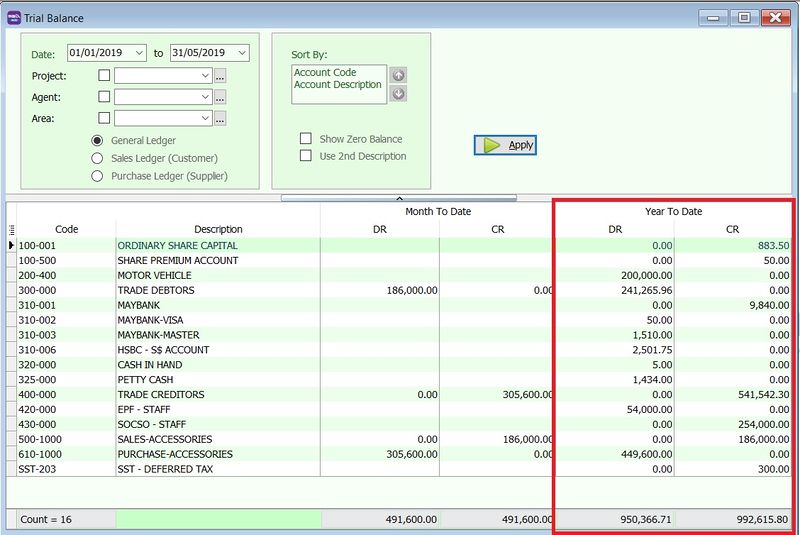
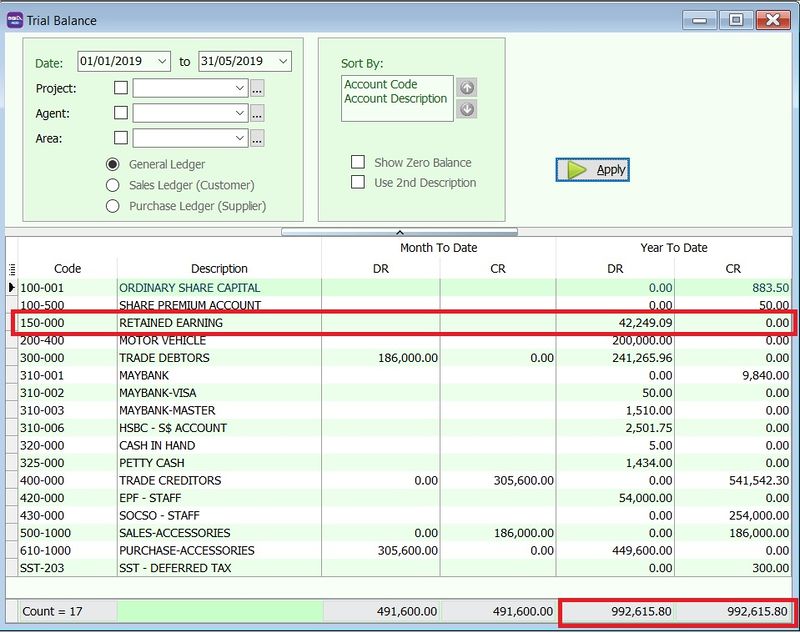
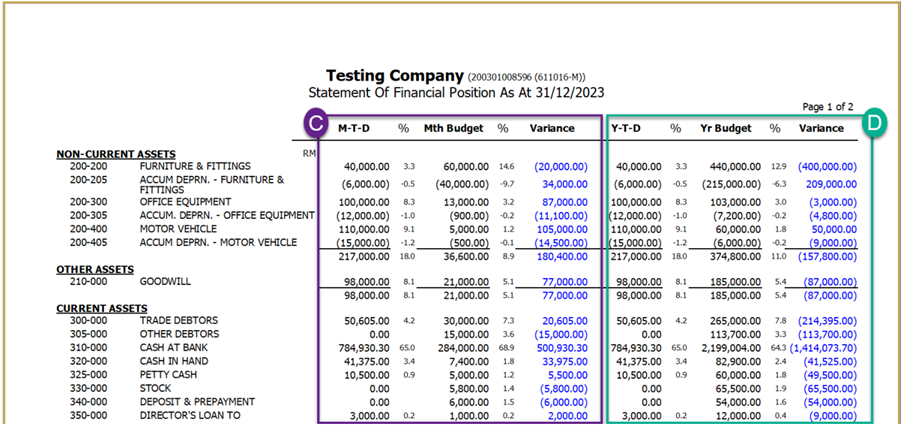
Trial Balance Does Not Balance in YTD (Year To Date)
Issue:
The Year To Date (YTD) Debit and Credit totals do not balance in the Trial Balance because the Retained Earnings account is missing.
Solution:
-
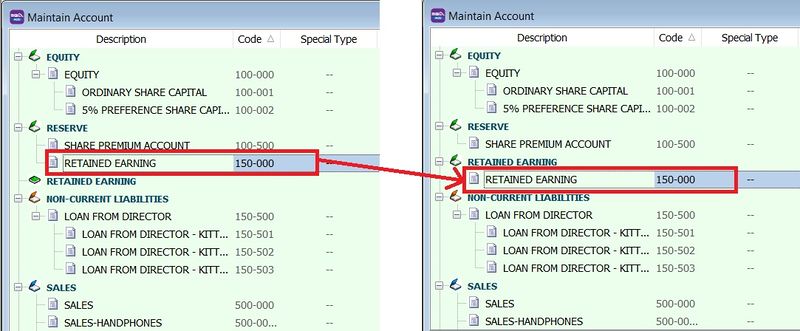
Go to GL → Maintain Account...
-
Restore the Retained Earnings account by dragging and dropping it into the Retained Earnings group (original).
-
Re-apply the Trial Balance.
-
Once the Retained Earnings account is restored, the YTD Debit and Credit totals should balance.
Trial Balance is Not Balanced��
If your Trial Balance does not balance, perform the following checks:
1. Ensure Retained Earnings has a valid Account Code
Go to GL → Maintain Account.
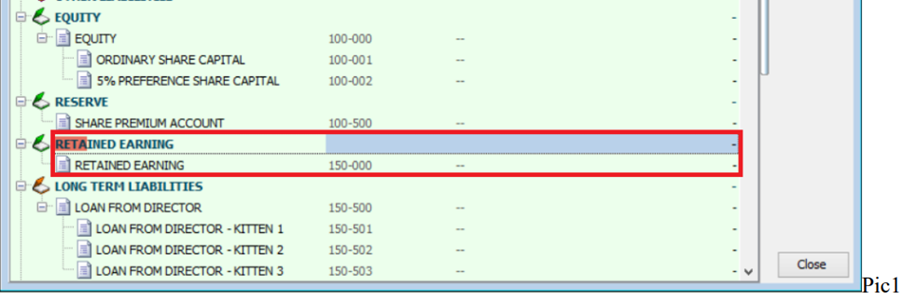
If the Retained Earnings group is empty, create an account under Reserve, then drag it into the Retained Earnings group.
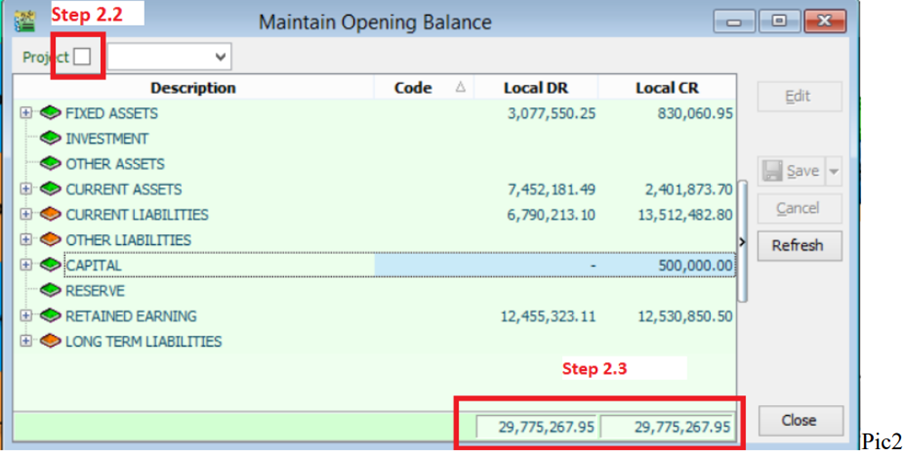
2. Ensure the Opening Balance is Balanced
-
Go to GL → Maintain Opening Balance.
-
Uncheck Project at the top left.
-
Ensure that Local DR and Local CR totals are balanced.
3. Identify Imbalances in Current Transactions
If the steps above are correct, the imbalance is likely caused by a current transaction.
- Go to GL → Print Journal of Transaction Listing.
- Select the date period that is not balanced.
- Click Preview.
- Select the report named: GL Journal-of-Transaction-Imbalance-Document.
- This report will list the specific documents causing the imbalance.
- You may need to upload a backup file to support for further investigation.
Bank and Currency Management
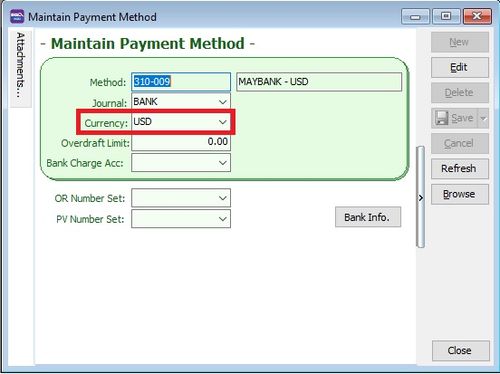
Setting a Foreign Bank Account to USD
Issue:
I cannot enter foreign bank transactions in USD.
Solution:
Ensure you have the following add-on modules:
- Multi-Currency: Allows adding multiple currency codes (e.g., USD, SGD).
- Advance Currency: Allows bank accounts to use foreign currencies.
-
Go to Tools → Maintain Payment Method...
-
Edit the Foreign Bank Account.
-
Change the currency to USD.

-
The foreign bank account will now be valued in USD. See the example below in Supplier Payment.
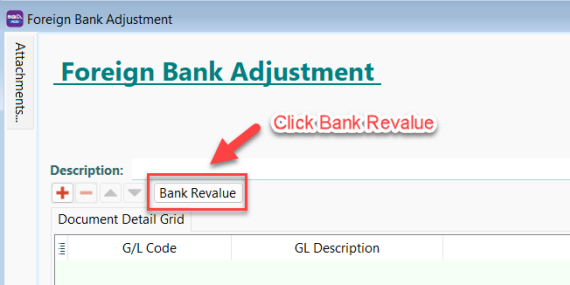
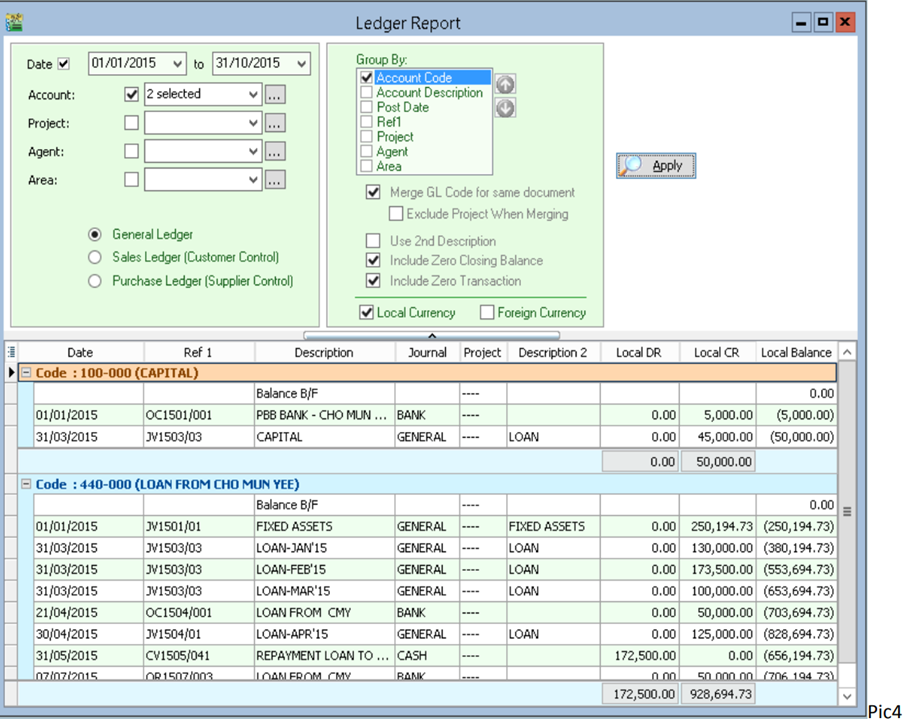
Foreign Bank Adjustment
-
Go to GL → Foreign Bank Adjustment → New → Click Bank Revalue.
-
In the Revalue window, select the Bank Account Code and Date.
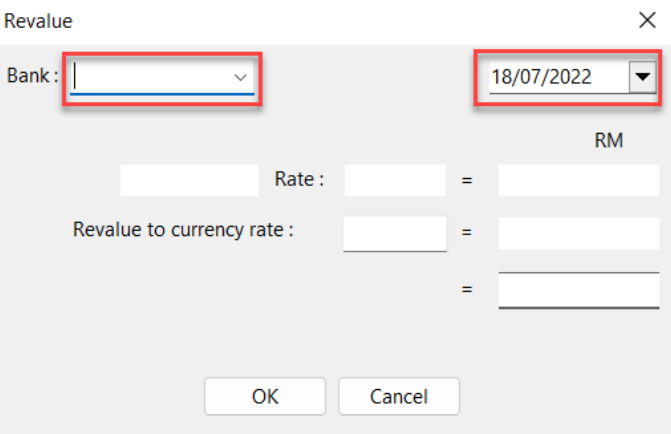
-
The USD balance and local amount will be displayed based on the ledger report.

-
Enter the Revalue to currency rate. The system will automatically recalculate:
- New local balance amount
- Gain/Loss Amount
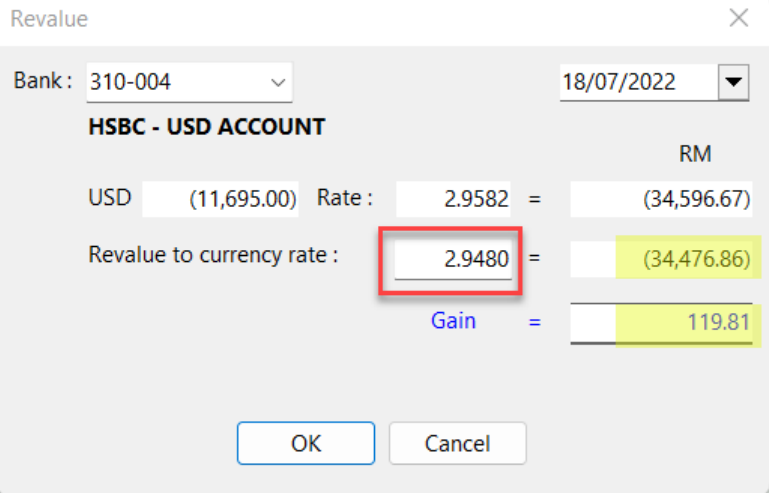
-
Click OK.
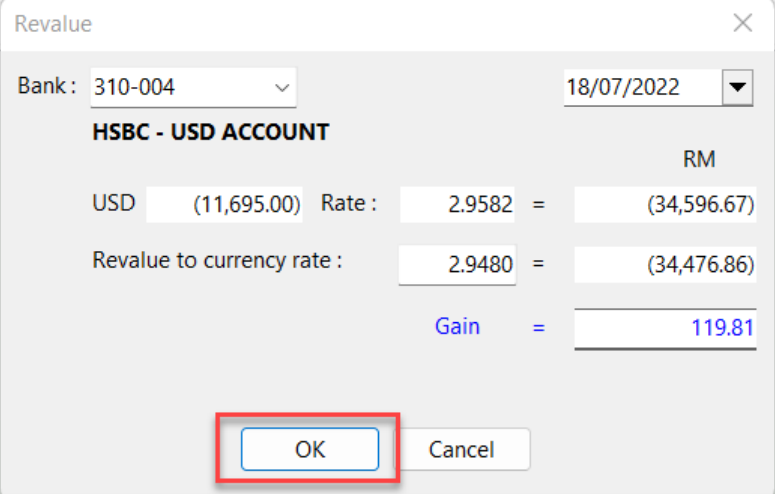
-
The system will automatically post the double entries.
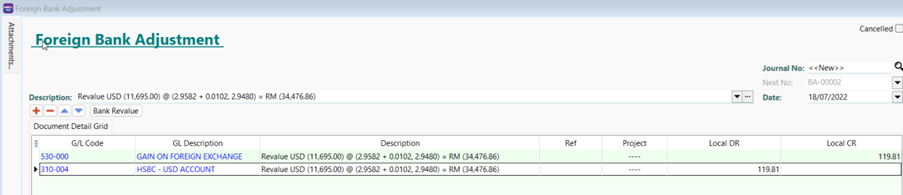
-
Click Save.
-
Verify the adjustment in the ledger report.
Fixed Assets and Depreciation
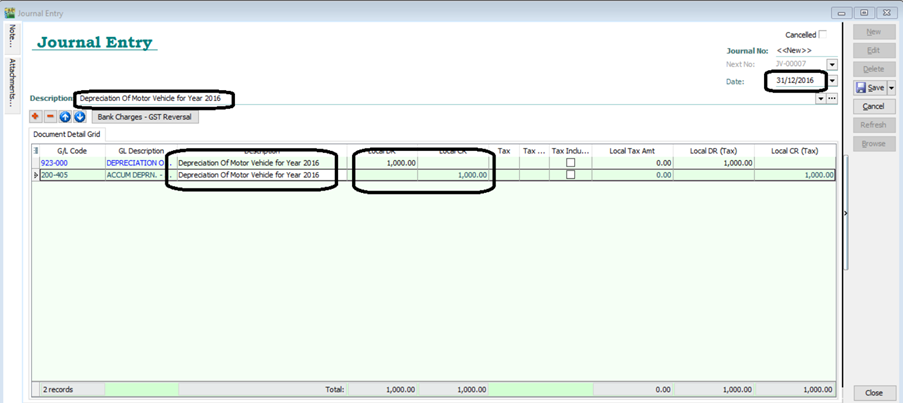
Recording Accumulated Depreciation for Fixed Assets
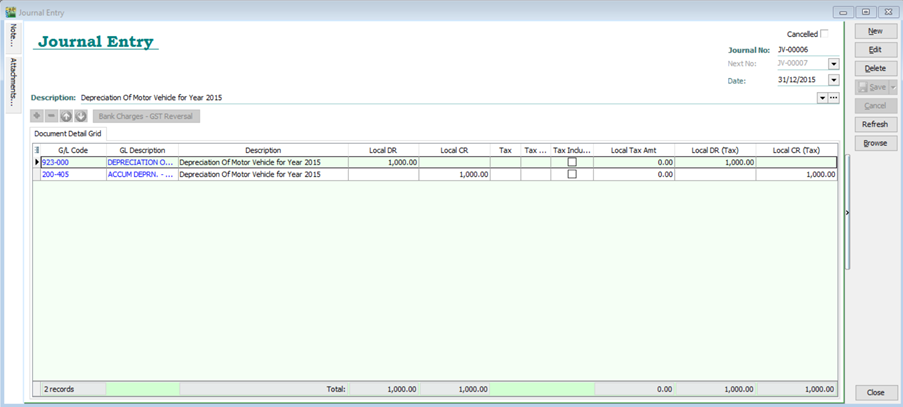
-
Go to GL → Journal Entry → New.
-
Enter the double entry for recording accumulated depreciation.
infoExample: Recording motor vehicle depreciation for the year 2015:
- Debit: Depreciation Expenses (RM 1,000)
- Credit: Accumulated Depreciation of Motor Vehicle (RM 1,000)
-
Click Save.
Copying Depreciation for Subsequent Years
-
Go to GL → Journal Entry and open the depreciation entry from the previous year (e.g., 2015).
-
Right-click on an empty space and select Copy Journal Entry.

-
Click New.
-
Right-click on an empty space and select Paste Journal Entry.
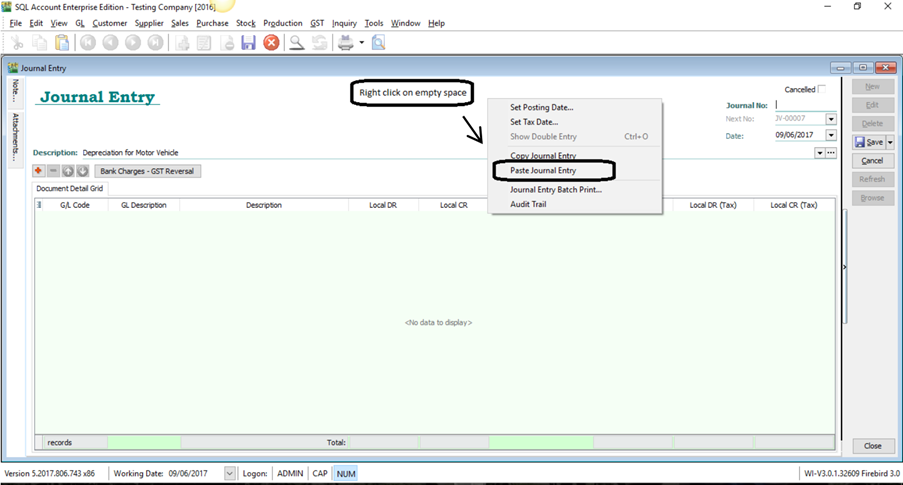
-
Update the date, description, and amount as needed.
-
Click Save.
Stock Value Management
Auto Maintain Stock Value with Project Setup
Requires SQL Account version 839 or above.
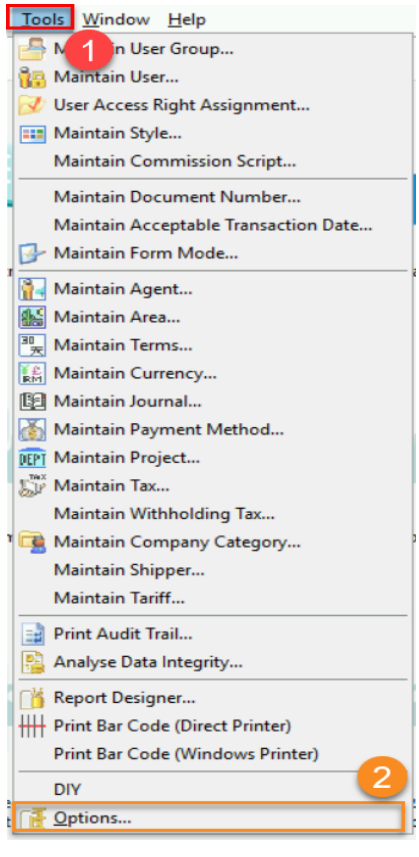
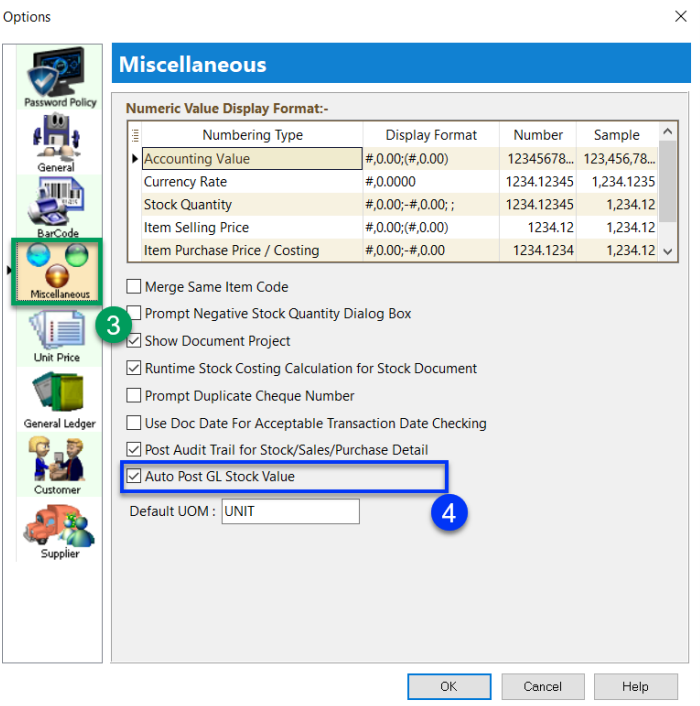
Step 1: Enable Auto Post GL Stock Value
-
Go to Tools → Options.
-
Select Miscellaneous.
-
Check Auto Post GL Stock Value.
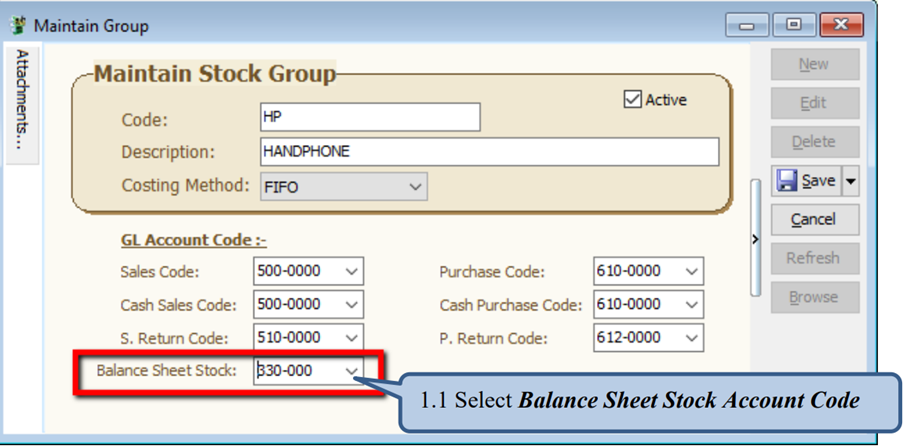
Step 2: Map Balance Sheet Stock Account
-
Go to Stock → Maintain Stock Group.
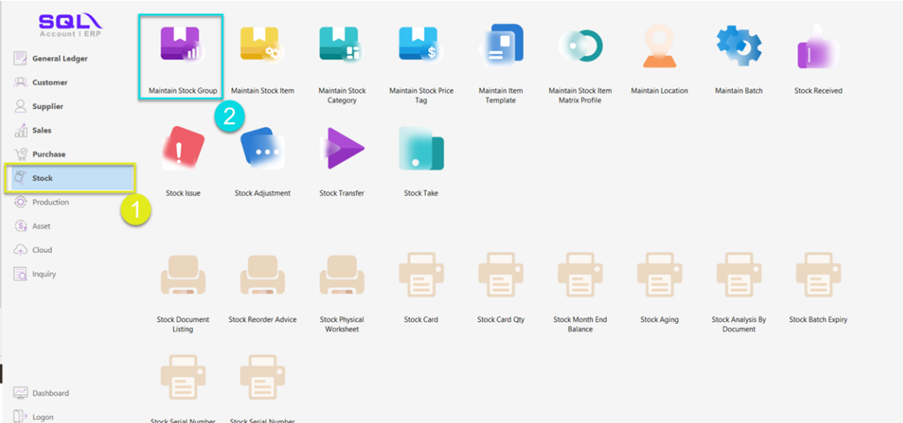
-
Click Edit.
-
Select the Account Code for Stock Value Posting.
-
Click Save.
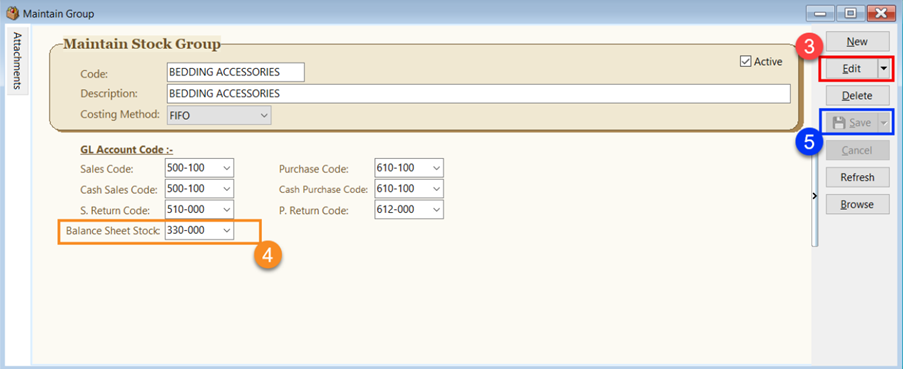 note
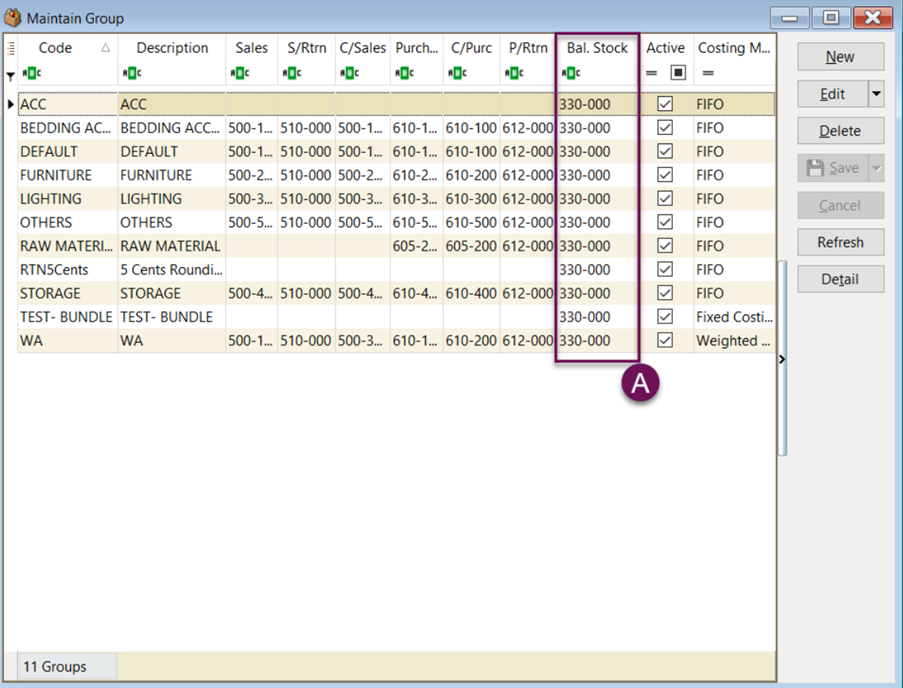
noteEnsure all Stock Groups are mapped to a Balance Sheet Account Code.
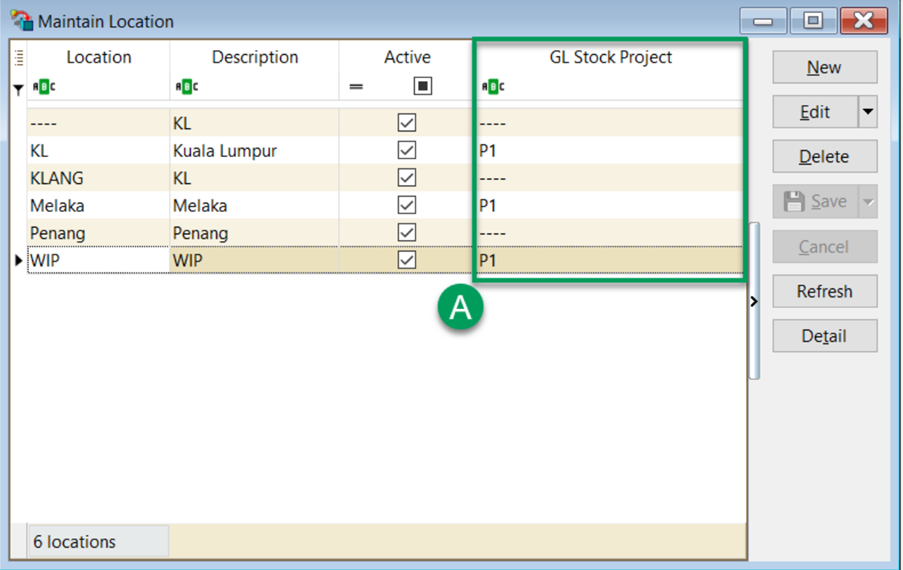
Step 3: Map Project Code in Maintain Location
-
Go to Stock → Maintain Location.
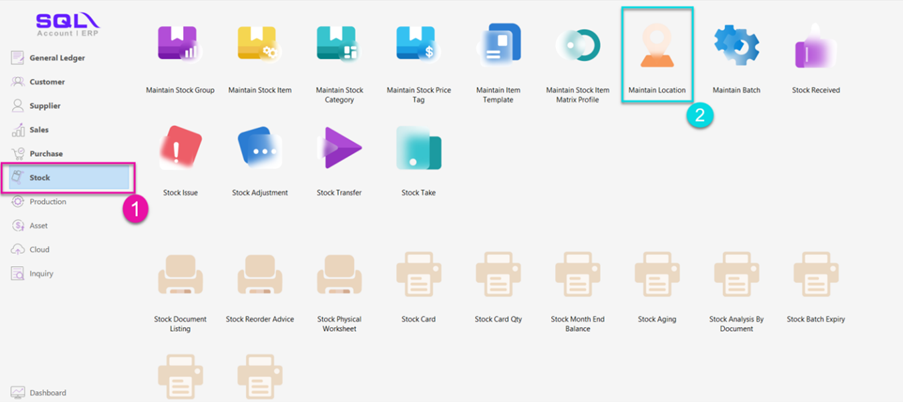
-
Click Edit.
-
Assign a stock project to each location.
-
Click Save.
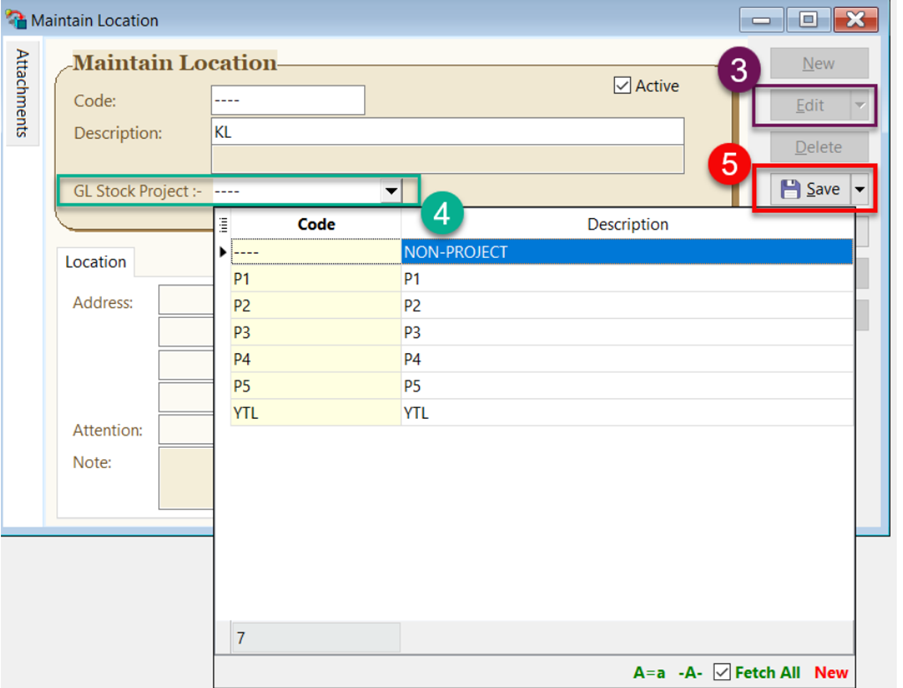 info
infoEnsure all locations are mapped to a Project Code.
 note
noteYou may skip this step if you only use one project.
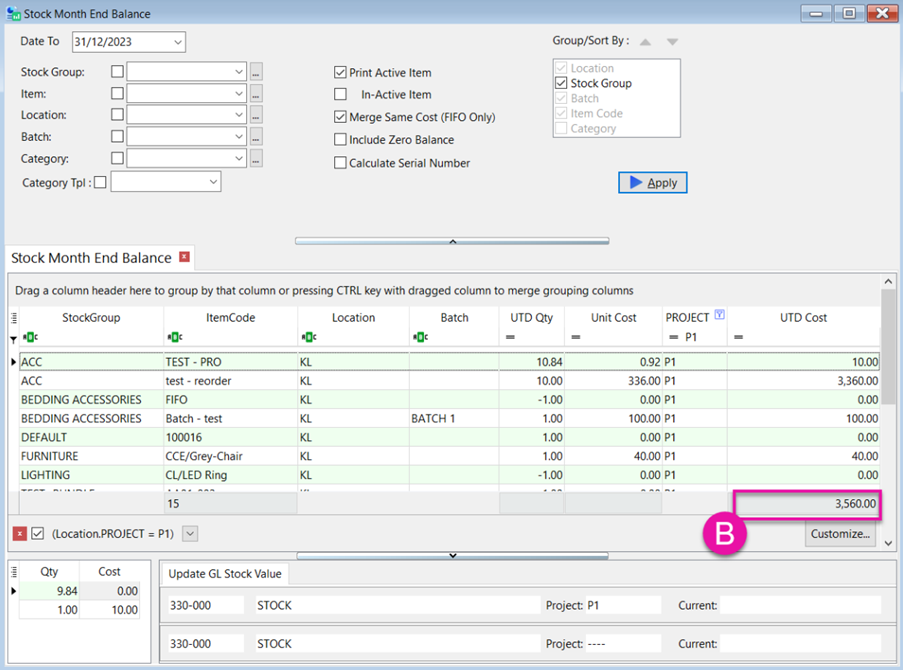
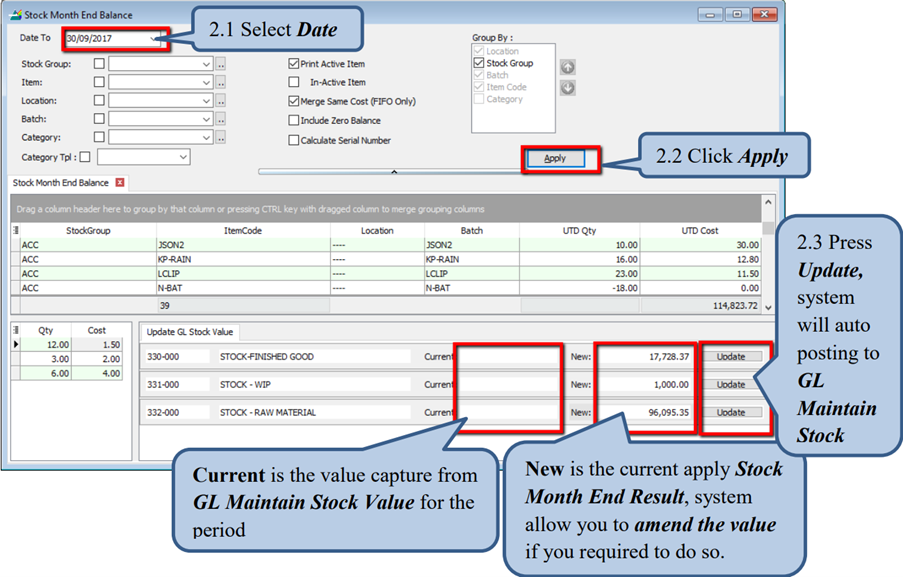
Step 4: Maintain Stock Month End
This step shows the total stock value for the default project and specific projects (e.g., P1).
Project Code: ---- Closing Stock: 308,534.22

Project Code: P1 Closing Stock: 3,560.00
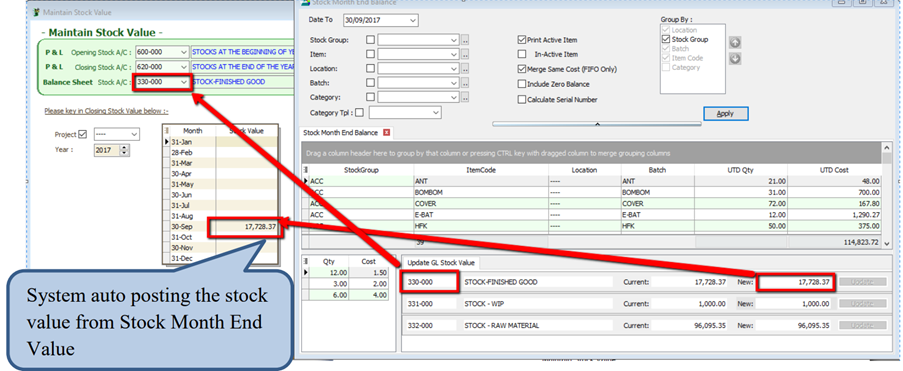
Step 5: Automatic Stock Value Updates in Financial Reports
When you apply a Profit & Loss Statement, Balance Sheet, or Trial Balance, the system automatically retrieves the stock value from the Stock Month End Balance and updates the closing stock value in Maintain Stock Value.
-
Example of a Balance Sheet Statement showing the Closing Stock Value.
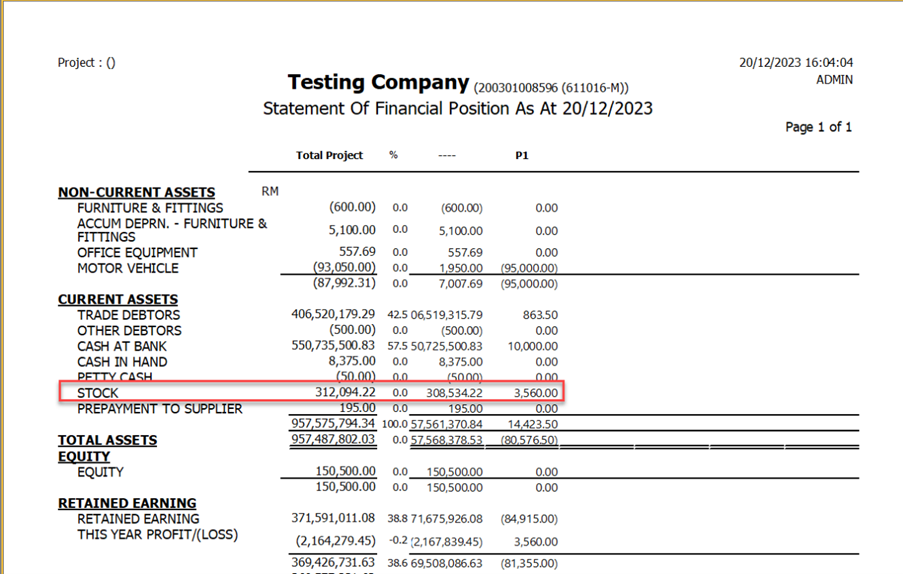
If the date falls outside the Maintain Acceptable Trans Date range, the system will not retrieve the stock value or perform the update.
Auto Post Stock Month End Value Setup
Requires SQL Account version 748 or above.
This feature automatically posts the stock value from the Month End value to the GL Maintain Stock Value.
Step 1: Configure Stock Groups
Go to Stock → Maintain Stock Group.
Step 2: Generate Stock Month End Balance Report
Go to Stock → Print Stock Month End Balance Report.
You must fill in the Balance Sheet Account in the Stock Group to update the GL Stock Value.
Step 3: Verify in Maintain Stock Value
Go to GL → Maintain Stock Value.
Bank Reconciliation
Auto Bank Reconciliation Example
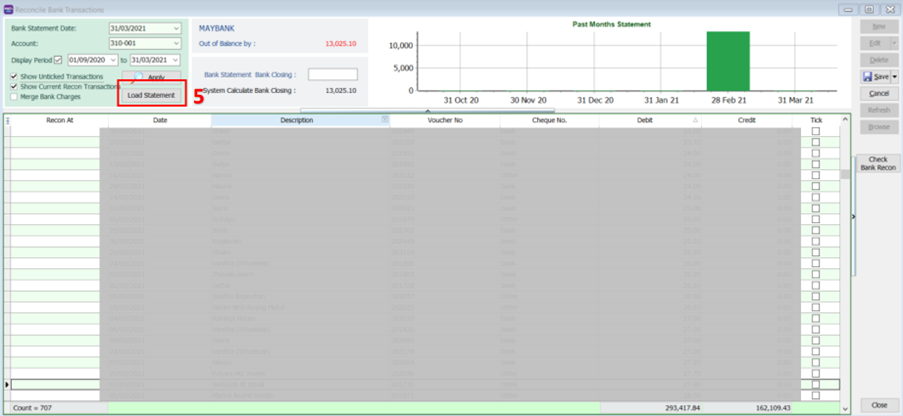
Step 1: Create a New Bank Reconciliation
-
Go to GL → Bank Reconciliation → New.
-
Select the Bank Statement Date.
-
Select the Account.
-
Check Show Current Recon Transactions.
-
Click Apply.
-
Click Load Statement.
-
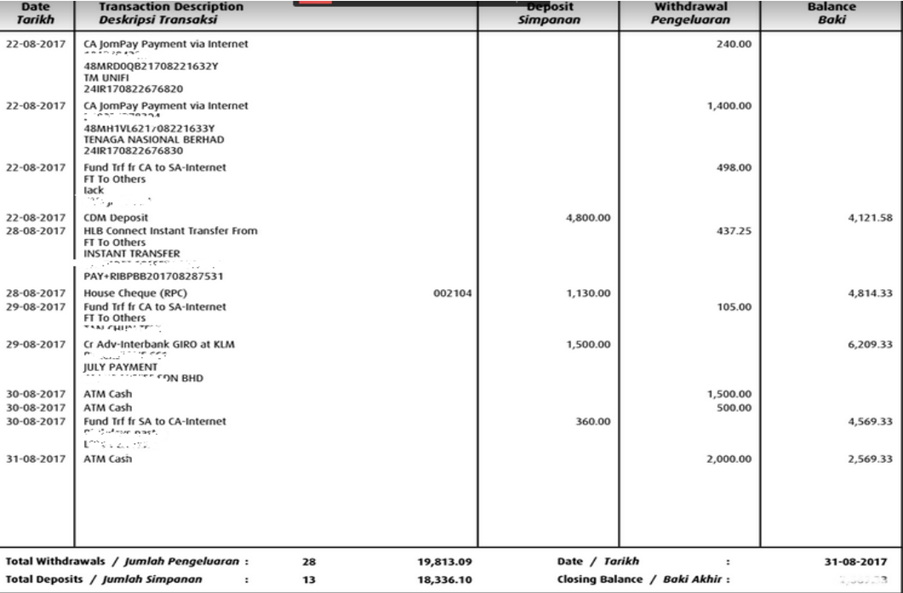
Select your Bank Statement (PDF / CSV).
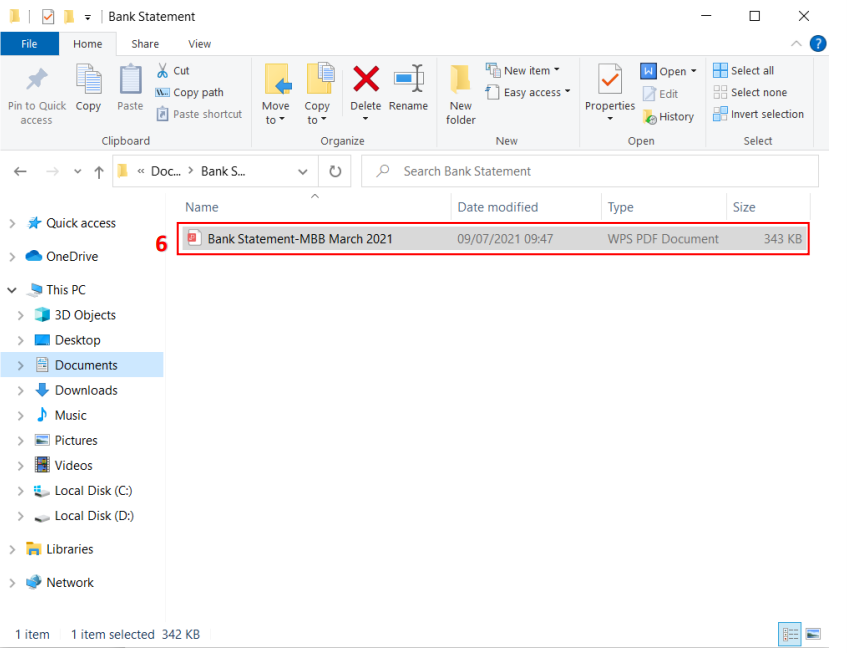
-
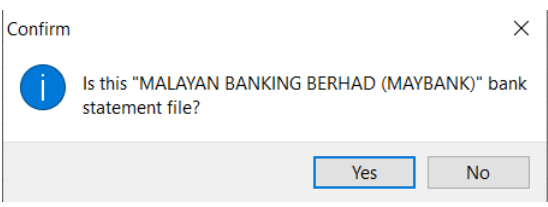
The system will detect your bank name and prompt a confirmation message. Click Yes if it is correct.
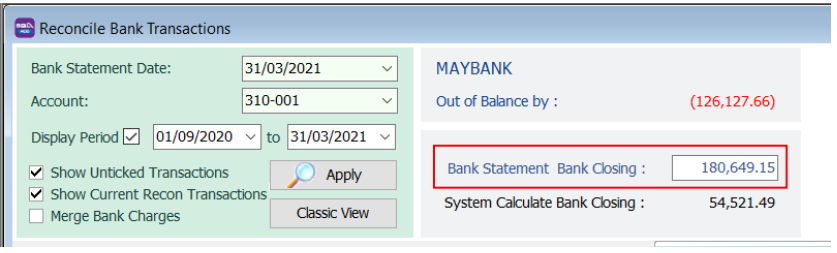
-
Once the statement is loaded, the bank closing amount will be automatically filled.
 info
infoMatching Criteria:
- Cheque number + Amount
- Description + Amount
-
The system will automatically match transactions with the bank statement and check them (highlighted in yellow).
Transactions that cannot be auto-matched will remain unchecked (indicated by the red box).
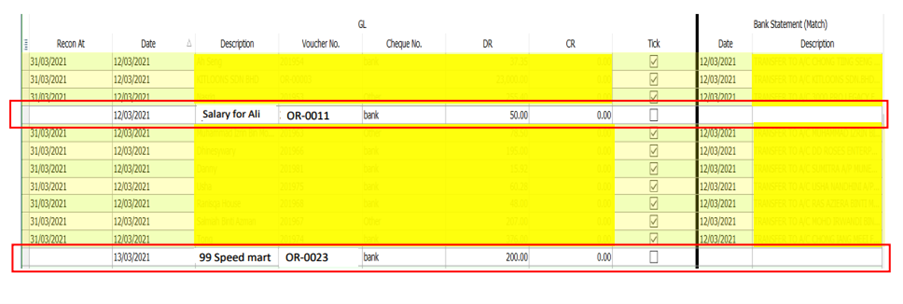
Step 2: Manually Match Unmatched Transactions
-
Select an unmatched transaction.
-
At the bottom, search for SAME DR/CR AMOUNT. You will see one or more Match buttons if matching amounts are found.
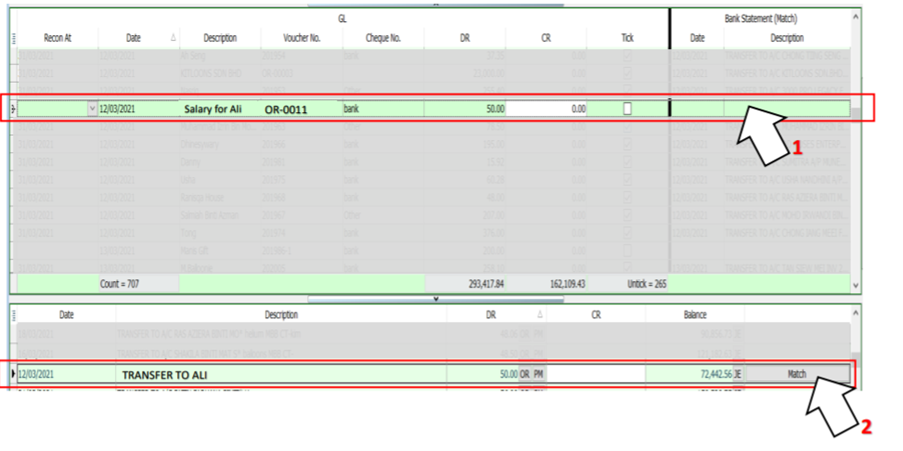
-
Click Match when you identify the correct bank transaction (e.g., Salary for Ali).
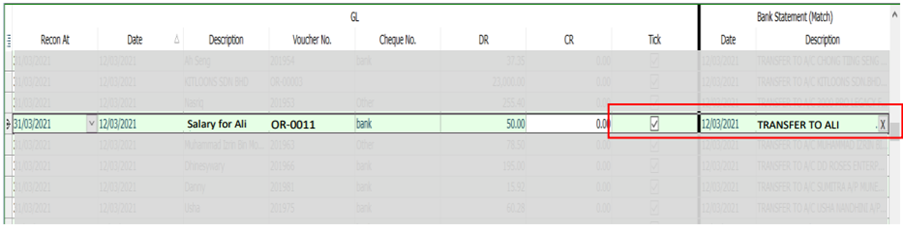
The system will then check the transaction and display the date and bank description in the Bank Statement (Match) column.
Manual Bank Reconciliation Example
For Opening Bank Reconciliation, please refer to this Guide.
Bank reconciliation ensures that the company's records (check register, General Ledger, Balance Sheet, etc.) match the bank's records.
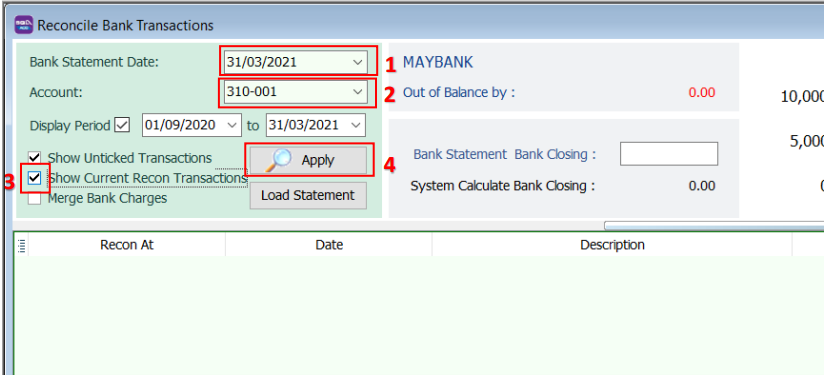
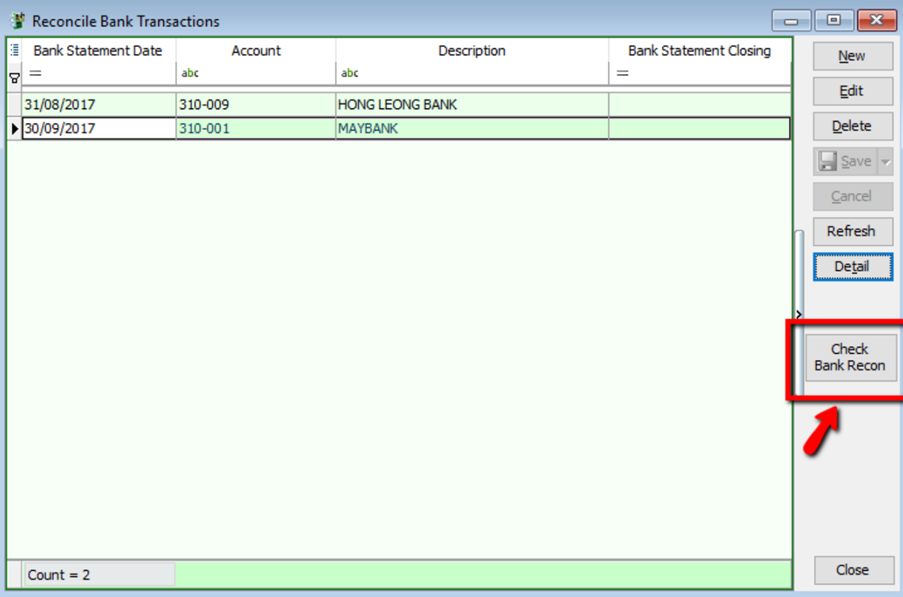
Reconciling Bank Transactions
-
Go to GL → Bank Reconciliation.

-
Select the Bank Statement Date.
-
Select the Bank Account (e.g., Hong Leong Bank).
-
Set the Display Period (typically, the 'From' date is left blank, and the 'To' date matches the Bank Statement Date).
-
Check the following options:
- Show Unticked Transaction
- Show Current Recon Transaction
- Merge Bank Charges
-
Click Apply.
-
Check the transactions that match your bank statement and click Save.
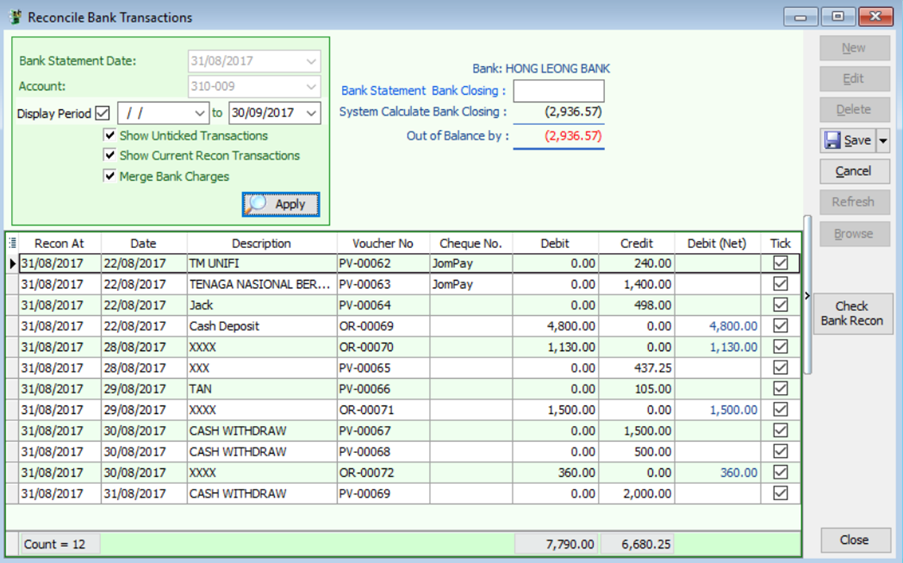
Printing the Bank Reconciliation Report
After completing the reconciliation, you can save and preview the report.

Press F6 to preview the report.
Financial Analysis and Reporting
How to Calculate Profit & Loss Statement Percentages
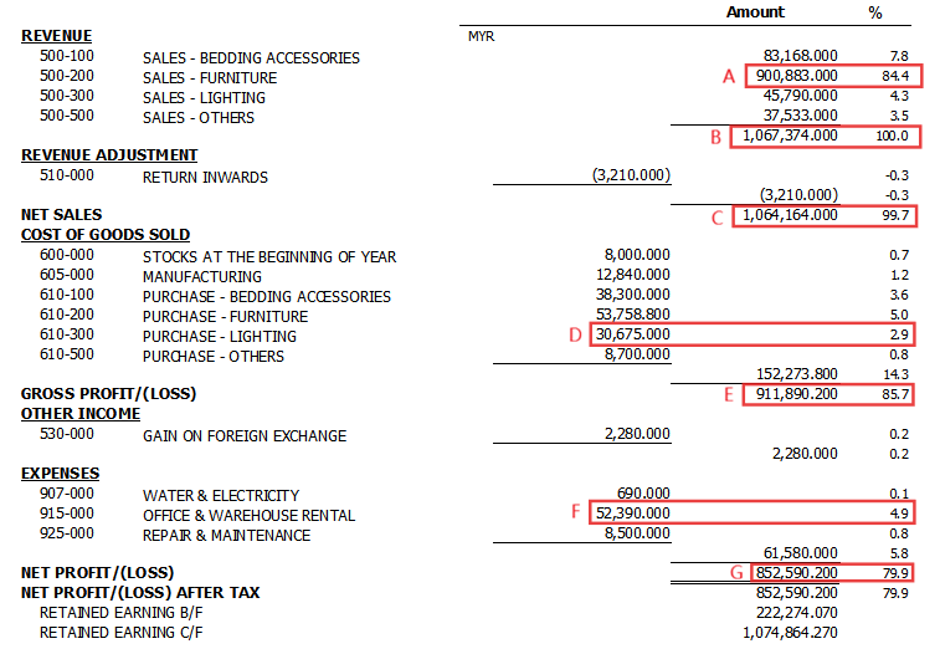
Formula:
Sales, Purchase, Expenses, Net Profit (%) = (Account Amount / Total Sales) * 100
Gross Profit (%) = (Account Amount / Net Sales) * 100
Examples
- Sales % (A): (900,883.00 / 1,067,374.00) * 100 = 84.4%
- Purchase % (D): (30,675.00 / 1,067,374.00) * 100 = 2.9%
- Gross Profit % (E): (911,890.20 / 1,064,164.00) * 100 = 85.7%
- Expenses % (F): (52,390.00 / 1,067,374.00) * 100 = 4.9%
- Net Profit % (G): (852,590.20 / 1,067,374.00) * 100 = 79.9%
Percentages are rounded to one decimal point.
P&L Statement for More Than 12 Months
-
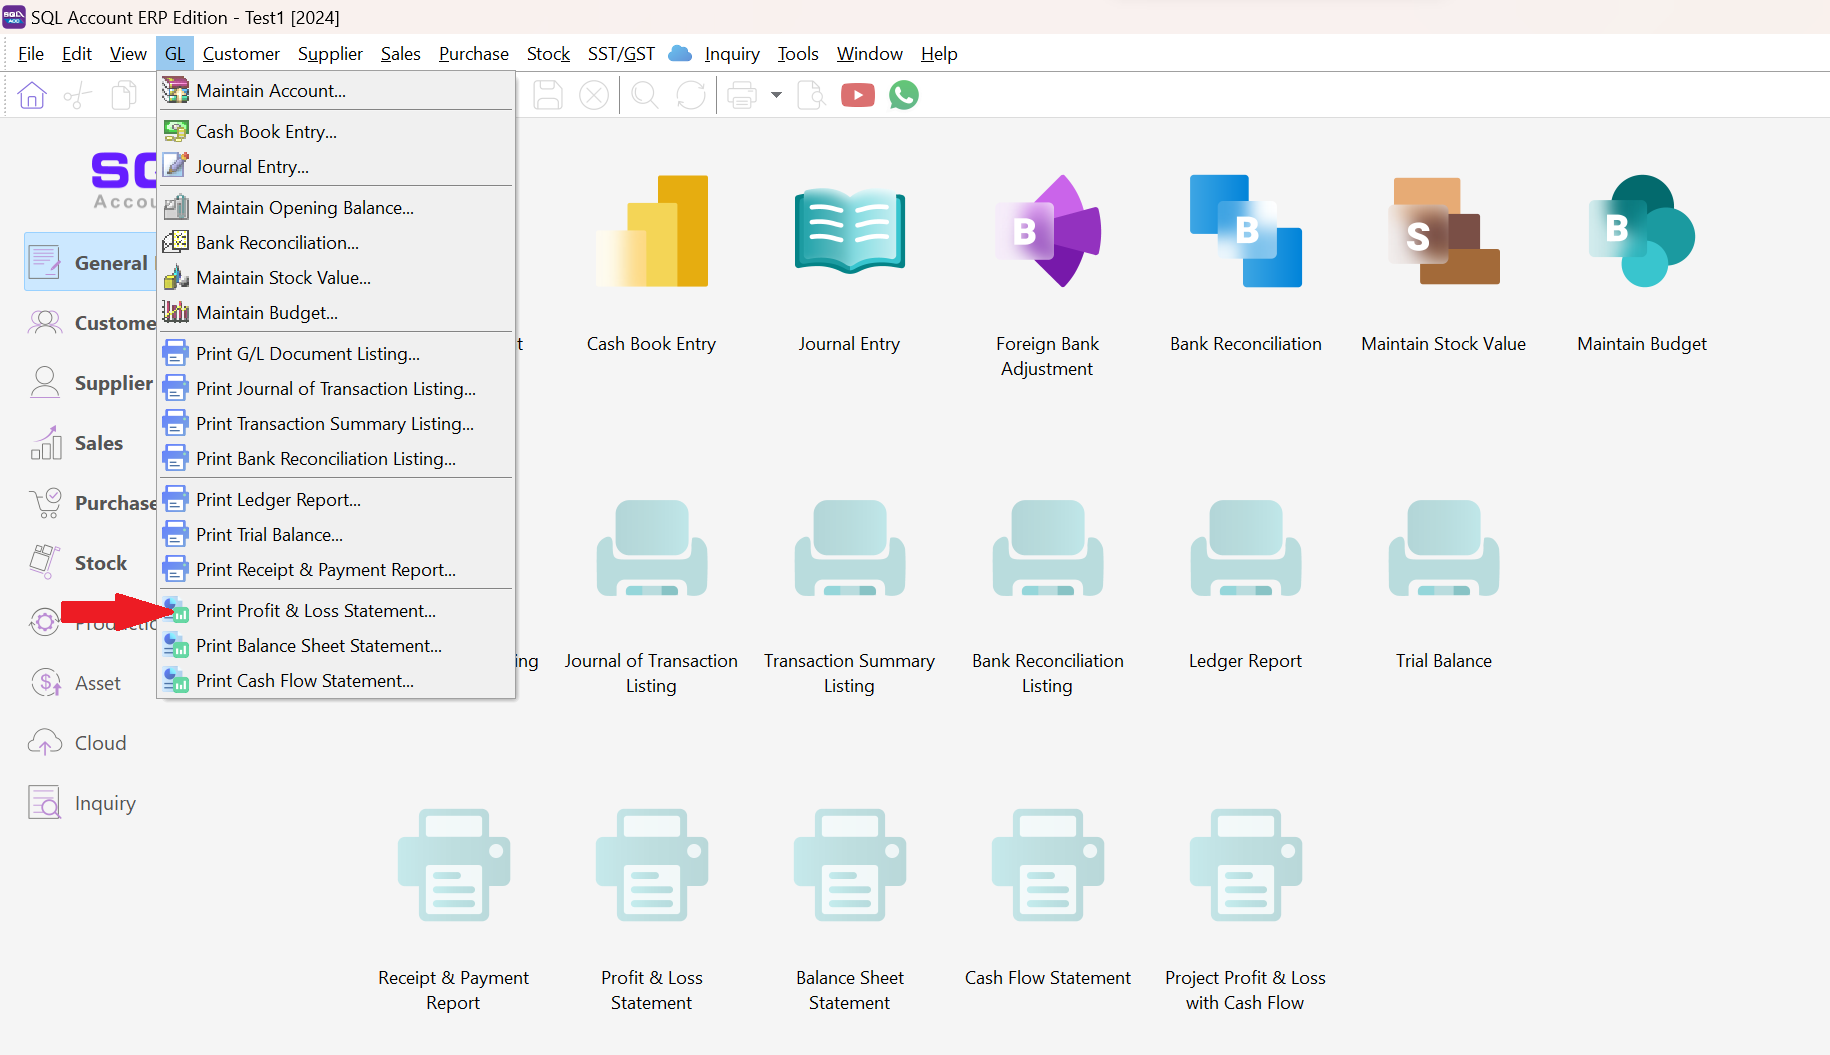
Go to GL → Print Profit & Loss Statement.
-
Right-click the SQL Icon and select 800 x 600 to resize the screen.
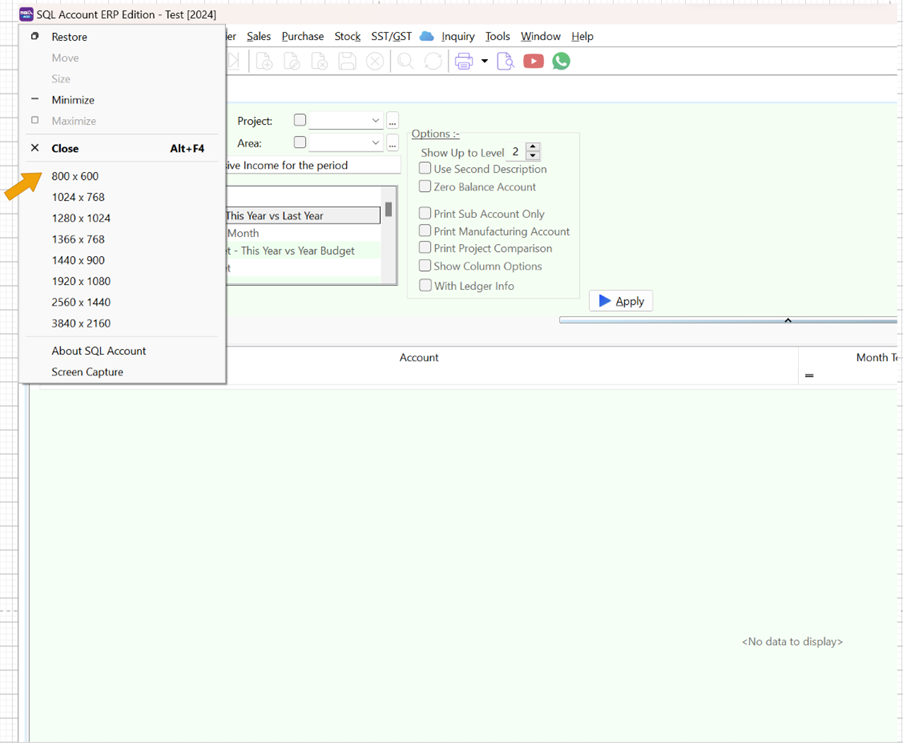
-
Drag the report name This Year - 2 Column to your desktop.
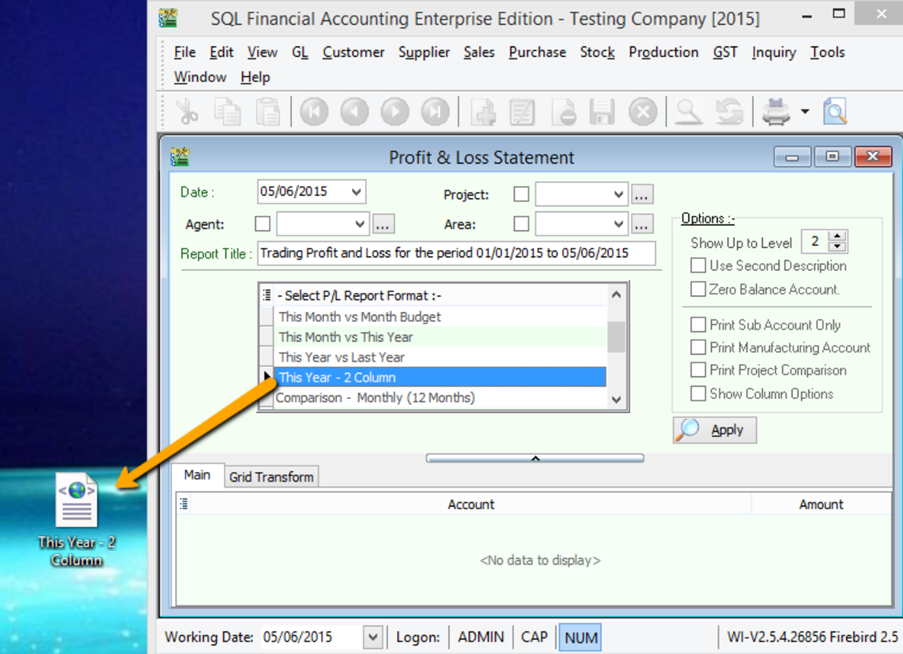
-
Drag the report from your desktop back into the SQL Account window.
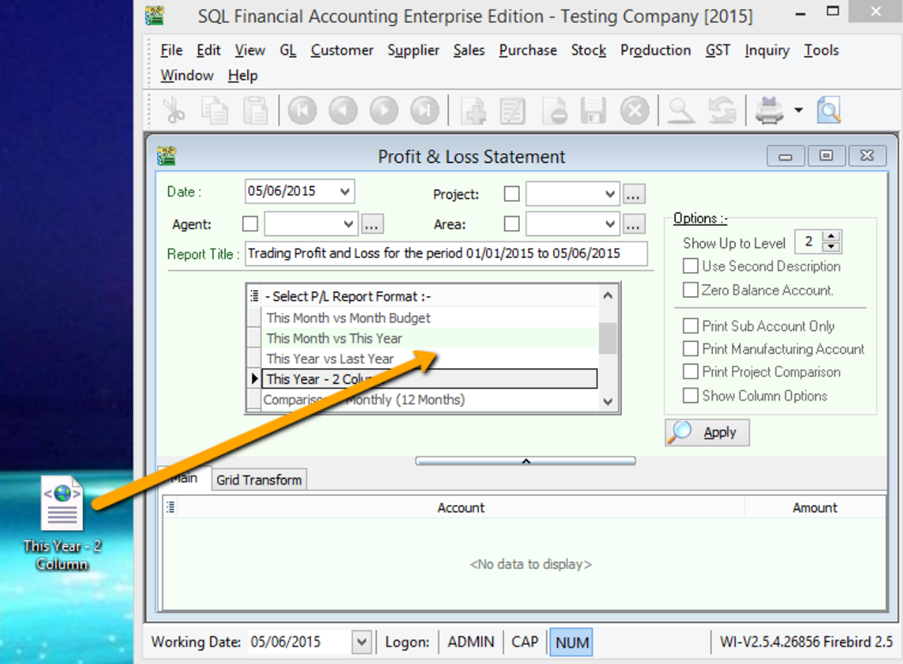
-
Click OK when prompted.
-
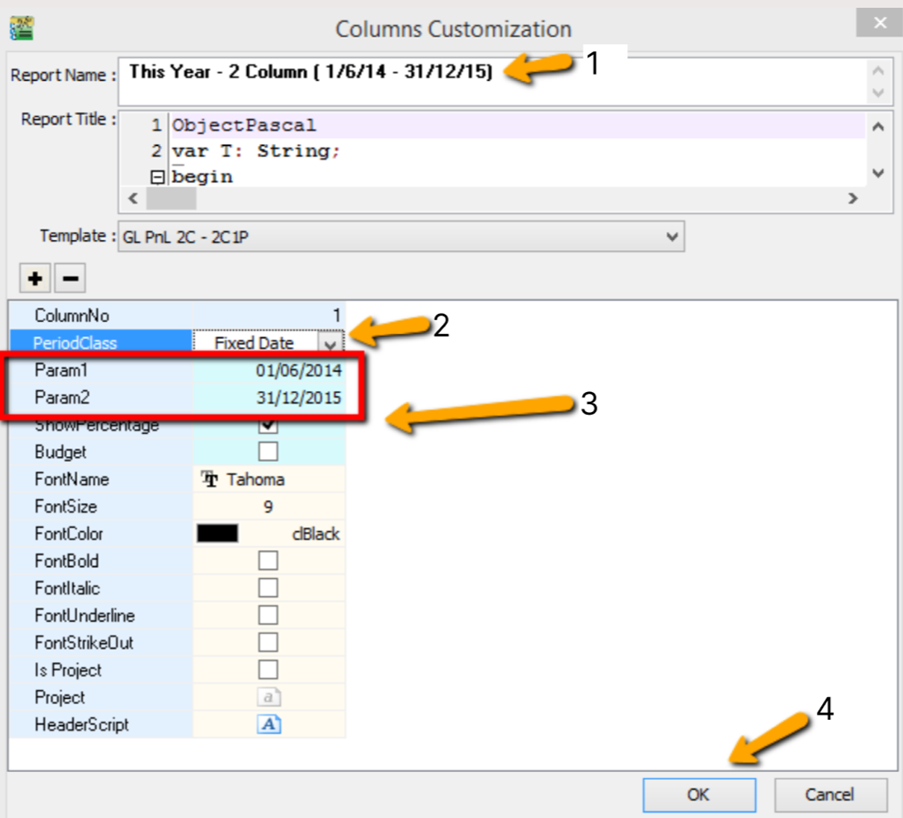
Double-click the report name This Year - 2 Column (displayed in blue).
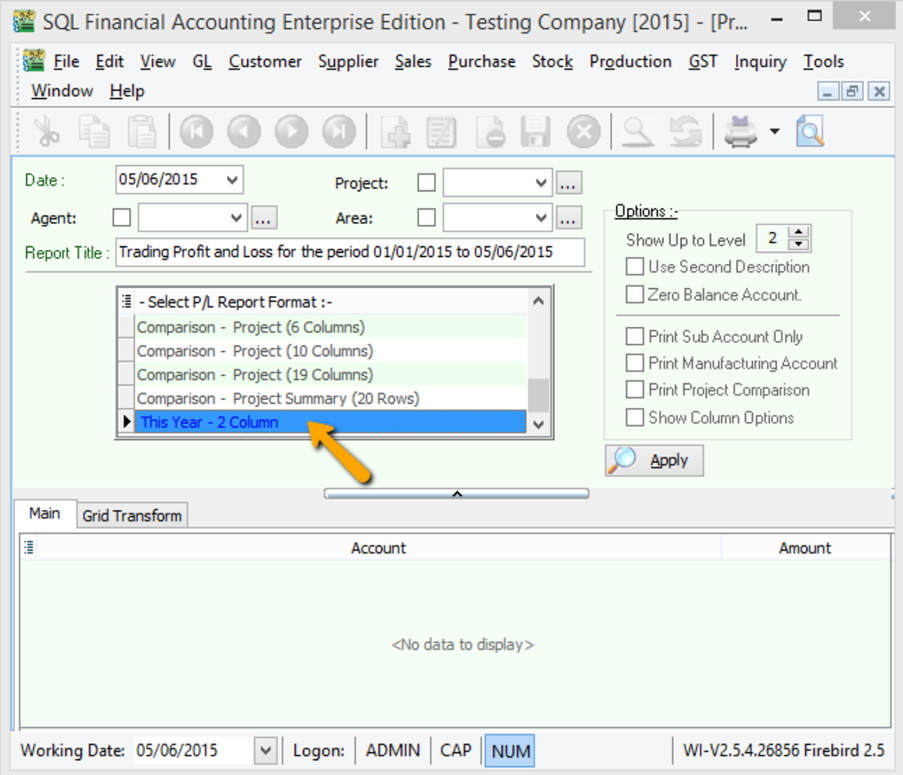
- Enter a new report name.
- Change the period class to Fixed Date.
- Set Param 1 (Date From) and Param 2 (Date To).
- Click OK.
Apply the report as usual; the results will be based on the parameters set. You can repeat these steps for the Balance Sheet Statement.
P&L Statement with Appropriation Account
-
Go to GL → Maintain Account.
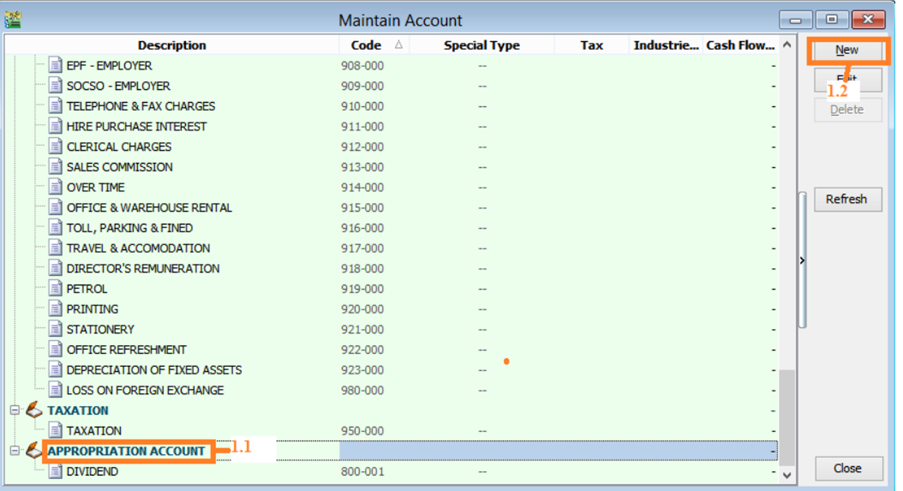
-
Select the Appropriation Account.
-
Click New.
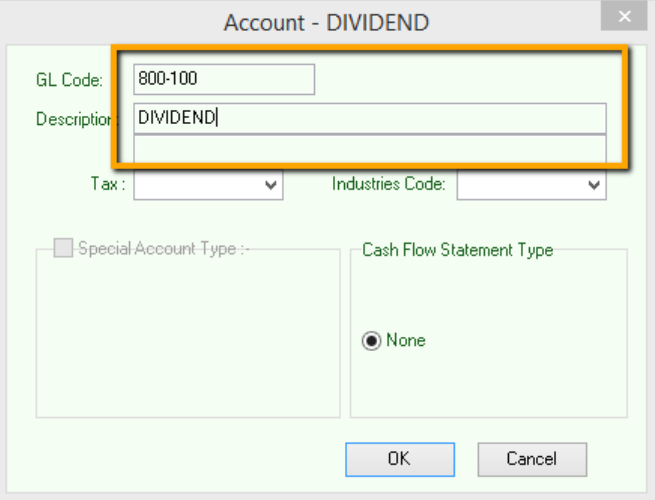
-
Enter the GL Code and Description, then click OK.
-
-
Go to GL → Journal Entry → New.
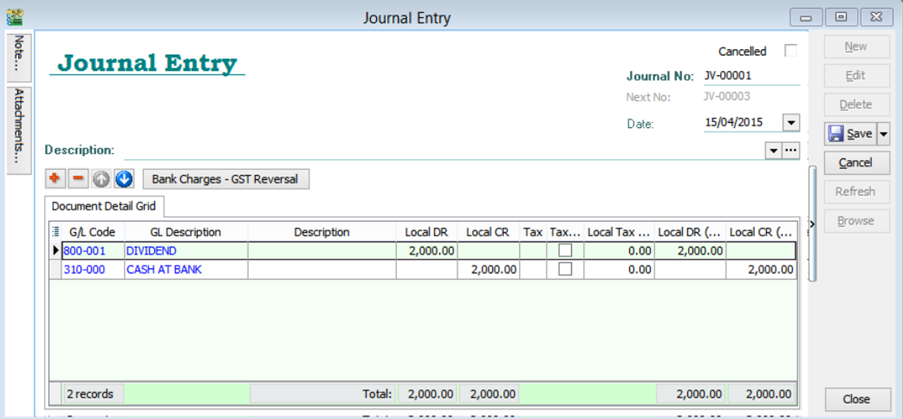
Example: Debit Dividend (2,000), Credit Bank (2,000).
-
Go to GL → Print P&L Statement.
-
Select the Date.
-
Select the report format: This Year – 2 Column.
-
Click Apply.
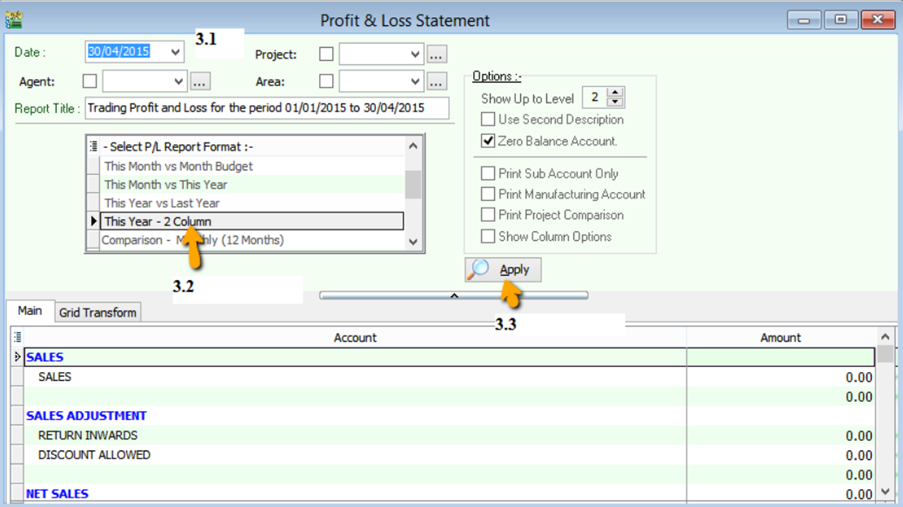
-
Click Preview.


-
Troubleshooting and Other FAQs
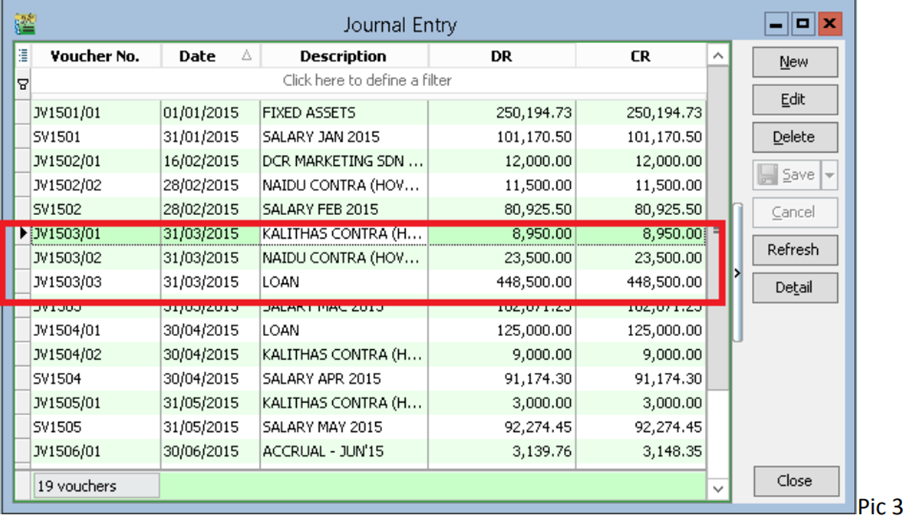
General Ledger Report Ref1 (DocNo) Appears as <<New>>
If Ref1(DocNo) appears as <<New>> in the General Ledger Report, follow these steps to fix it:
-
Identify the document source and date (e.g., 31/03/2015).
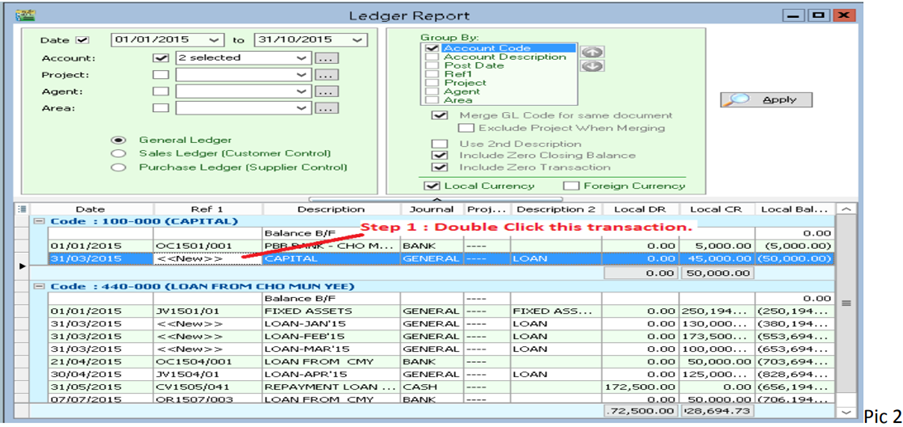
-
Go to Journal Entry and locate the entries for that date.
-
Click Edit and then Save for all entries on that date.
-
Re-apply the ledger report to verify the fix.
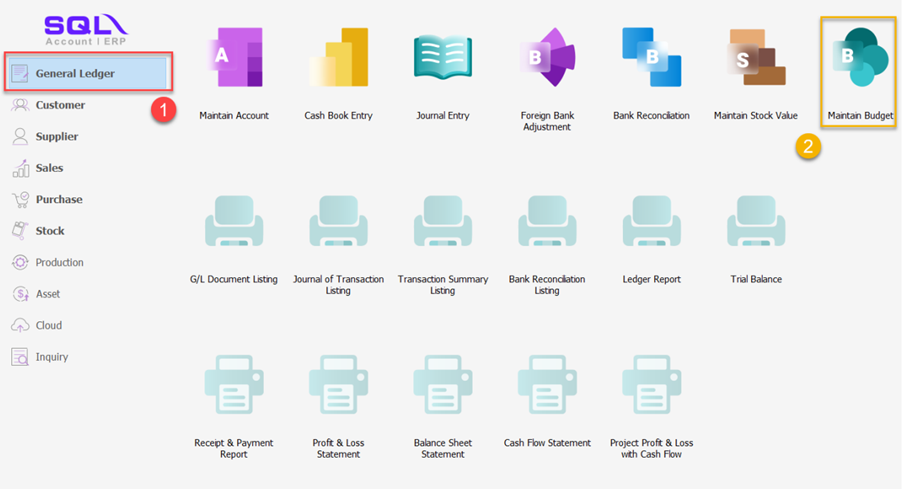
Budget Management
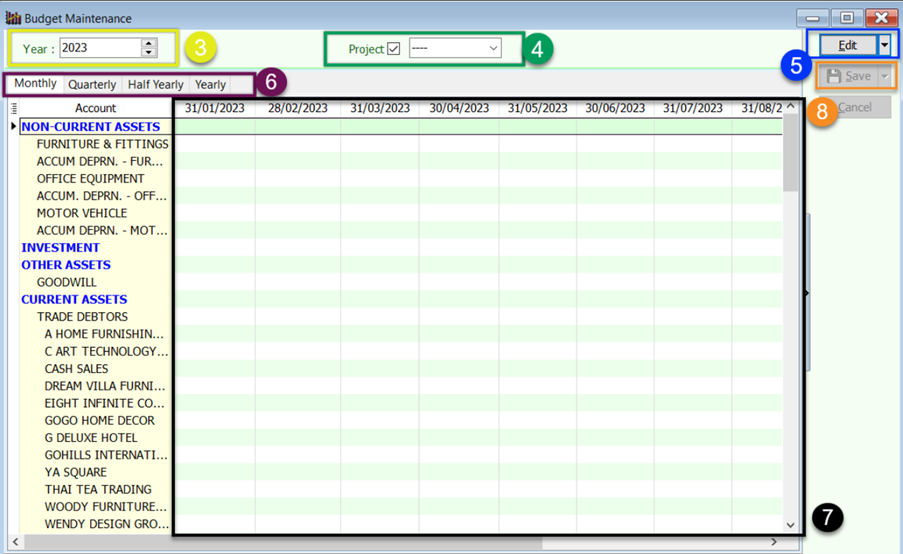
Budget Setting
-
Go to GL → Maintain Budget.
-
Select the Year.
-
Choose a Project Code or select 'Non Project'.
-
Click Edit.
-
Enter monthly budget amounts; quarterly, half-yearly, and yearly totals will update automatically.
-
Enter budgets by account code.
-
Click Save.
Profit & Loss Statement with Budget
You can compare actuals against monthly or yearly budgets using various report formats:
-
This Month vs. Monthly Budget
-
This Year vs. Yearly Budget
-
This Year vs. Last Year Budget

Balance Sheet Statement with Budget
Similar to the P&L, the Balance Sheet supports budget comparisons:
-
This Month vs. Monthly Budget
-
This Year vs. Yearly Budget
Withholding Tax
Setup Withholding Tax Account
Go to GL → Maintain Account. Create a Withholding Tax Payable account under Current Liabilities.
| GL Account | Description | Remark |
|---|---|---|
| 460-XXX | Withholding Tax Payable | Under Current Liabilities |
Maintain Withholding Tax Codes
Go to Tools → Maintain Withholding Tax.
-
Click New.
-
Enter the following details:
- Code: e.g., WTH-TAX15
- Description: e.g., Withholding Tax 15%
- Tax Rate: 15%
- Tax Account (DR): Leave blank to follow document accounts.
- Tax Account (CR): Select the Withholding Tax Payable account.
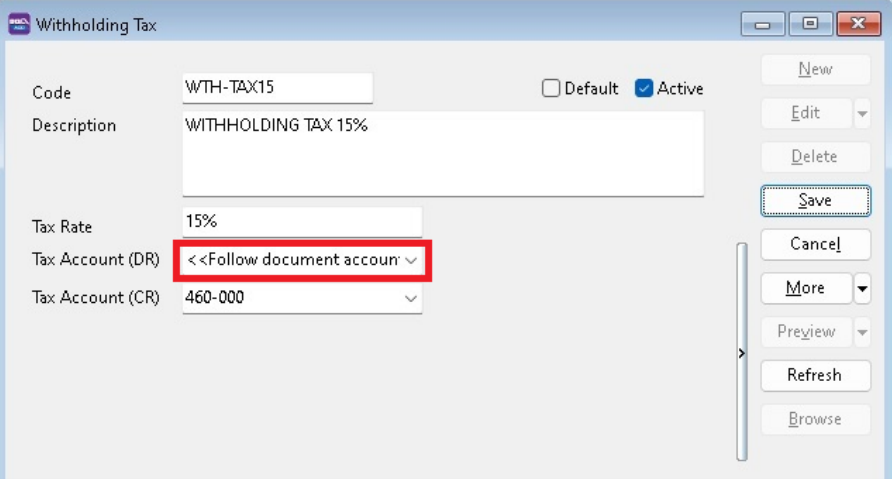
-
Click Save.
Withholding Tax Purchase Entry
Available in Purchase Invoice, Cash Purchase, Purchase Debit Note, and Purchase Returned.
-
In the document entry, insert the following columns:
- WH Local Tax Amt
- WH Tax
- WH Tax Rate
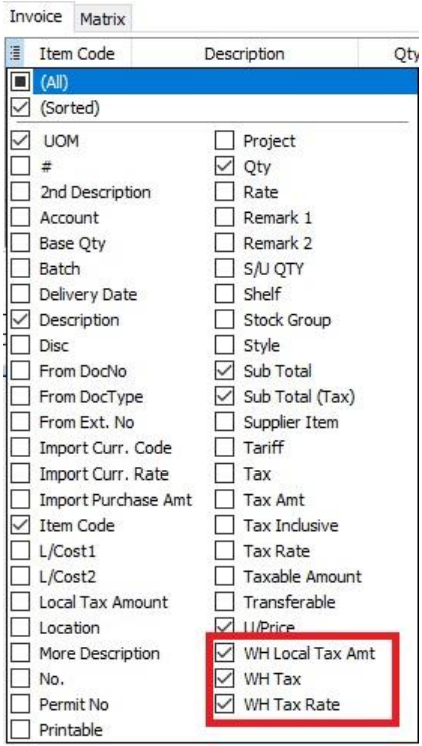
-
Select the WH Tax code.
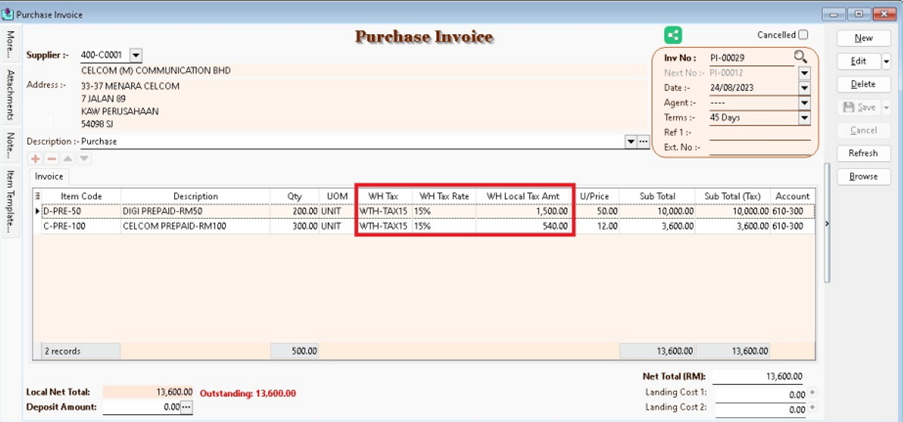
-
The system will automatically post the double entry. Press Ctrl + O to verify.
GL Description Local DR Local CR Expenses Account XXX Withholding Tax Payable XXX 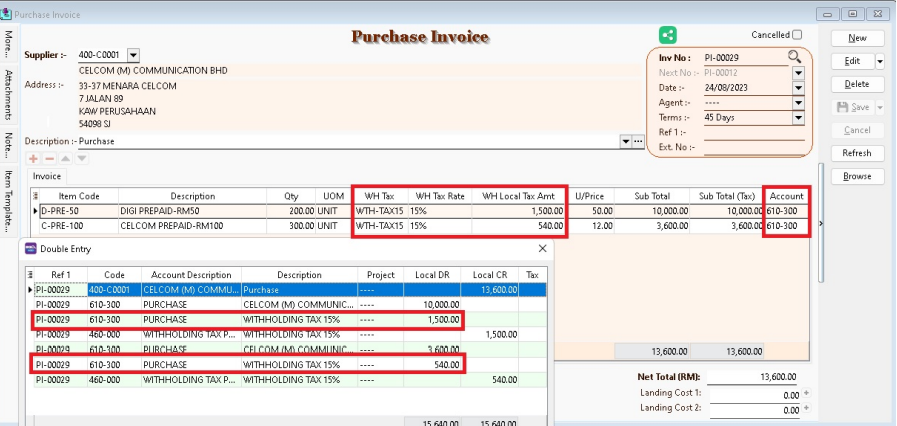
The withholding tax amount is not added to the purchase invoice total.
Payment of Withholding Tax
-
Go to GL → Cash Book Entry.
-
Create a New PV.
-
Enter the Payee and select the bank account.
-
In the detail grid, select the Withholding Tax Payable account.
-
Enter the amount and click Save.
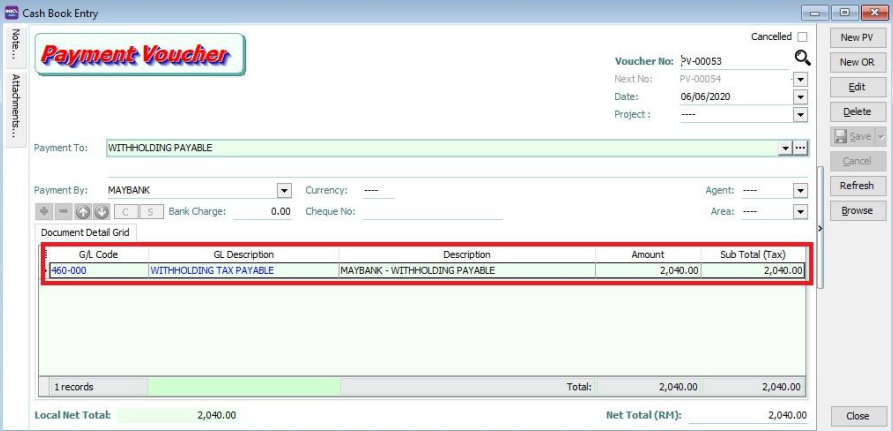
-
Check the ledger report for the outstanding balance of Withholding Tax Payable.